At the Midwest Management Summit 2017, I gave a session called Building the Ultimate Windows 10 UEFI Task Sequence. In this session, I covered both types of BIOS to UEFI Task Sequences – Wipe-and-Load and In-place Upgrade. This blog is going to cover the In-place Upgrade version of the BIOS to UEFI Task Sequence. This Task Sequence will use variables that I previously wrote about in the blog posts: BIOS and Secure Boot State Detection during a Task Sequence Part 1 & Part 2, as the goal is to have a single Task Sequence that covers the various scenarios. In addition, this blog also replaces the original blog I wrote, Using MBR2GPT with Configuration Manager OSD, when I first discovered MBR2GPT in one of the Windows Insider builds.
NOTE: See my blog Configuration Manager Dynamic Drivers & BIOS Management with Total Control Part 2 for a downloadable Task Sequence Template for the following Task Sequence.
When converting from BIOS to UEFI, it is best to do this after the system has been upgraded to Windows 10. The version of Windows 10 does not matter, although, it should be a version that is still supported. Also, even though MBR2GPT will run in the full OS (starting with Windows 10 1703), it is a best practice recommendation to run it from WinPE (version 1703 or later). The reason for this is that there can be other applications on the system that use filter drivers for disk access (antivirus, antimalware, 3rd party disk encryption and other 3rd party p2p solutions). These applications could interfere with the disk conversion and potentially cause a failure, therefore, always run MBR2GPT in WinPE for best results.
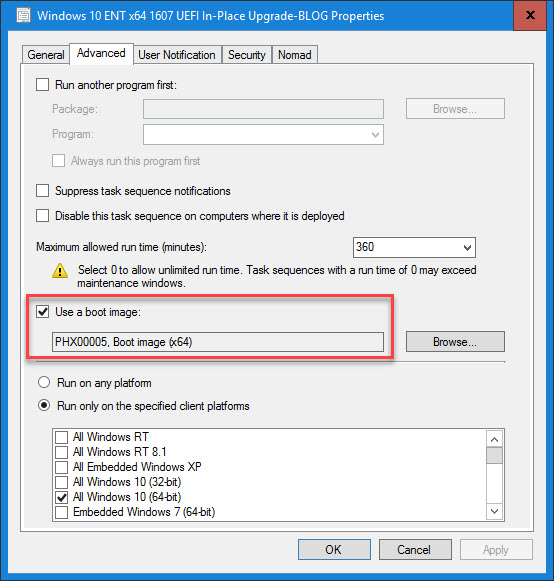
Typically, a Boot Image is not assigned to an In-place Upgrade Task Sequence. However, since we are going to use WinPE as part of our Task Sequence, a WinPE 1703 (or later) Boot Image should be assigned to the Task Sequence. Also, it is important to use the 64-bit Boot Image when running on a 64-bit UEFI System.
The basic flow goes like this after the OS has been upgraded:
Disable BitLocker
Set BIOS and Secure Boot Variables
Restart into WinPE (if running Legacy BIOS)
BIOS to UEFI
Run MBR2GPT (if running Legacy BIOS)
Configure BIOS Firmware Settings
Restart into Windows
Re-enable BitLocker
If you are not using BitLocker, then you can skip the two BitLocker groups. Also, even though this process works with BitLocker using earlier algorithms, if you are coming from a version of Windows before Windows 10 1511 (like when coming from Windows 7), then you might want to consider the new encryption type AES-XTS (see the blog BitLocker: AES-XTS new encryption type for more information). Moving to the new encryption type will require decryption/re-encryption of the drive.
Disable BitLocker
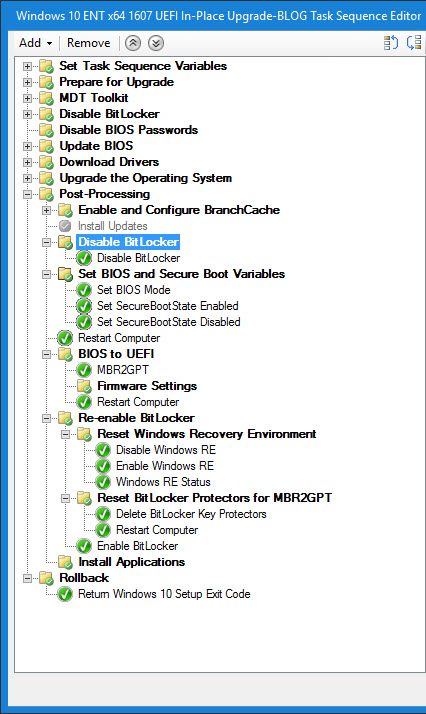
The reason for putting this Group in after the OS has upgraded is to cover the scenario when coming from Windows 7. As I mentioned in my blog How to detect, suspend, and re-enable BitLocker during a Task Sequence, the built in Disable BitLocker Task Sequence step on suspends BitLocker for one reboot. Therefore, I run this Group one more time just incase BitLocker was re-enabled after the In-place Upgrade.
Set BIOS and Secure Boot Variables
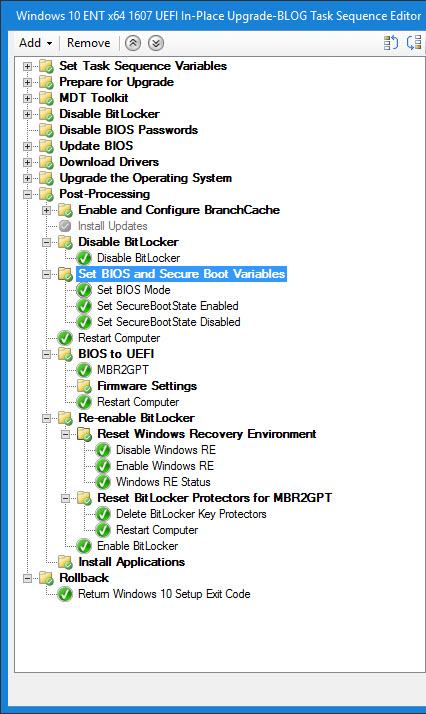
I cover these steps in detail in the two blogs mentioned above, but the two variables that get used in the BIOS to UEFI Group are BIOSMode and SecureBootState.
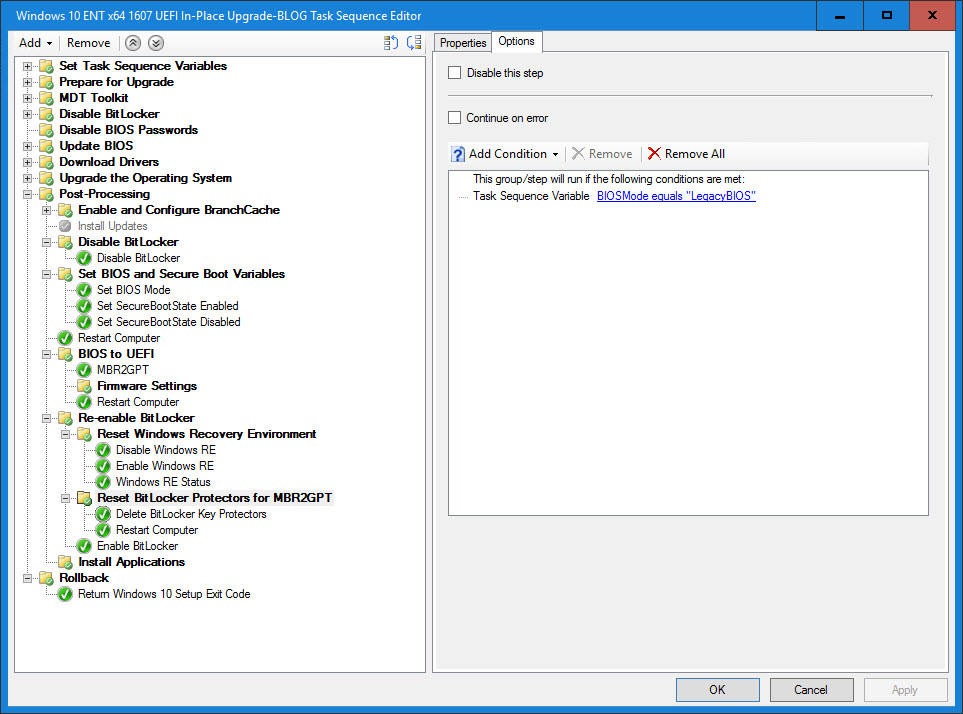
Restart into WinPE (if running Legacy BIOS)


On this step, we only need to reboot if the system is running in Legacy BIOS Mode. If it is running in UEFI Hybrid or UEFI Native without Secure Boot, the disk will already be configured for GPT. On the Options tab, add the condition: Task Sequence Variable BIOSMode equals “LegacyBIOS” (Note: you could also use _SMSTSBootUEFI equals FALSE, but having LegacyBIOS is easier to find in log files, status messages and is easier for help desk personal to understand). Also add the hardware manufacturers that you want to support. This is important because you cannot convert BIOS to UEFI on a GEN 1 Hyper-V VM and you will probably want to test the rest of the Task Sequence on a VM outside of the BIOS to UEFI steps.
BIOS to UEFI
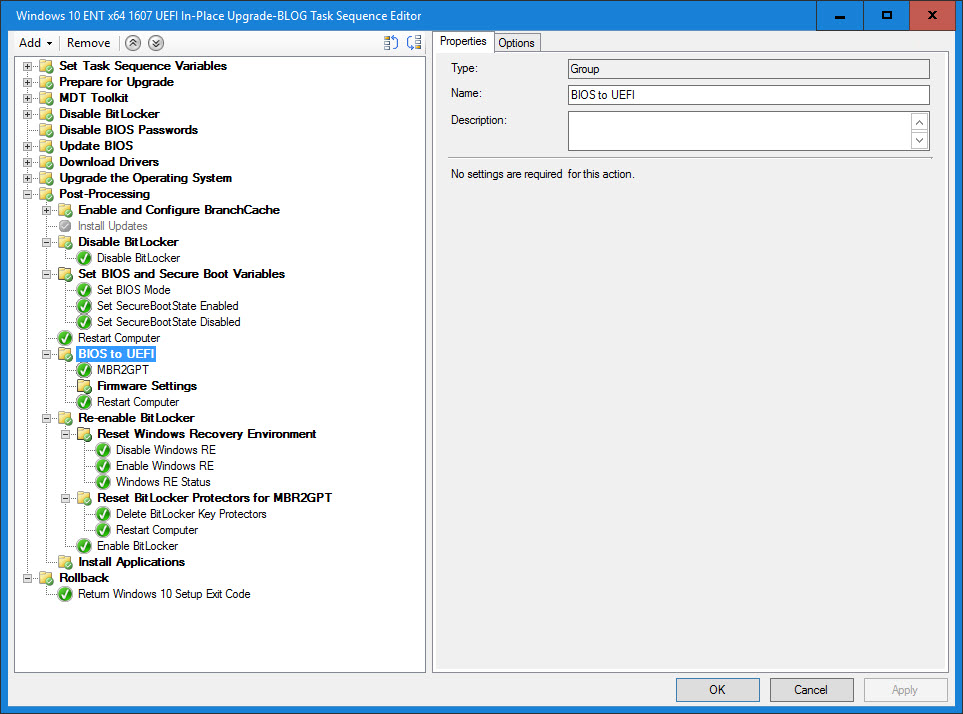
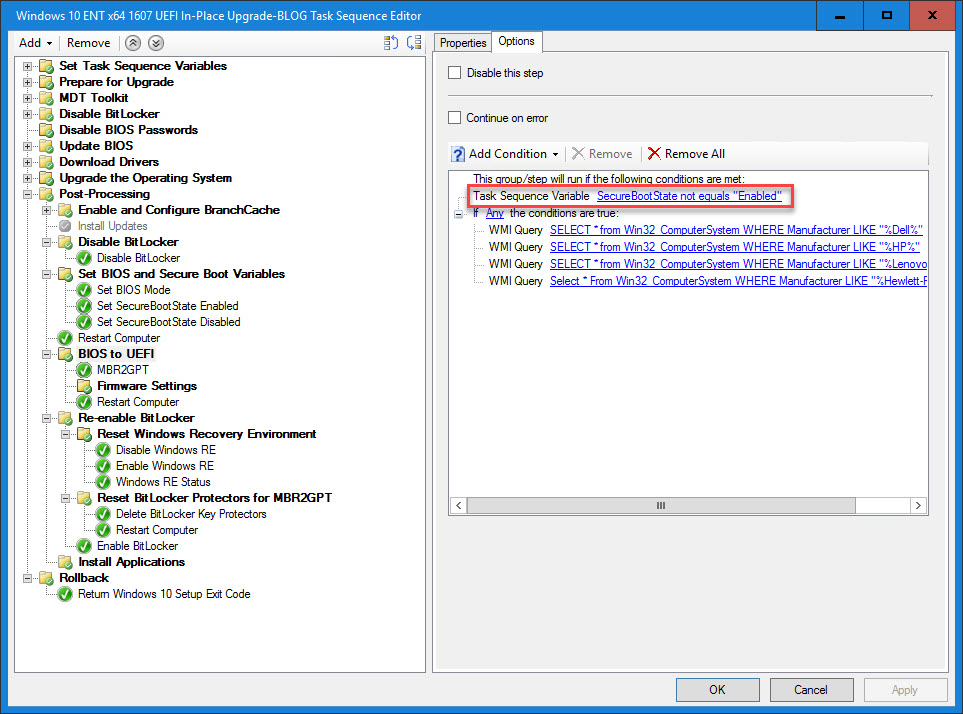
On this Group, we only need to perform BIOS to UEFI or BIOS Firmware Settings if the system is running Legacy BIOS, UEFI Hybrid or UEFI Native without Secure Boot. On the Options tab, add the condition: Task Sequence Variable SecureBootState not equals “Enabled”. Once again, also add the hardware manufacturers that you want to support.
MBR2GPT (if running Legacy BIOS)

I like to run this step prior to configuring the BIOS settings. Secure Boot can be programmatically enabled, however per the specification it cannot be programmatically disabled. If you enable Secure Boot prior to running converting the disk and MBR2GPT is not able to convert the disk for some reason (like too many MBR partitions, see my blog Configuration Manager OSD, Recovery Partitions and MBR2GPT), then the machine will require a desk side visit to reset the BIOS settings and manually disable Secure Boot.
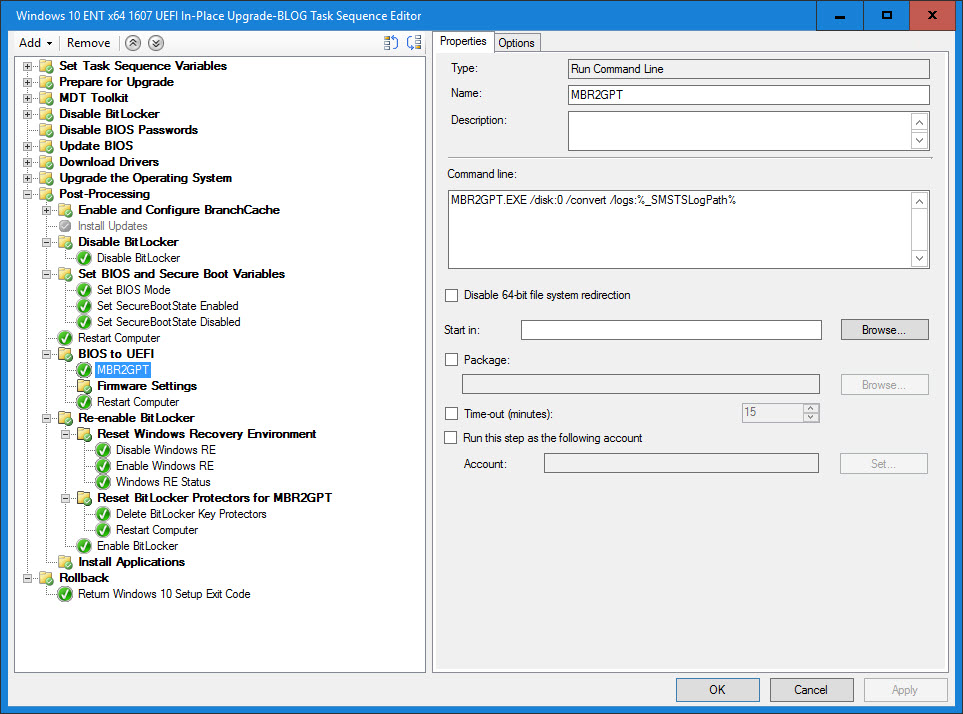
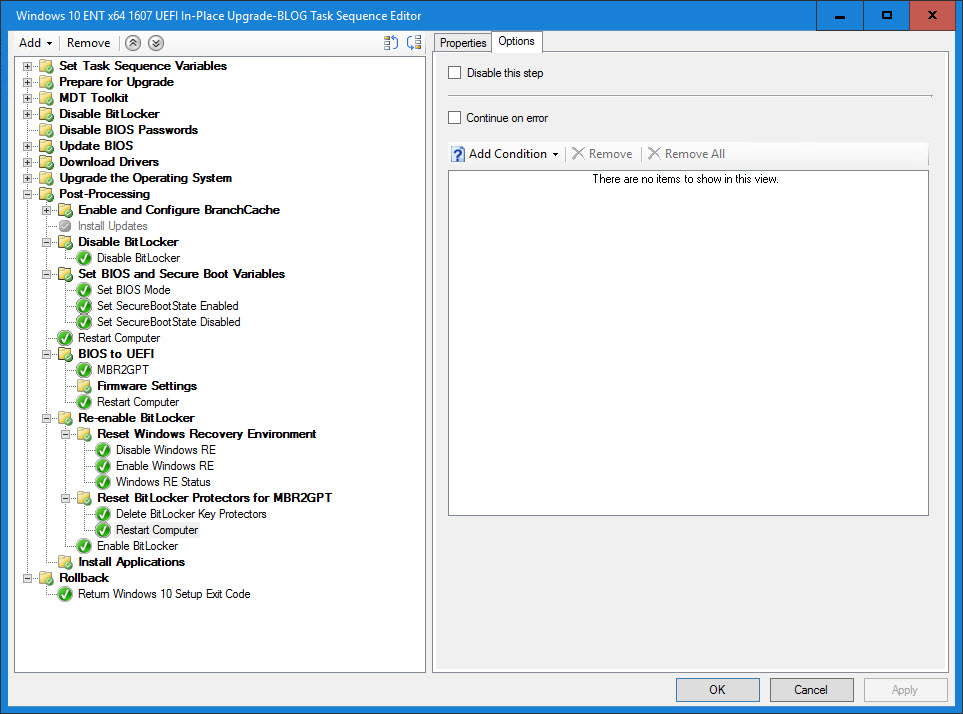
This step will run under WinPE. MBR2GPT can be called directly using a Run Command Line step since it is in the path in WinPE. If dealing with systems that do not install the OS on disk 0, then you will need to create multiple steps and put the necessary conditions on each. MBR2GPT will generate useful log files and I like to save them in the Task Sequence log directory (_SMSTSLogPath). This way they will be available after the Task Sequence runs. On the Option tab, add the condition: Task Sequence Variable BIOSMode equals “LegacyBIOS. This will ensure that this step only runs under this condition. Note: we could have also used and/or added _SMSTSinWinPE equals “TRUE”. Also enable Continue on error. This is important because we do not necessarily want the entire In-Place Upgrade to fail just because MBR2GPT was not able to run. If it is a hard failure, then the Task Sequence will definitely not continue as the system will probably no longer boot up.
Configure BIOS Firmware Settings
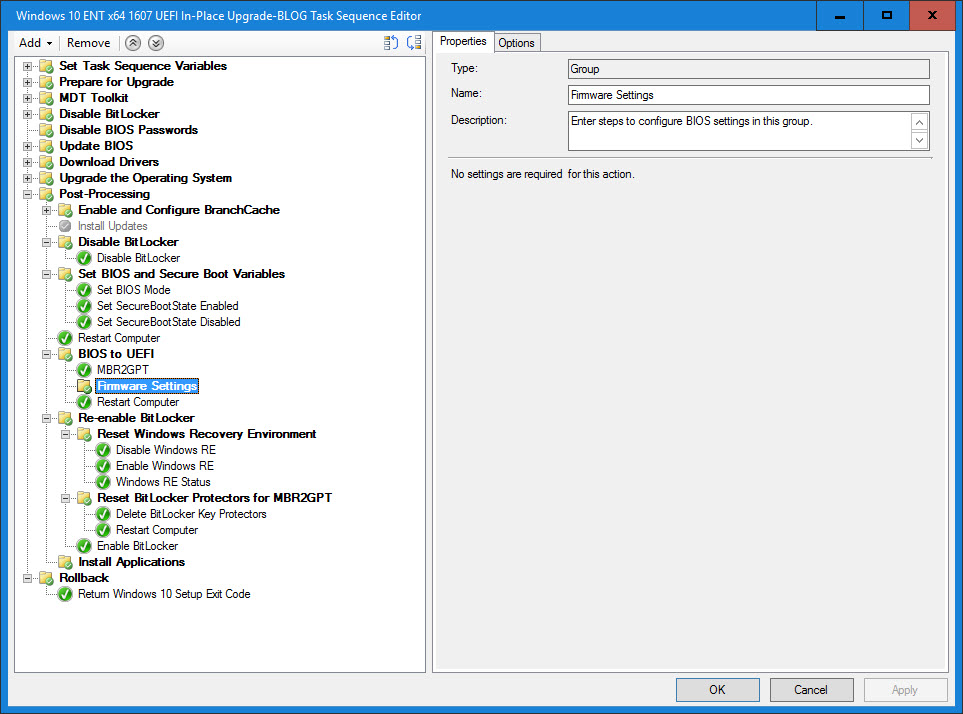
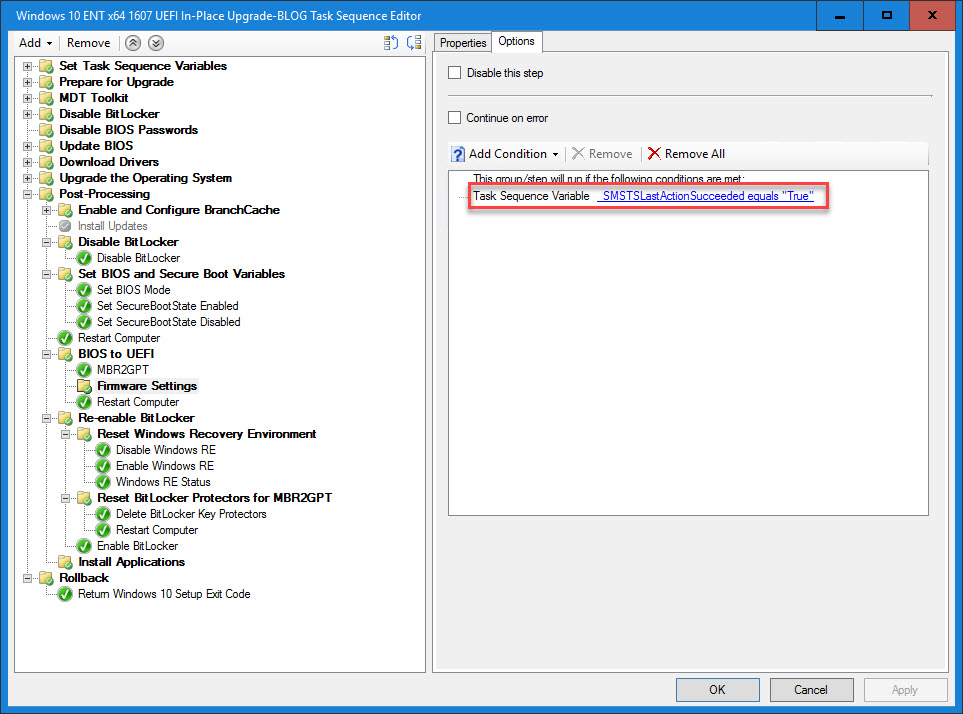
In the Firmware Settings Group, you will add your own BIOS settings commands, utilities or tools. These commands, utilities and tools can run in a full OS or WinPE. If you use Dell systems, please see my previous blog post Automating Dell BIOS-UEFI Standards for Windows 10 for the commands (and order) of switching the UEFI settings using the Dell CCTK (aka Command Monitor). On the Option tab, add the condition: Task Sequence Variable _SMSTSLastActionSucceeded equals “TRUE”. This will ensure that this group is only entered if the previous step that runs was successful. In the case of a Legacy BIOS system, if MBR2GPT is not successful, we want the Task Sequence to continue, but we do not want to flip the BIOS settings to UEFI and enable Secure Boot. In the other case of a system running UEFI Hybrid or UEFI Native without Secure Boot, it will run if the previous non-skipped step was successful. NOTE: It is important to be running the latest BIOS version and BIOS utilities for best results. Also, be sure to account for BIOS passwords if used in your environment. It is best to disable the BIOS passwords and then re-enable them at the end of the process.
Restart into Windows
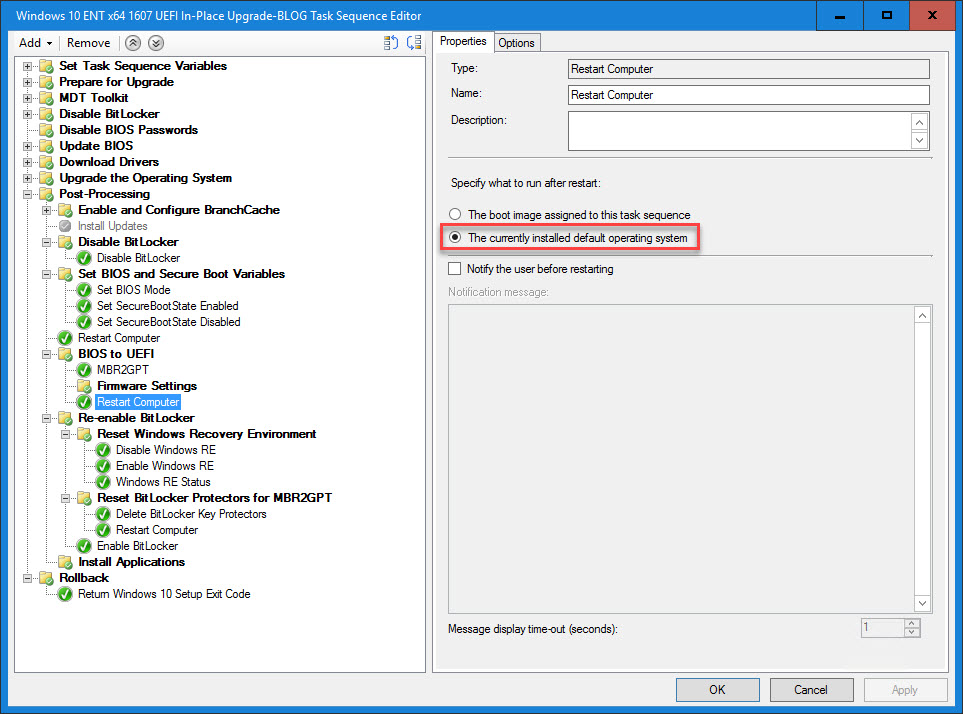
After the Firmware Settings are changed, a system reboot is required for them to be applied. This restart will boot the system back into Windows 10.
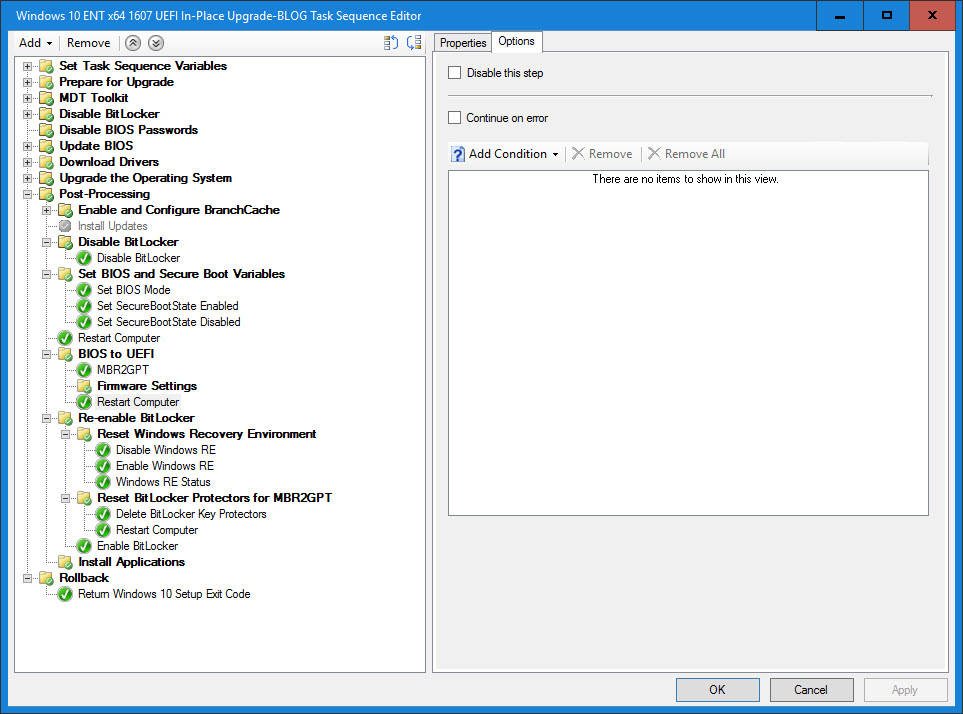
Re-enable BitLocker
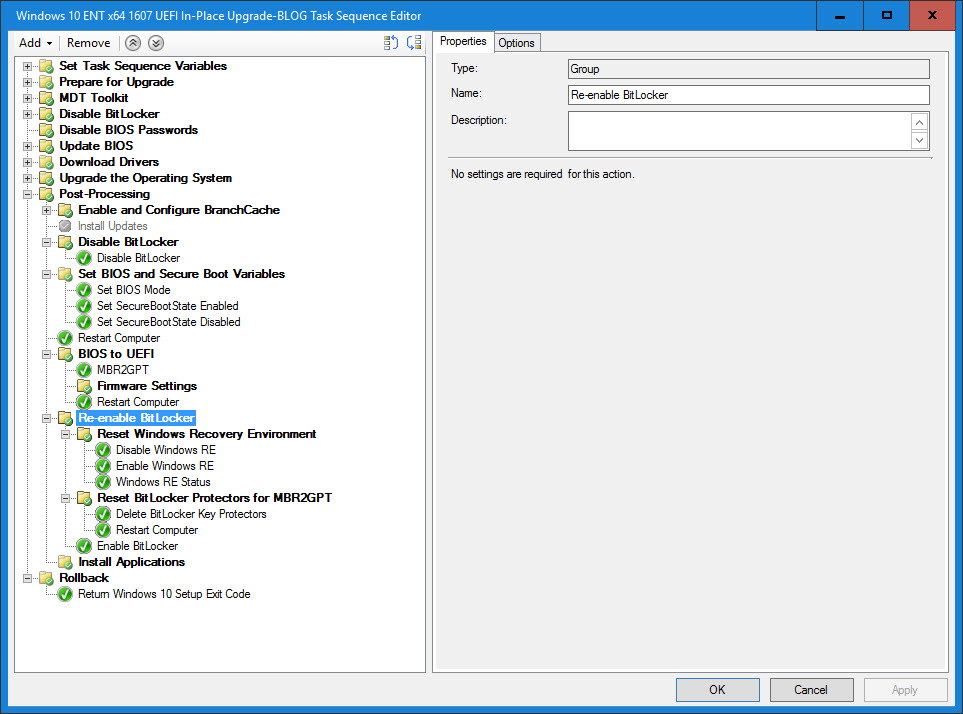
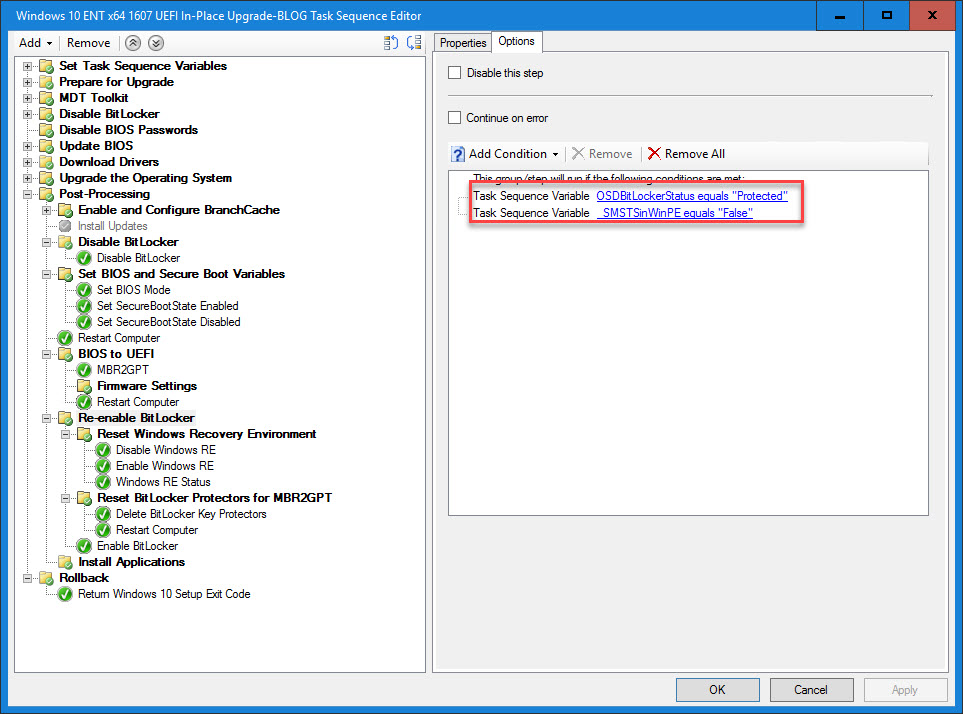
Once the system has been configured for UEFI Native with Secure Boot and booted back up into Windows 10, it is time to re-enable BitLocker. The Re-enable BitLocker Group will run in a full OS and only if the OSDBitLockerStatus equals “Protected”. This variable gets set earlier in the Task Sequence before the operating system is upgrade. For more information, see my blog How to detect, suspend, and re-enable BitLocker during a Task Sequence.
MBR2GPT and BitLocker
If you read the Microsoft documentation for using MBR2GPT, they only tell you that you need to delete the existing protectors and recreate them (they don’t mention that you need to reset the Windows Recovery Environment to generate a new reagent.xml and update the bcd). They do not really give any clear guidance on how to do this.
Reset Windows Recovery Environment
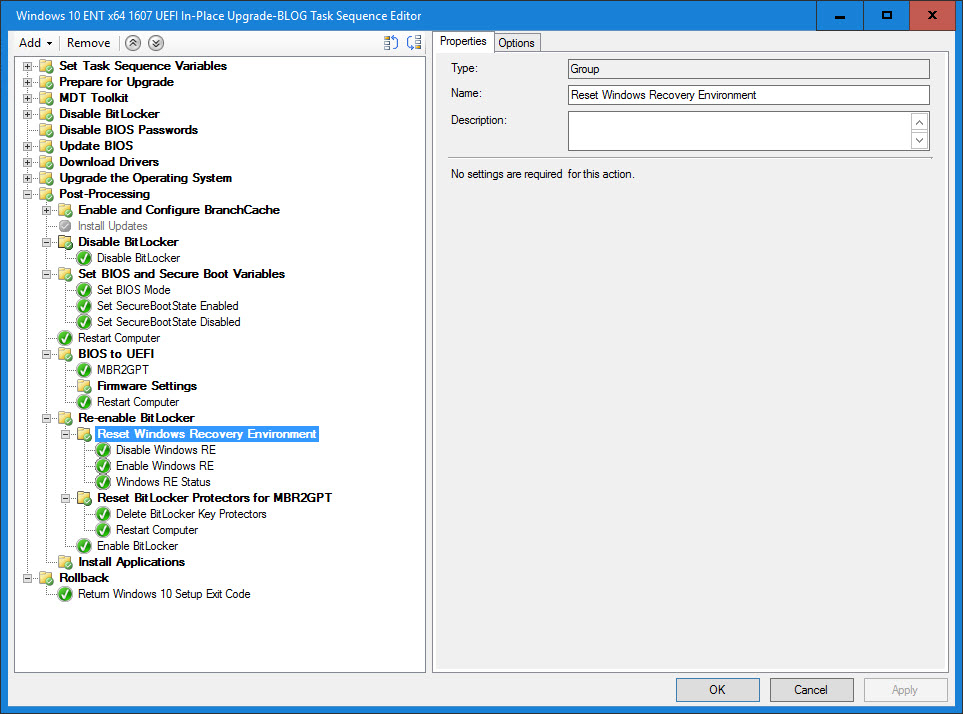
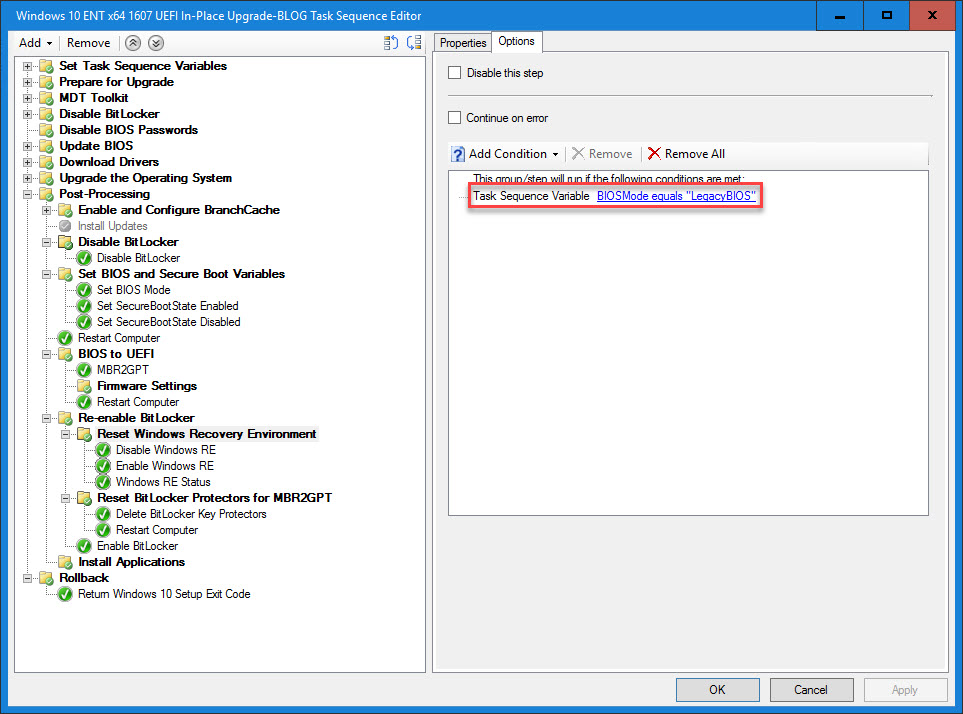
Resetting the Windows Recovery Environment only needs to be done when using MBR2GPT with BitLocker. On the Option tab, add the condition: Task Sequence Variable BIOSMode equals “LegacyBIOS”.
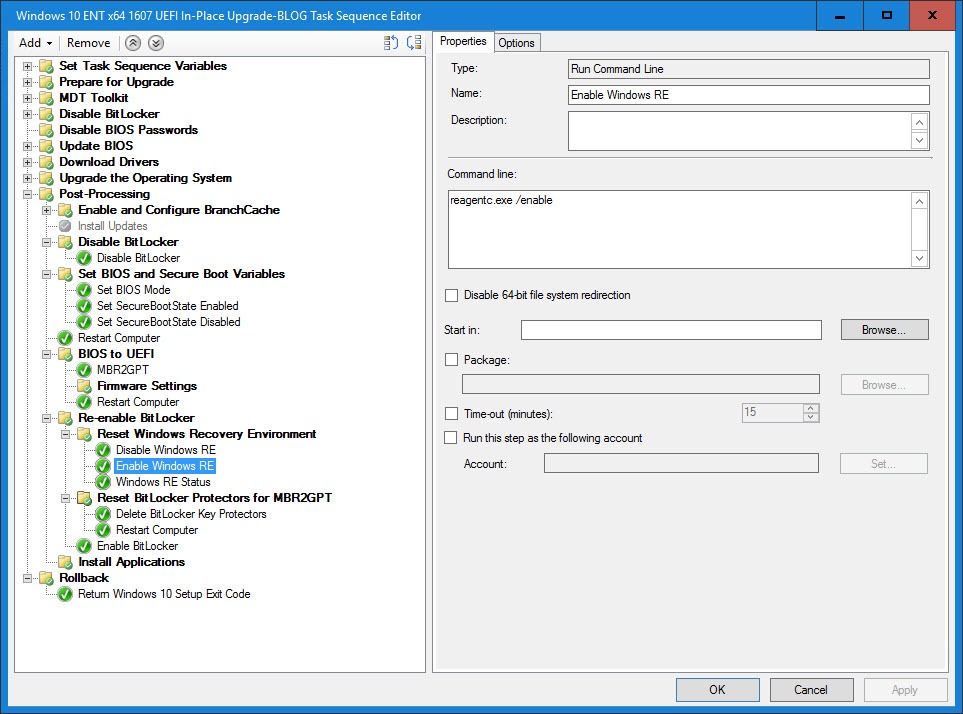
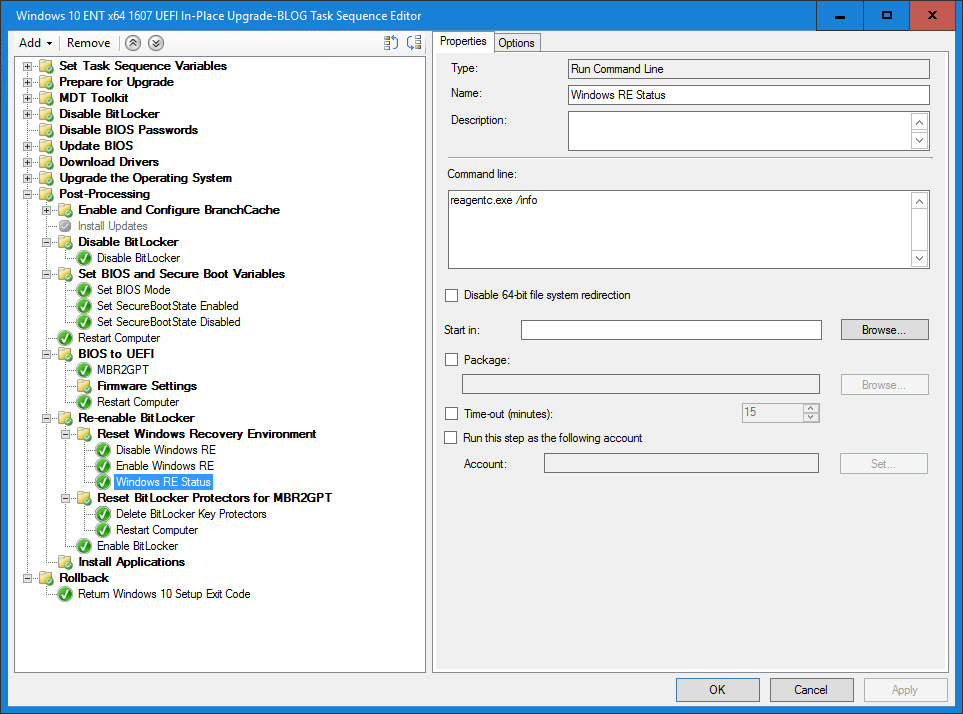
I have seen some forum posts on the internet that talk about deleting the ReAgent.xml file (found in C:Windows\System32\Recovery). Windows will re-create this file on the next reboot and it should modify the bcd file accordingly. However, I prefer to update it (and the bcd) by simply disabling WinRE and re-enabling it. I also display the status after re-enabling it. Each of these commands will pipe output to the smsts.log and also CM Status Messages. For clarity they are split in three different steps.


Reset BitLocker Protectors for MBR2GPT
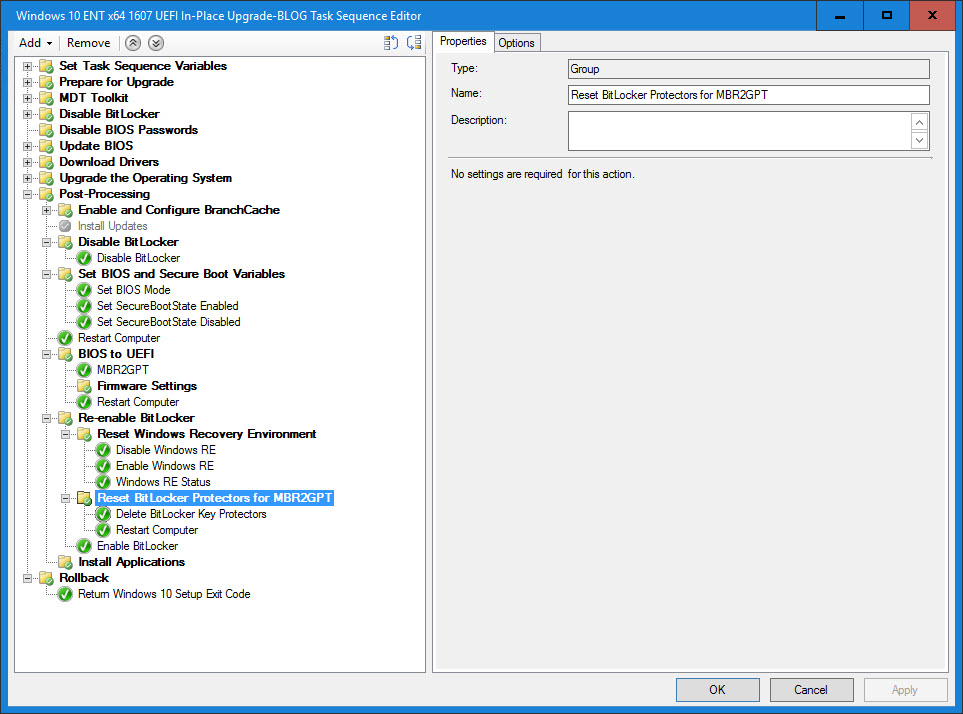
Just like Resetting the Windows Recovery Environment, resetting the BitLocker Protectors only needs to be done when using MBR2GPT with BitLocker. On the Option tab, add the condition: Task Sequence Variable BIOSMode equals “LegacyBIOS”.
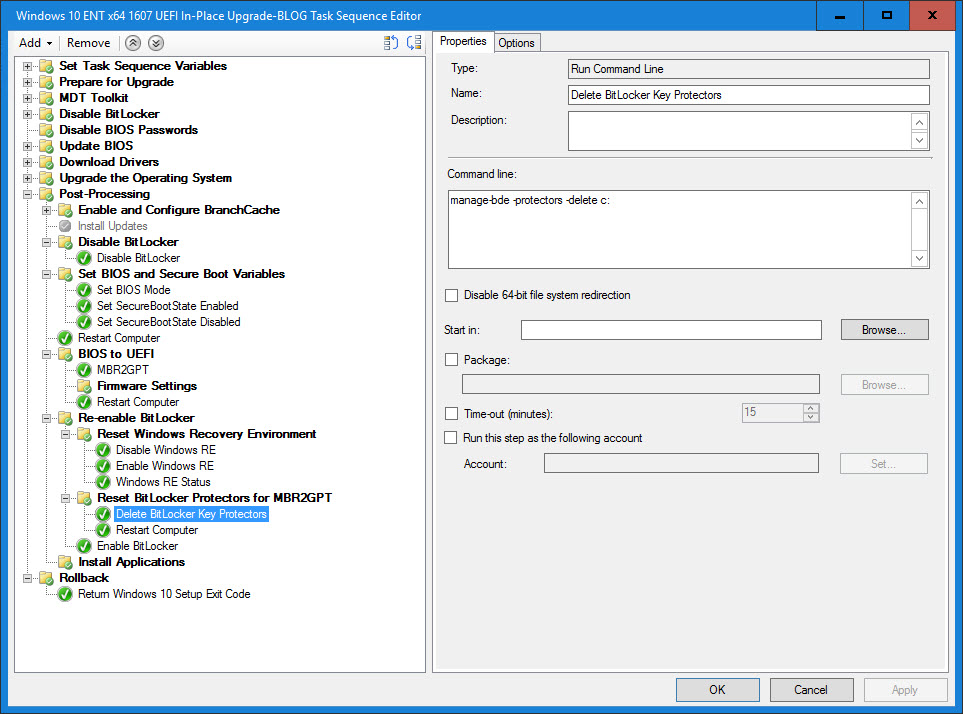
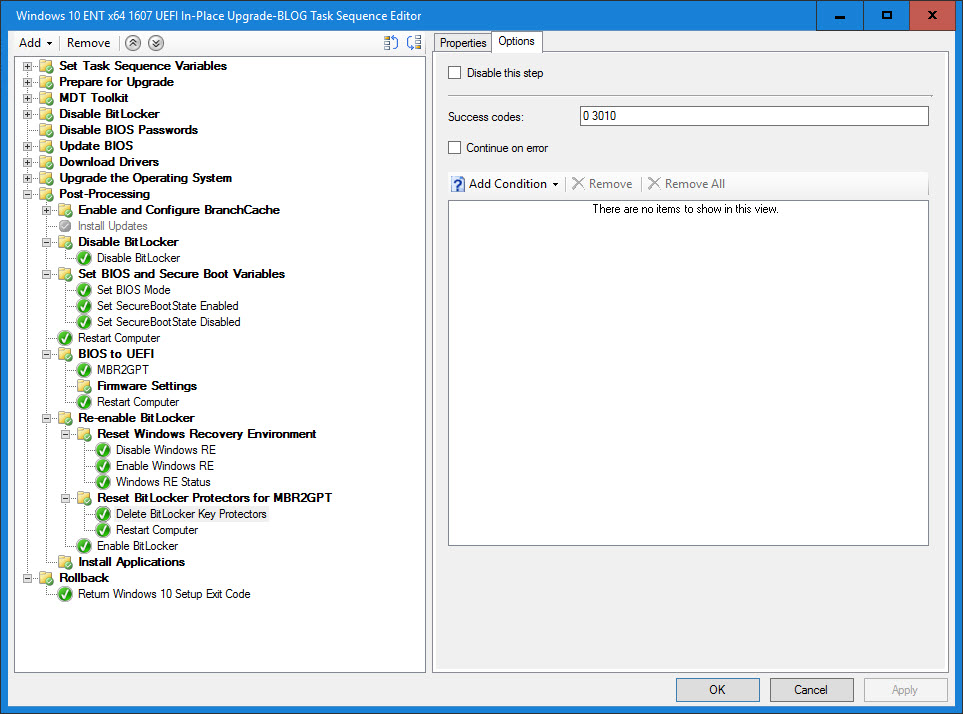
Now we just need to delete the BitLocker protectors. This can be done by running the following command: manage-bde -protectors -delete c:
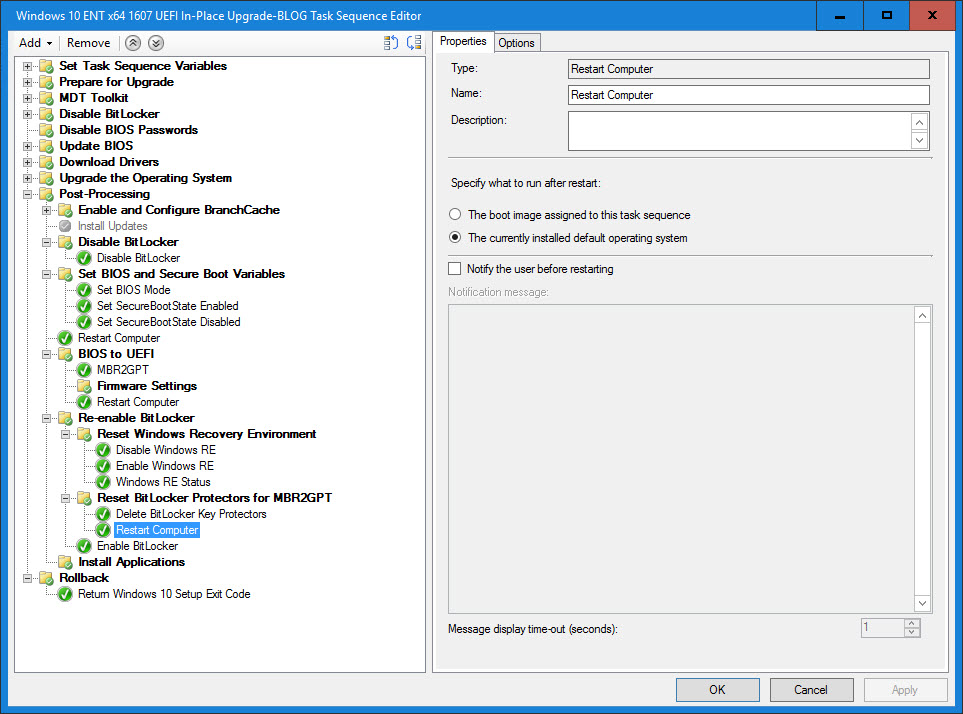
It is extremely important to perform a restart after deleting the BitLocker protectors and before enabling BitLocker. If it is not done in this order, the system will prompt for the BitLocker recovery key on the next reboot.
Enable BitLocker
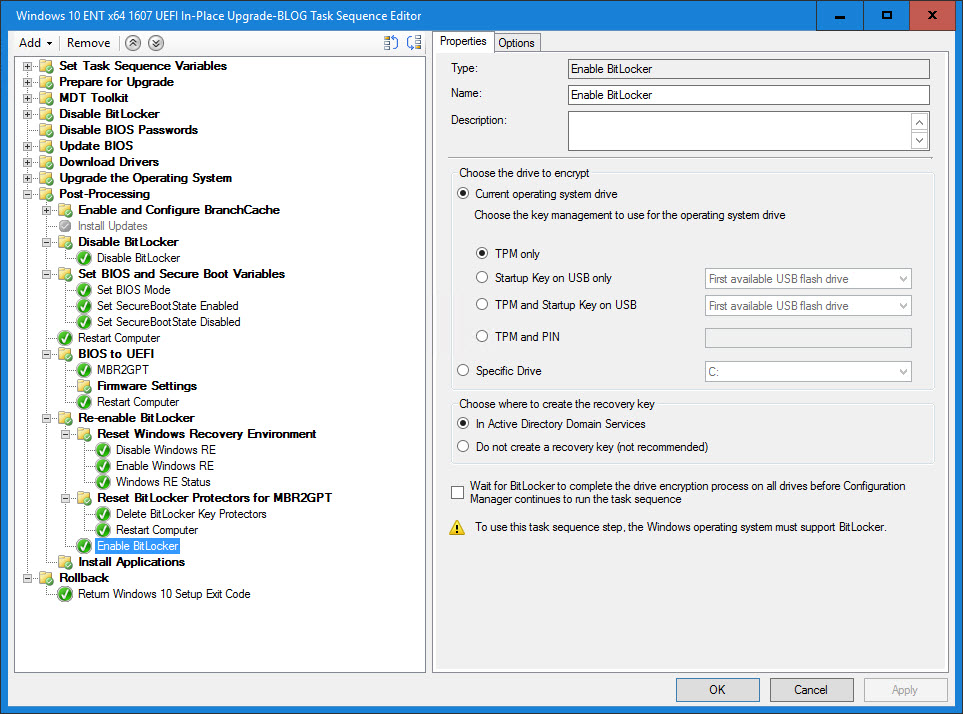

The last thing to do in the Re-enable BitLocker Group is to enable the BitLocker protectors. This can be done using the native Enable BitLocker Task Sequence step. Since the operating system drive is already encrypted, just the BitLocker protectors are being created and/or enabled (depending on the scenario).
In summary, this approach will cover multiple upgrade scenarios, including BIOS to UEFI, when performing an in-place upgrade to Windows 10.
Originally posted on https://miketerrill.net/

Excellent article. How about in Wipe and load scenario? Can we use MBR2GPT as well ? Also we have Windows 7 running with bitlocker. So when we upgrade wipe and load method do we need to also reset the TPM after disabling the bitlocker ?
Thanks! I have a BIOS to UEFI Task Sequence for Wipe-and-Load that I covered at MMSMOA, but it does not use MBR2GPT. Rather it uses the TSUEFIDrive variable that Microsoft introduced in CB1610. I can see a use case for using MBR2GPT in a non-destructive Wipe-and-Load (one that doesn’t format and partition the disk but clears everything outside of the protected directories). This would be where you might be going from x86 to x64 but want to keep the USMT capture locally. As for Win7 with BitLocker, it will depend on what you want to do TPM ownership. The TPM can be used after a re-image, but it will say with limited functionality. Also, you might want to leverage the newer crypto algorithms and flash it to TPM 2.0 if capable.
Thanks Mike. Can you let me know the URL where i can find the BIOS to UEFI TS for Wipe and Load.
I don’t have a blog that specifically explains the BIOS to UEFI for Wipe and Load, but I will be making both of my Task Sequences downloadable in Part 2 of my Configuration Manager Dynamic Drivers & BIOS Management with Total Control blog post.
THANK YOU!! I’ve had a task sequence for months that could convert from mbr to gpt and bios to uefi, but couldn’t for the life of me figure out how to re-enable bitlocker and it was driving me nuts!
Can’t wait to give this a try!
Thanks for posting this. Helped us resolve BitLocker recovery prompts we were receiving after the MBR2GPT process.
Hi After resetting the Bitlocker protectors for MBR2GPT, when i try to enable Bitlocker it is failing to enable the bitlocker. When i try to manually run the enable bitlocker step, it throws the following error.
C:\WINDOWS\system32> manage-bde -protectors -enable c:
BitLocker Drive Encryption: Configuration Tool version 10.0.15063
Copyright (C) 2013 Microsoft Corporation. All rights reserved.
ERROR: An error occurred (code 0x80070002):
The system cannot find the file specified.
Then when i rename the ReAgent.xml file to old and run the enable bitlocker command it works fine. Is it advisable to run this step in case the protection is off even after running the windows recovery environment step.?
That error – 0x80070002 – is The system cannot find the file specified. So if you are getting that when trying to run manage-bde, it sounds like you have a bigger problem. As for renaming reagent.xml, that does seem to work, however, I have not (or heard) any sort of support from Microsoft for doing it this way, so your mileage may vary.
Can this task sequence be modified to work with currently build Windows 10 machines that I do not wan’t to wipe?
Hi Aaron, this Task Sequence is not a Wipe-n-Load TS. It does not have any format and partition steps. It is for non-destructive, in-place upgrades.
-Mike
Mike,
Thanks for the post. I have a question though. I would like to make this work without a TS just to see how it goes. I have a Dell Precision T3600 that has Win7 on it. BIOS is set to Legacy. This system is not encrypted or anything like that. I used SCCM to perform the Windows 10 in place upgrade and that was successful. Then I ran the MBR2GPT manually using a /validate switch and it passed OK. So I ran mbr2gpt /convert /allowFULLOS /Logs:C:\Windows\Temp and it said the conversion was completed successfully and to set the BIOS to UEFI. I rebooted into the BIOS and set it to UEFI. I noticed there was no windows boot manager. I clicked ok and rebooted but it cannot find a boot drive. In this manual process what am I missing? I just wanted to understand it better before trying to use a TS. Thanks
Mike,
After further testing I see what happened. Even though I manually choose UEFI in the BIOS, when I did, there was nothing showing at the top. Usually you will see “Windows Boot Manager”. For some reason this was not showing though. I added a boot option and then it worked. Is this added correctly if I try your automated method? Thank you
I am not familiar with that particular model, however, when a system is configured to boot UEFI it looks in the locations for the boot files that are defined in the UEFI specification. Once Windows Boot Manager boots up in UEFI for the first time, it will create this entry in the boot options.
Hi Mike,
Excellent article, thank you!!
I’m a bit confused, or missed something. On the “Reset Windows Recovery Environment” step you said to add the condition: Task Sequence Variable BIOSMode equals “LegacyBIOS”. But, since the Firmware Settings has already been applied and system restarted to Windows full OS, should this step still be under “LegacyBIOS”? Appreciate if you could clarify please.
Sheikh
Since this TS is built to be modular and work on both Legacy systems and UEFI systems, we need to track which mode the system starts out in. I accomplish this by creating the LegacyBIOS variable – when it is set to true, I know that it started out that way and that I need to do some additional steps after the system has been converted to UEFI.
Great article, I’ve enjoyed going through it! One question however..
At the step of regenerating the reagent.xml file, I can successfully disable it, but cannot enable it again, with the error “REAGENTC.EXE: Windows RE cannot be enabled on a volume with BitLocker Drive Encryption enabled”.
Looking at our task sequence (done by a previous colleague), if BIOS then it formats/partitions MBR, if UEFI, it formats/partitions GPT.
MBR: 350MB System Reserved, Windows 99%, and Windows Recovery 1% remaining.
GPT: EFI 500MB, MSR 128MB, Windows 99% and Windows Recovery again 1%
On my desktop (Optiplex 3020), I have a 456MB recovery partition, and I can disable/enable winre successfully. On my SP3, it’s configured to use the main windows partition as the recovery location (as reagentc.exe /info tells me, which I’ve discovered Windows does if the RE partition is too small), I can disable, yet can’t re-enable with the same error above. My other test machine is the same as the SP3.
My question is if throughout the past few years, the disk config has been changed and we have different machines with different WinRE partitions setup all over the place, how can I resolve enabling winre again? Seems I’ll need to create a new partition during the TS and move the RE to it?
I’ve increased WinRE to 100% of remaining disk space as per https://winpeguy.wordpress.com/2015/07/08/partitions-my-recommendations-for-windows-deployments/ and am currently testing, which will resolve for future machines, but obviously this TS is targeting legacy machines.
Thanks for any help.
Thanks for reading and sorry for the late response. As for these partitions, it seems to change with the different versions of Windows. So depending on the version of Windows you are deploying, your partition layout maybe be different. Windows 10 likes the recovery partition to follow the Windows partition. This is so that it can dynamically adjust the recovery partition if needed by shrinking the Windows partition (provided there is enough free space). I have a method on this post https://miketerrill.net/2017/07/12/configuration-manager-osd-recovery-partitions-and-mbr2gpt/ that I like using to control the size of the recovery partition – you basically do the partitioning in two steps, but you can get the size exact. As for the guide lines for Windows 10 partitions see: https://docs.microsoft.com/en-us/windows-hardware/manufacture/desktop/configure-uefigpt-based-hard-drive-partitions. I haven’t tested the latest build to see what happens during a Win10 to Win10 upgrade, but previously I would find that it would not want to use the existing recovery partition and it would create a new one.
HI, I am getting an issue when converting from Win7 to Win10.Build completes BitLocker is on but in the TPM administration I am getting 0x900 error. Do I need to clear the TPM?
I haven’t seen that error before so I am not sure. Let me know if you do figure it out. Thx, Mike
I’m sorry to ask a dumb question, but how does your initial restart into WinPE not create a loop in your TS where it continually starts the TS over from the beginning? When I try to replicate the relevant pieces of your example, my TS starts over from the top.
The task sequence state is written to the disk, so that on a reboot, it knows what step it left off at and can continue. It sounds like something isn’t configured correctly in your environment.
Thanks for the confirmation. I did find the issue with the reboots. Now permit me to ask a larger question.
If I’m dealing with a population of Dell computers with Win 7 (64-bit), Legacy BIOS, TPM 1.2, some BitLocker encrypted (some with NO TPM and some TPM + PIN). Our goal is to get every computer converted to UEFI + SecureBoot + BitLocker + TPM 2.0 + Win 10 (64-bit).
We’re not even going to consider USMT. We’re going to assume each re-image is a disk-wipe + a TPM Clear
Putting aside how to do each step, would the proper order of steps be:
1. Update BIOS
2. Update TPM 1.2 to 2.0 (where possible)
3. Run task sequence similar to yours to set “standard” BIOS configuration
4. Clear TPM (requires reboot)
5. Deploy Win 10
You could do it a few different ways, however, if you BIOS versions are rather old, then I would update them in WinPE prior to loading Win10. Also, the TPM will need to be cleared in order to be updated or flashed to 2.0 for those capable. Depending on the current state, it might be best for this to be done in WinPE as well so that it can be used for existing machines, as well as new, out of the box machines. A fresh install of Win10 will want to provision and take ownership of an available TPM (unless you disable this in your build process).
Mike,
Did you ever post a version of this article for a “clean slate” scenario where it’s either a new computer out of the box, or it’s a computer you know you want to wipe the disk from the get go?
Is it the case that the “upgrade” task sequence above is started from a Full OS session, and not WinPE?
Hi Kevin,
Configuration Manager Dynamic Drivers & BIOS Management with Total Control Part 2 (https://miketerrill.net/2017/09/17/configuration-manager-dynamic-drivers-bios-management-with-total-control-part-2/) has a new computer sequence that covers BIOS to UEFI. It uses the native CM method of using the TSUEFIDrive variable. There should be a download link for the sample Task Sequences in the blog. See if that gets you what you are looking for.
Thanks,
Mike
Hi Kevin,
This blog really helped me when I was attempting to sort out my environment. https://ibb.co/gRe58L is an overview of the TS I developed. There are plenty of blogs that show how to do each step, but let me know if you have any questions or need a specific command. I had already done all the bios updates for our environment separately, and all supported devices were already TPM2.0. But you could potentially do the bios updates and TPM firmware update (if supported) first.
Thanks for the pic of the TS layout. It looks like I’m close. One big roadblock for me has been how to “Clear TPM” and “Get TPM Status” from WinPE. Can you provide any further details on those steps?
Also, do all your “Get * Status” steps write to a log file, or do you do any pop-ups?
The Get Status just writes the current state of that setting to the log so I could verify it had been set correctly, not really needed once setup correctly.
Clear TPM – https://msdn.microsoft.com/en-us/library/windows/desktop/aa376478(v=vs.85).aspx
powershell.exe -executionpolicy bypass -command “(Get-WmiObject -Namespace “root\CIMV2\Security\MicrosoftTpm” -Class Win32_TPM).SetPhysicalPresenceRequest(5)”
Get-TPM Status
cctk.cmd –tpm
Enable TPM
cctk.cmd –tpm=on –valsetuppwd=”password” (if bios password set)
Get TPM Activation status
Hit enter before finishing.
Get TPM Activation status
cctk.cmd –tpmactivation
ActivateTPM
cctk.cmd –tpmactivation=activate –valsetuppwd=”password”
All available from Dell.
Sorry to keep asking questions, but if your “Restart -> WinPE” task is a “Restart Computer” with the “boot image” selected, how does your TS pick up where it left off? When I try a restart to WinPE task, it starts the TS over again.
I do recall having that issue at one point, but don’t remember exactly how I resolved it. The reason for the restart at that point is for two reasons, one to allow _SMSTSBootUEFI to be detected as True further on down the TS, and two, as F12 needs to be pressed to clear TPM. I couldn’t figure out a way to do it unattended, not sure if our hardware supports it.
I do have the boot image assigned to that step, and it only runs if variable _SMSTSLastActionSucceeded is True (previous step was successful).
Other than that, you might just need to do some googling/testing. Sorry I couldn’t be more specific.
Andrew – is there any way you could export the TS you use, or the one that you based your TS on, so I could look at the settings to see how you restart to WinPE and pick up where you left off in your TS (without starting over)?
Kevin there is no specific setting, it’s simply a restart to the boot image assigned to the task sequence. Exporting my TS won’t help I’m afraid. If I were you I’d do more testing, i.e. create another TS with a few simple steps including the restart to see if that works. If it does, perhaps recreate your TS.
I have a theory on what could be happening in Kevin’s situation. Back when I first started my research into doing BIOS to UEFI, I noticed that on some systems if you enabled UEFI PXE, that would become the first boot device on the next boot when switching to UEFI. If a deployment is configured to be Required and also includes Clients, Boot Media and PXE, then I can see where it could be PXE booting after the switch to UEFI and restarting the Task Sequence (or it could also have another Required Deployment targeted to it that includes PXE). So the rule of thumb is to only make your IPU Deployment available to clients (not Boot Media and PXE) and also do not enable UEFI PXE at the same time you switch to UEFI – this can be done later in the Task Sequence so that the system does not try to PXE Boot the first boot after switching to UEFI.
Hi Kevin,
I believe I’ve come across the solution going through my TS again..
I have a format GPT step after the first boot into WinPE. This is because if the drive is formatted MBR, the next restart to WinPE will fail. If formatted GPT, it boots fine into WinPE.
Give that a go and let me know how you get on.
Andrew.
Hello Mike good Post.
I am missing something, I am trying to upgrade from LTSB to 1803 and upgrade works good. we want to change to UEFI, I followd the article and did step by step. After I run the TS, It upgrade OS and runs MBR2GPT step as well after that it wont do anything. iT stuck in BIOS. to bring it back i Have to change secureboot, legacy rom and uefi to legacy then it will boot other wise no boot image found.
Any suggestions?
Thanks
It sounds like MBR2GPT did not run successfully. If it had converted the disk, then it would no longer be able to boot legacy.
thanks for the comment Mike, I have the exact TS like yours and its failing on MBr2GPT step. So I ran it manually after upgarde. it fails too. too many partitions found. So before upgrade I have 3 partitions and after upgrade it is creating one, MBR2GPT works if there are 3 but I have 4. I am thing that is the reason. Any suggestions? I am banging my head with this past 2 months.
thanks
Thank you for this post Mike, it’s been very helpful. It has however uncovered a few issues in the environment I’m currently working with. I have just started to put together a plan to flip around 7000 Windows 10 machines (HP & Lenovo) from BIOS to UEFI but have run into the following issues.
Firstly I’ve found that the disk partitions have been created using an old SCCM/MDT task sequence template and the recovery partition was set to only use 1% of remaining disk. All explained here:
https://blogs.technet.microsoft.com/jchalfant/configuration-manager-2012-sp2-r2-sp1-incorrectly-sizes-partitions-during-formatting-steps/
This means that the recovery partition on most of my machines is only 12mb in size, rendering it useless.
Whilst testing your method above, I noticed that my 12mb recovery partition was being assigned a drive letter following the MBR2GPT conversion. I then discovered that this was happening due to the recovery partition actually being a “Primary” partition! I went back a tested several scenarios in my task sequence but it appears to create a primary partition each time which is very odd.
Anyway my main reason for commenting here was to try and get some clarity around the Recovery Environment reset step. I have the same issue as one of the other commenters above where if I disable the RE agent I can’t then re-enable it as my recovery partition is junk.
Can you please explain the reasons for resetting the recovery environment as I can’t see any issues with my machine if I convert to UEFI using the MBR2GPT tool without resetting the RE?
Windows 10 will want to set up and manage its own recovery partition and will not use an old one. Best to get rid of the old one since it will not be used anymore. For updated partitioning guidance, see Gary Blok’s post here: https://garytown.com/osd-partition-setup-mike-terrill-edition-the-optimized-way
You can use this condition as well I think for MBR/GPT detection:
Select * FROM Win32_DiskPartition WHERE Type = “GPT: System”
Yea – but then you have to make sure you have the correct disk if there are more than one. Just use _SMSTSBootUEFI.
Thanks
Pingback: Windows 7 32-bit to Windows 10 64-bit task sequence and MBR2GPT – Modern Man
Hello
Thanks for the article.
If you’re using MBAM to manage your recovery keys can you still use the Enable Bitlocker step at the end of the Task sequence ie will the recovery key be escrowed to mbam correctly ?
Hi Paul – thanks and I am not sure on this one but if you find out let me know with a follow up comment.