In Configuration Manager Dynamic Drivers & BIOS Management with Total Control Part 1, I talked about the requirements for the various scenarios when coming up with a solution for driver and BIOS management. I also gave a glimpse of what the Task Sequence steps look like once the solution is in place. In Part 2, I am going to show what it takes to get the solution step up and running (at first glance it looks complicated, but it is actually pretty easy, especially if you download the templates below).
Video summary:
Before getting started, there are a few assumptions:
1. Configuration Manager is already running Current Branch
2. Windows ADK is Windows 10 Creators Update (1703) (required for MBR2GPT)
3. Microsoft Deployment Toolkit (MDT) 8443 is integrated with Configuration Manager
4. A MDT Toolkit package is available in Configuration Manager
5. A MDT database is setup and configured
If you do not already have MDT installed and configured, please see this excellent guide at windows-noob.com (just make sure to use the MDT 8443 release): How can I deploy Windows 10 with MDT 2013 Update 2 integrated with System Center Configuration Manager (Current Branch): https://www.windows-noob.com/forums/topic/14057-how-can-i-deploy-windows-10-with-mdt-2013-update-2-integrated-with-system-center-configuration-manager-current-branch/
For setting up the MDT database, see Use the MDT database to stage Windows 10 deployment information: https://docs.microsoft.com/en-us/windows/deployment/deploy-windows-mdt/use-the-mdt-database-to-stage-windows-10-deployment-information
Starting off, there will be a one time modification of the MDT database, extending the database to include some custom fields that we are going to define.
1. Add the following columns to the dbo.Settings table: TARGETBIOSDATE, FLASHBIOSCMD, BIOSPACKAGE, W10X64DRIVERPACKAGE, W7X64DRIVERPACKAGE. If you manage 32-bit operating systems, you can add columns for those as well. Also, as of now, there should not be a need for a build specific Windows 10 driver package (like one for 1607 and another for 1703), but if that changes then additional columns can be added to support them in the future. BIOS stepping – this is where you need to apply one or more BIOS versions to get to the latest version. Some older models require this and additional BIOSPACKAGE columns can be created to support this. This is not going to be covered in this blog, but if there is enough interest I will cover it in a future blog.

There is already a great blog called How to extend the MDT 2010 database with custom settings that is still applicable to MDT 8443 and can be used as a reference. Be sure to refresh the views after adding the columns.
2. Create BIOS Packages and Driver Packages for each make/model. If you do not already have them for each of the models you support or if you want to get the updated releases, then check out the Driver Automation Tool the awesome guys over at SCConfigMgr have created. This is a great tool and will save you a ton of time.
3. Define each make/model in the MDT database. I do not cover Lenovo systems in this blog, so if you manage those systems then check out The Deployment Bunny’s blog Modelalias User Exit for Microsoft Deployment Toolkit 2010/2012.
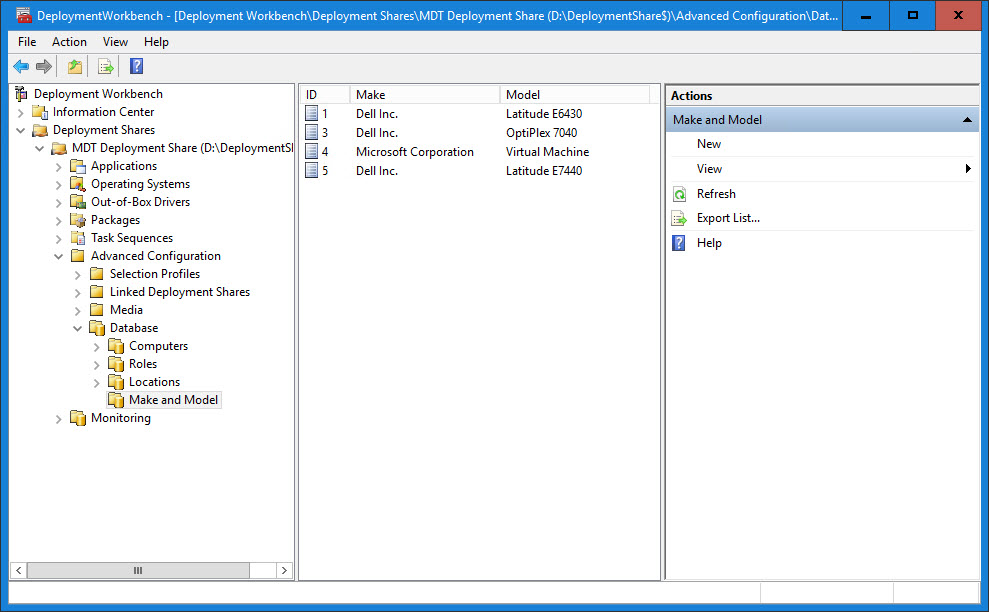
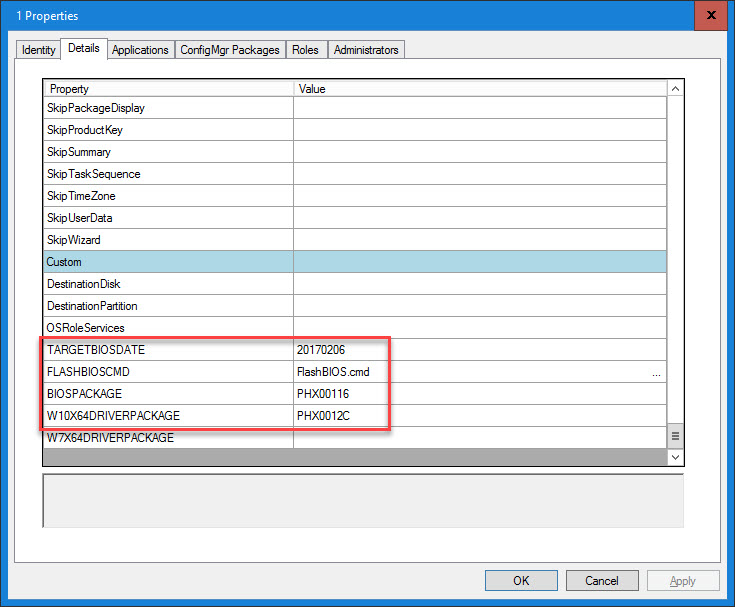
4. On the Details tab, scroll down to the bottom where the custom properties are listed and enter the Package IDs, Target BIOS Date and Flash BIOS command. The Target BIOS date is that that shows up in WMI for the BIOS version (also seen in msinfo32) in YYYYMMDD format.

For the Custom Settings and the Task Sequences, feel free to save some time and download them here:
Dynamic BIOS and Drivers Blog.zip
Disclaimer: Your use of these example Task Sequences is at your sole risk. This information is provided “as-is”, without any warranty, whether express or implied, of accuracy, completeness, fitness for a particular purpose, title or non-infringement. I shall not be liable for any damages you may sustain by using these examples, whether direct, indirect, special, incidental or consequential.
5. Create the following custom settings file and add it to an existing reference settings package or create a new one (feel free to replace SQL connection with a webservice of your choice):
[Settings]
Priority=CSettings,MMSettings,Default
Properties=TARGETBIOSDATE,FLASHBIOSCMD,BIOSPACKAGE,W7X64DRIVERPACKAGE,W10X64DRIVERPACKAGE

[Default]

[CSettings]
SQLServer=CM02
Database=MDT
Netlib=DBNMPNTW
SQLShare=DeploymentShare$
Table=ComputerSettings
Parameters=UUID, AssetTag, SerialNumber, MacAddress
ParameterCondition=OR

[MMSettings]
SQLServer=CM02
Database=MDT
Netlib=DBNMPNTW
SQLShare=DeploymentShare$
Table=MakeModelSettings
Parameters=Make, Model
ParameterCondition=AND
The following section is for a Wipe-n-Load Task Sequence
6. Create a MDT Gather step in the Task Sequence that uses the custom settings created above. This gather step will get the above entries that have been populated in the MDT database.
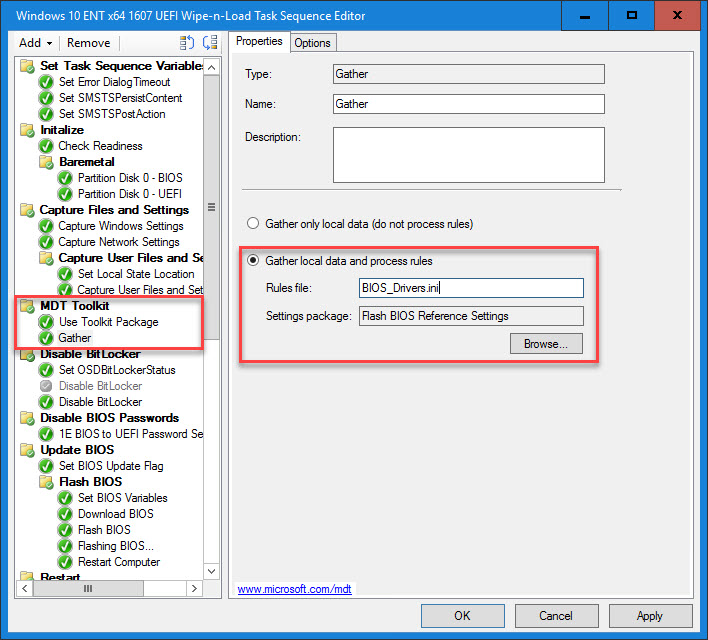
NOTE: Be sure to suspend BitLocker before flashing the BIOS in order to prevent being prompted for the recovery key. Also, if BIOS passwords are used, they will either need to be turned off or passed to the flash BIOS command line.
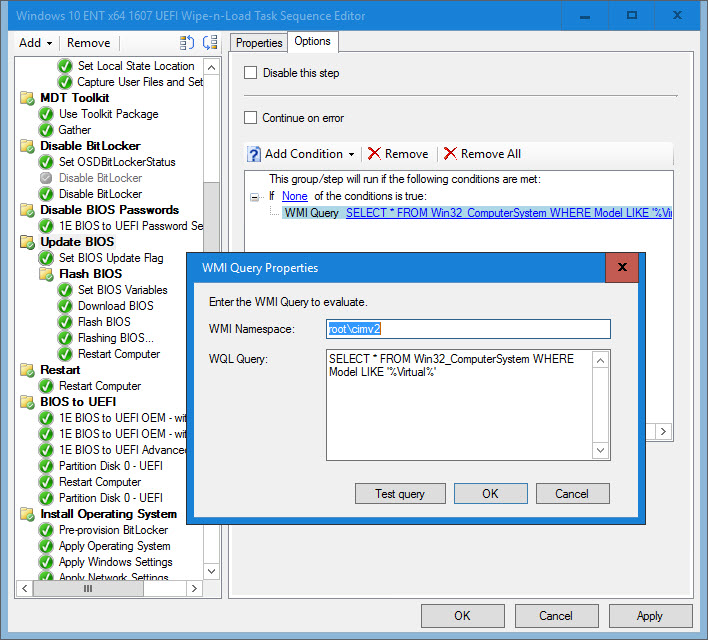
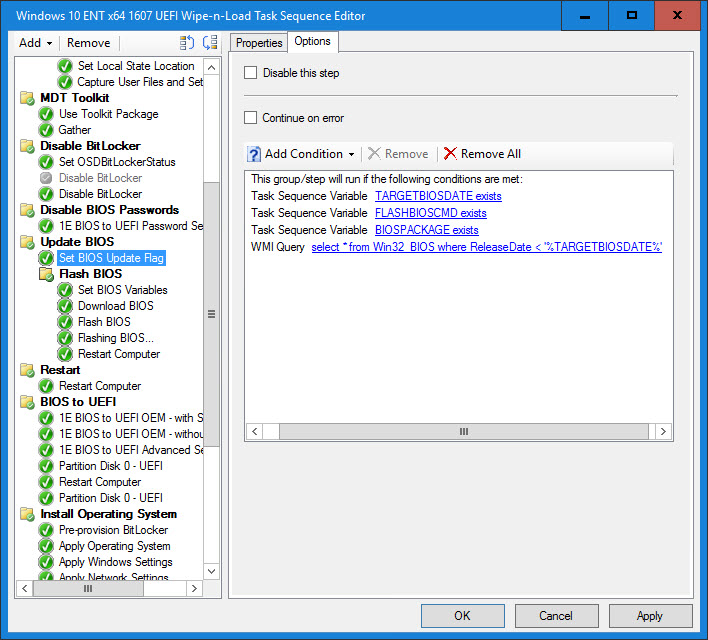
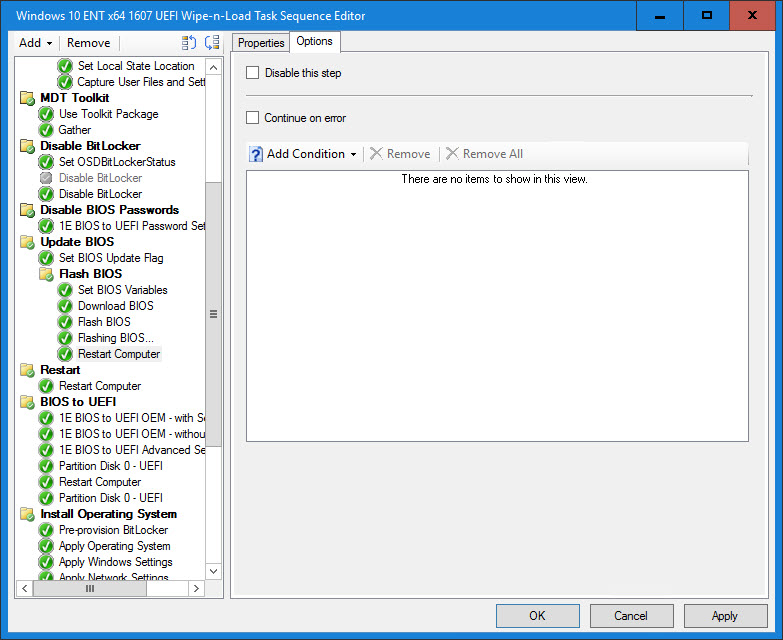
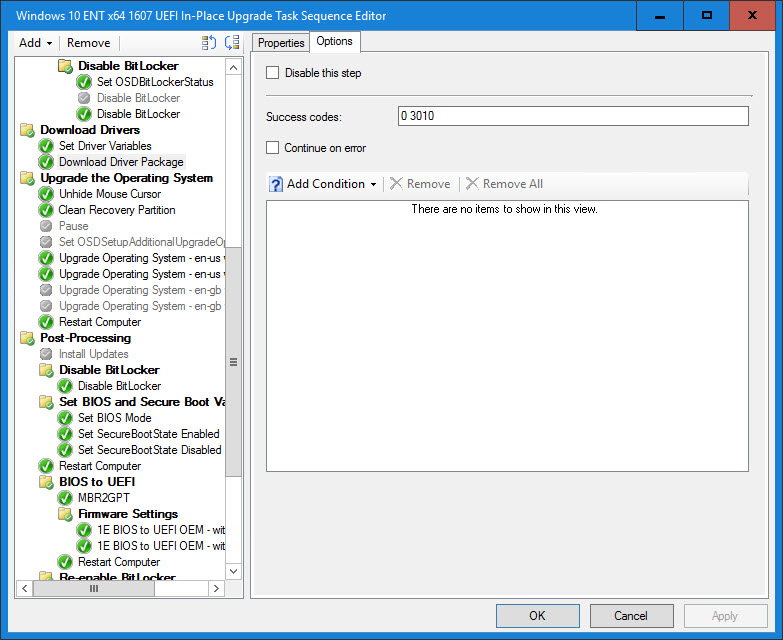
7. Create the Update BIOS Group with the following steps and conditions:

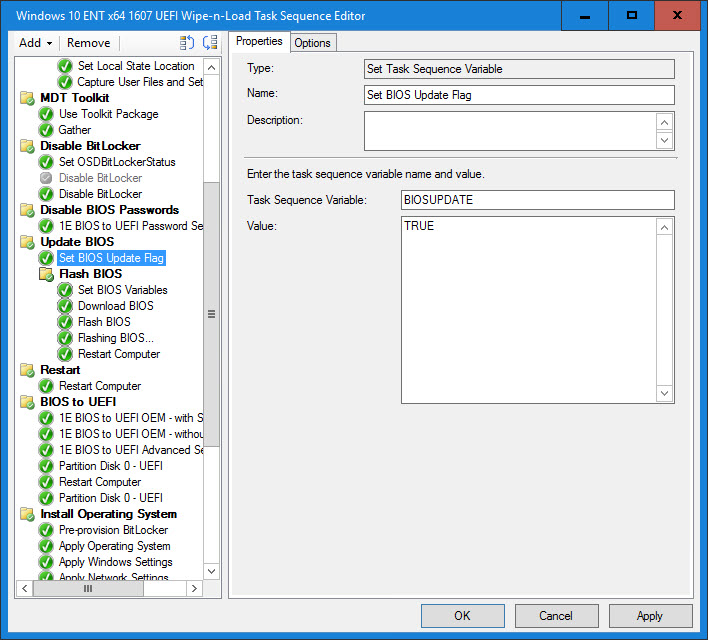
8. Set the BIOSUpdate Task Sequence variable. This variable will determine if a BIOS update is necessary based on the BIOS release date and also if TARGETBIOSDATE, FLASHBIOSCMD and BIOSPACKAGE exist.
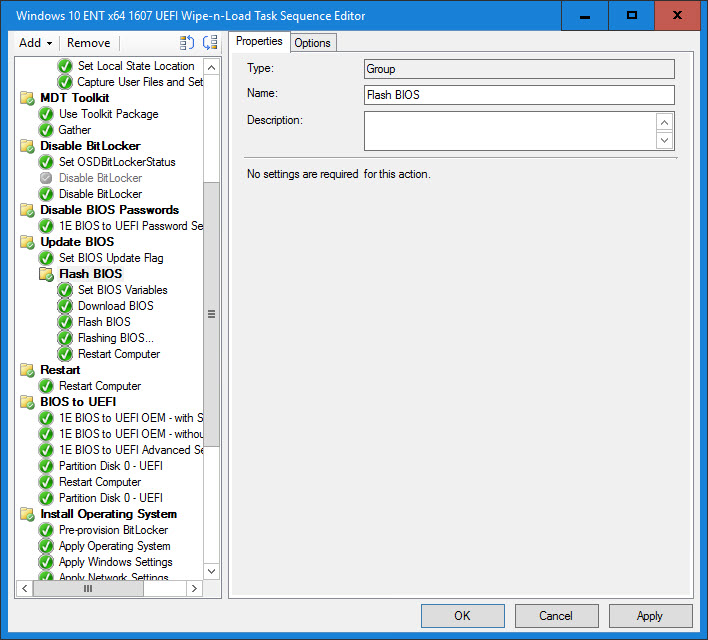
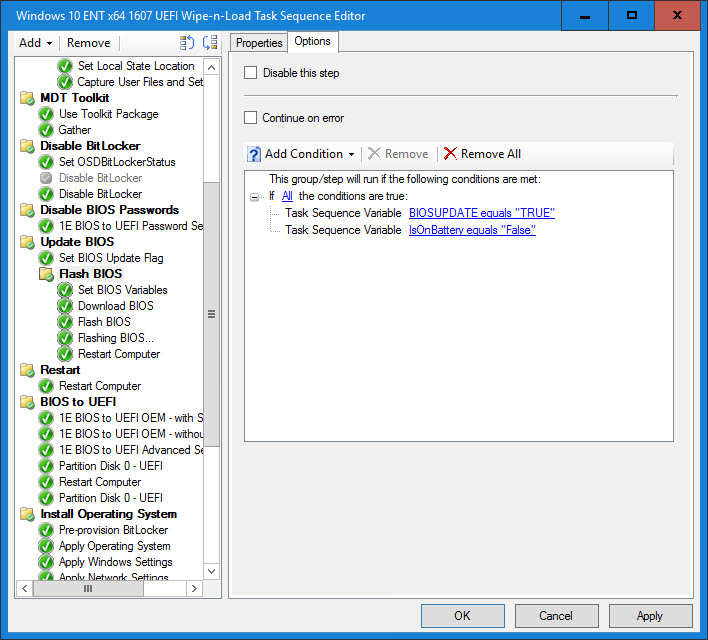
9. Create a Flash BIOS group. The conditions on this group are if BIOSUPDATE is TRUE and IsOnBattery is False. Since many BIOS update utilities require AC, we do not even want to try to update the BIOS if it is running on battery. The IsOnBattery variable is set by the MDT Gather step. It also should be checked as part of pre-flight checks, but by also keeping it in the Update BIOS group, we keep it modular and this group can be used in a Software Distribution Task Sequence to update the bios existing clients.
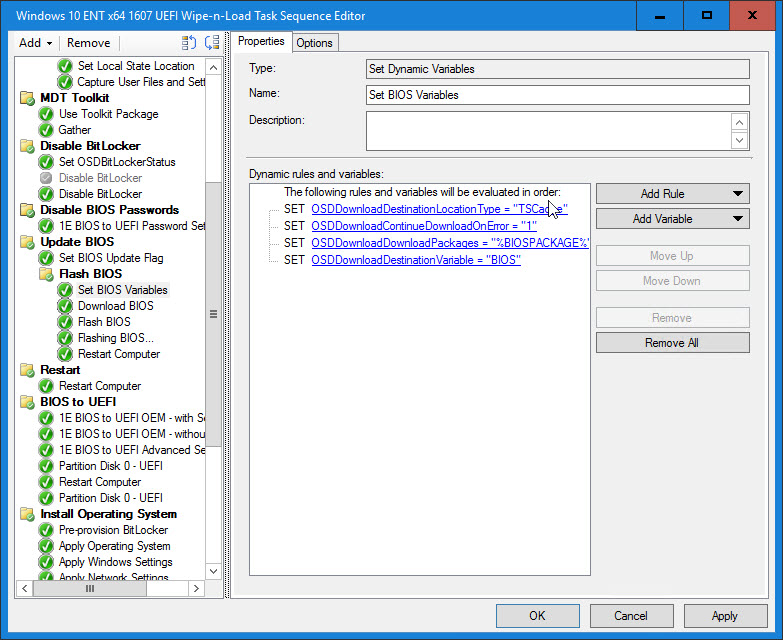
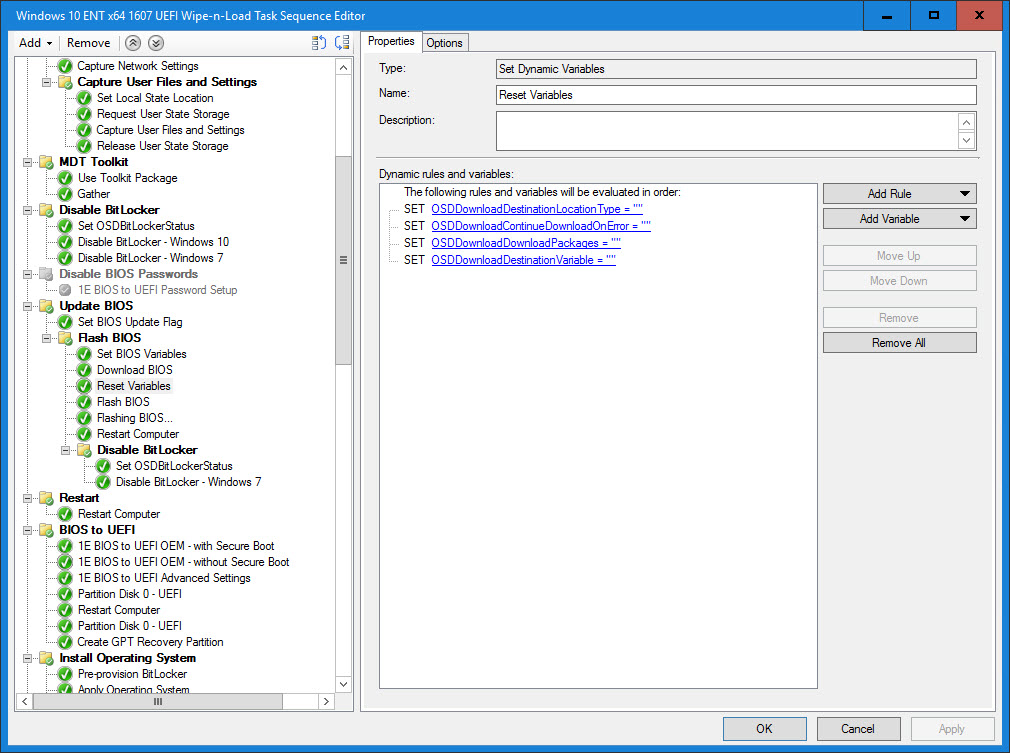
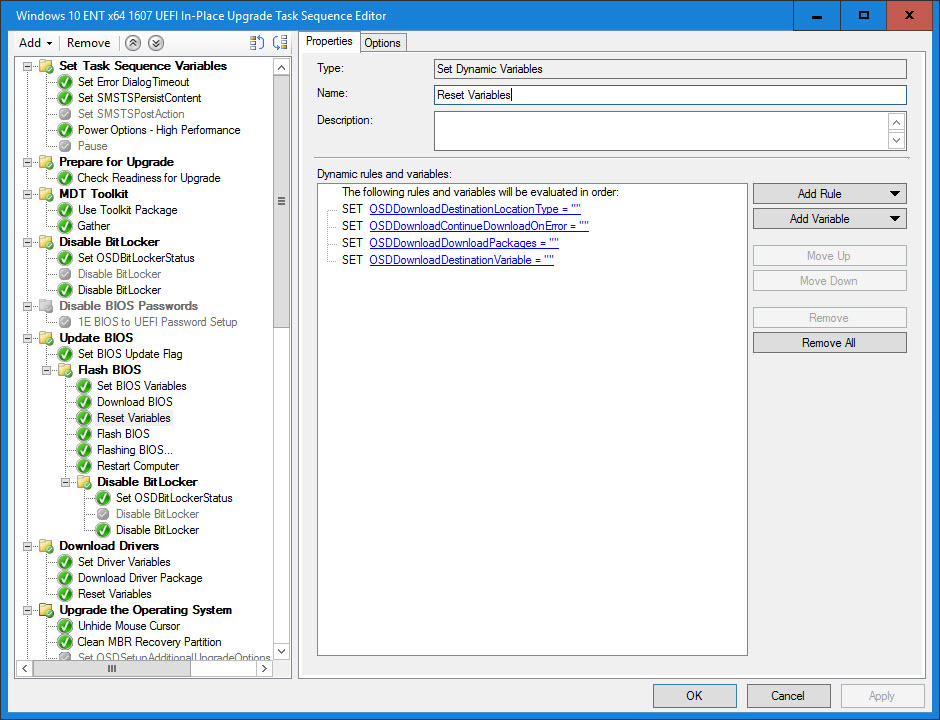
10. Set BIOS Variables is where part of the magic happens and is a Set Dynamic Variables Task Sequence step. This is where we set the following variables: OSDDownloadDestinationLocationType, OSDDownloadContinueDownloadOnError, OSDDownloadDownloadPackages and OSDDownloadDestinationVariable. I talked about these variables in my Hacking the Task Sequence 2017 session at the Midwest Management Summit and they may lead to a future blog post. But for now, just understand that they work with the Download Package Content step executable. We are downloading the package found in the BIOSPACKAGE variable and we are going to store the download location in a base variable called BIOS. Since there is only one package, the location will get stored in the variable BIOS01. DISCLAIMER: Although these Task Sequence variables are not read only (meaning they do not start with an “_”), they are not publicly documented, which translates to “use at your own risk”.
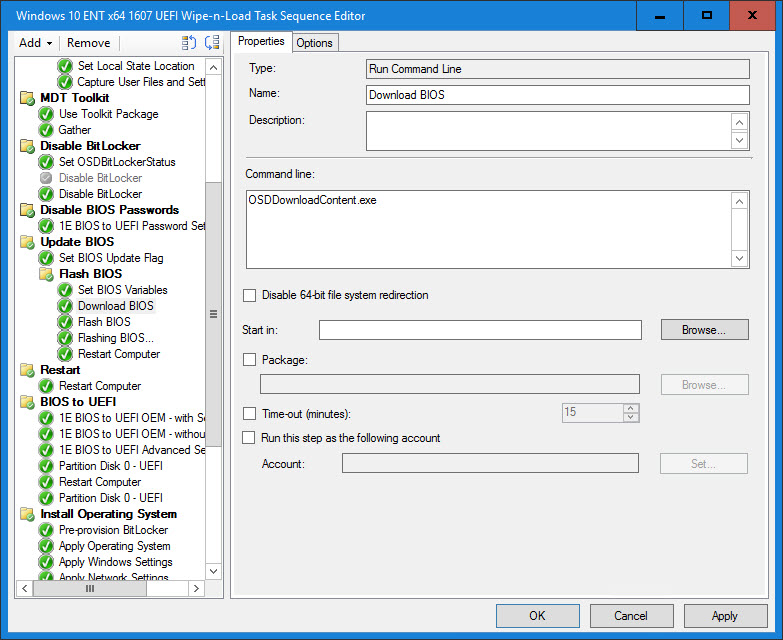
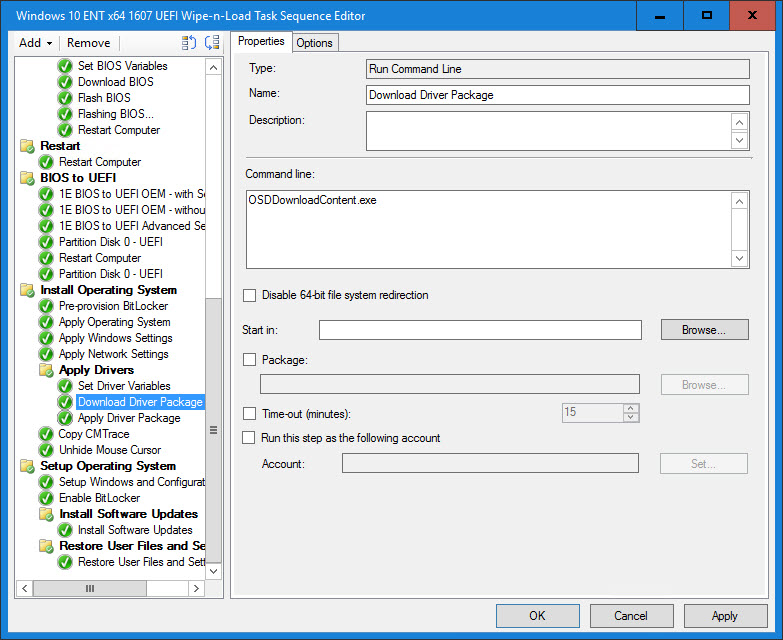
11. The Download BIOS step is a Run Command Line step that calls OSDDownloadContent.exe. This exe is tied to the Download Package Content Task Sequence step and will consume and use the variables set in the previous step. This step is also part of the magic as it will do a dynamic content location request for the package and then download it to the TS Cache.

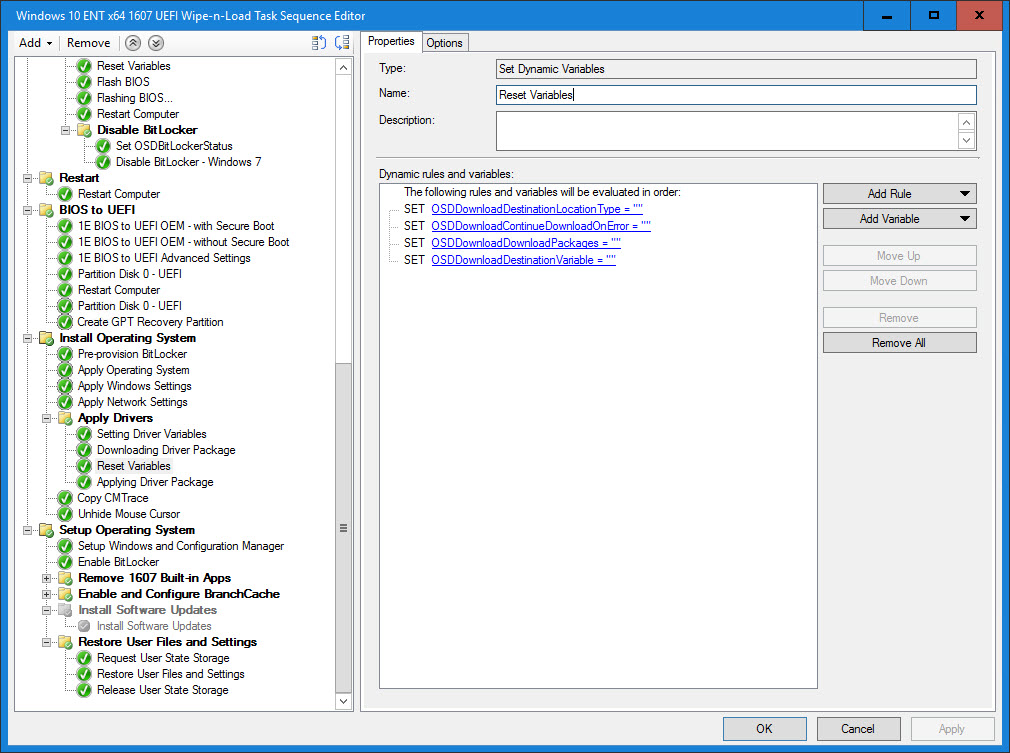
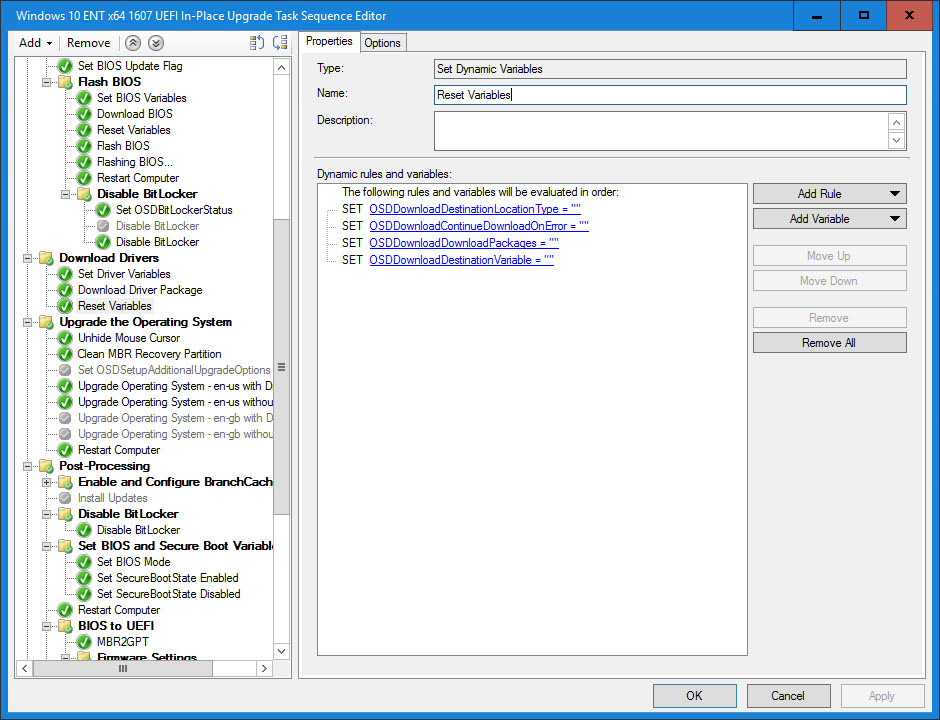
[Update] Directly after the Download BIOS step, it is important to insert a Reset Variables step. Since the variables are being set outside of the Download Package Content step, the variables do not get deleted. Resetting them to blank will allow any subsequent Download Package Content steps outside of this process to work normally if inserted into the Task Sequence.
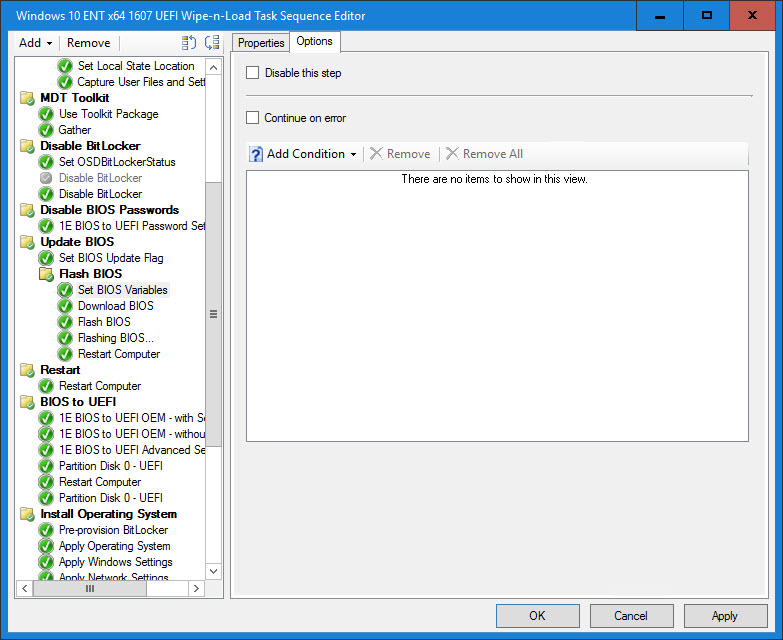
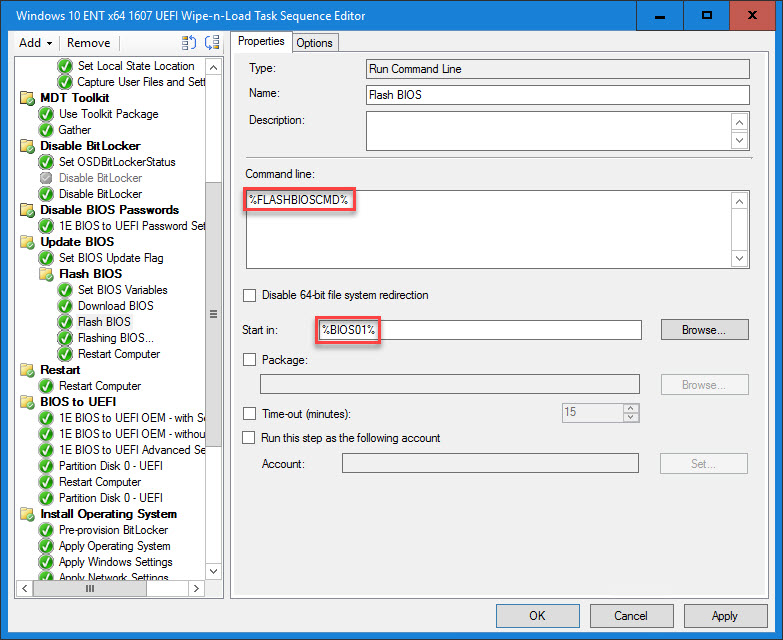
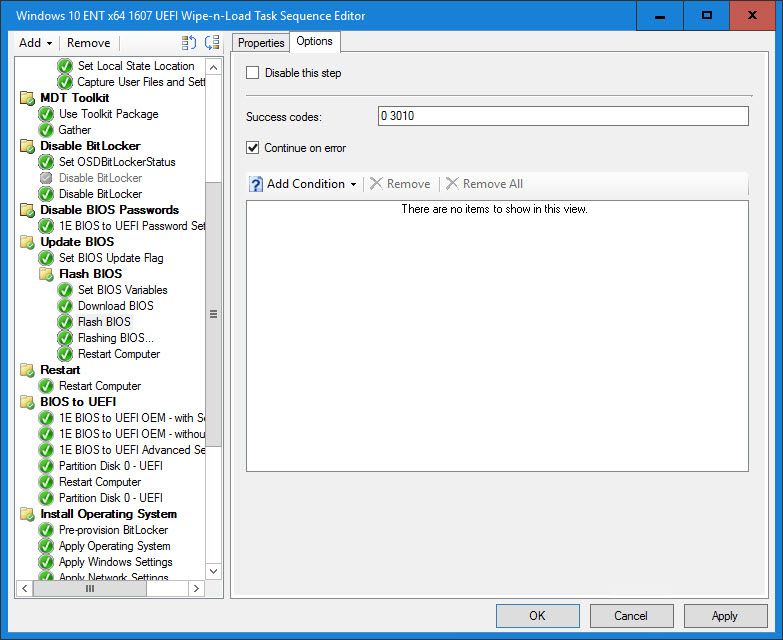
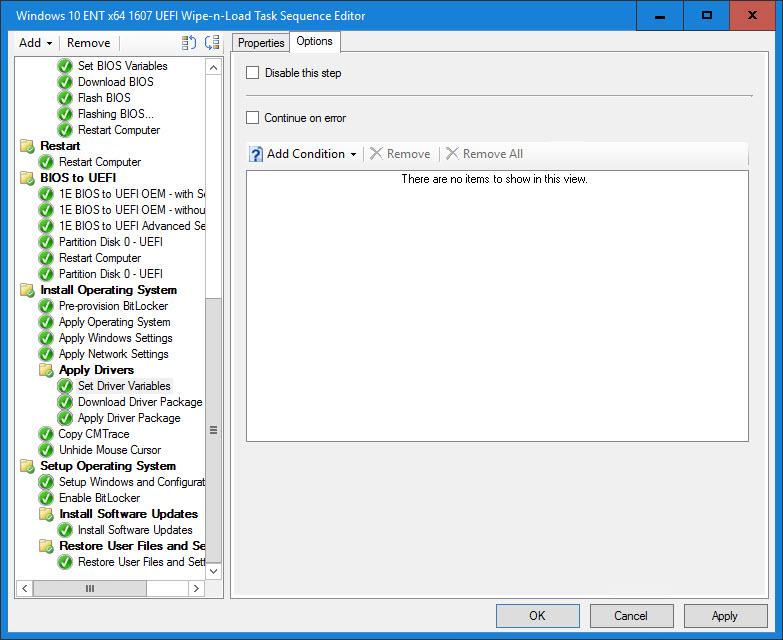
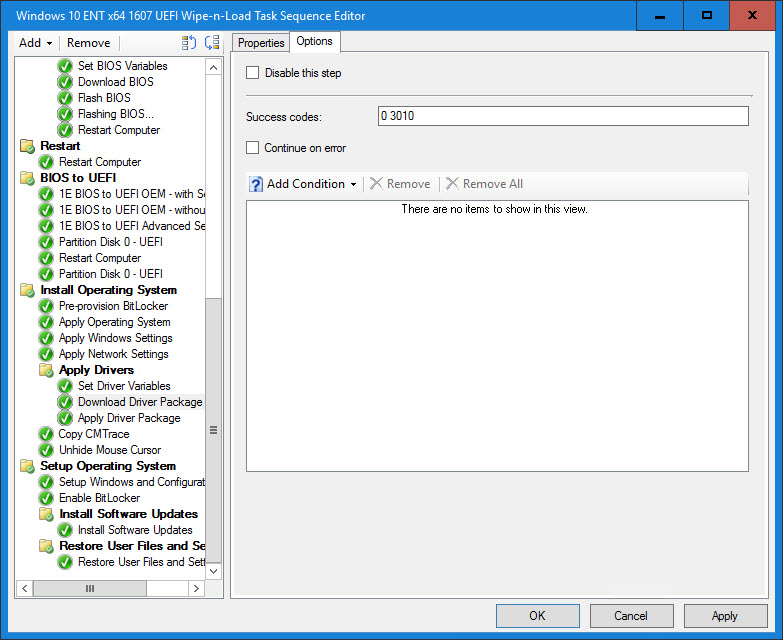
12. The Flash BIOS step is another Run Command Line step that executes the command stored in the FLASHBIOSCMD variable. It also sets the working directory to the location where the BIOS package was downloaded (BIOS01). Use Continue on error or define the exit return codes so the Task Sequence does not fail.
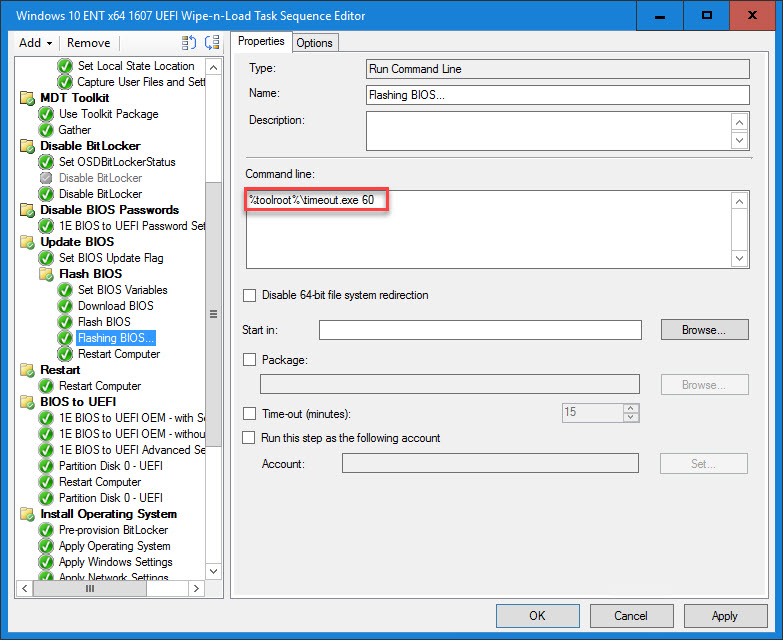
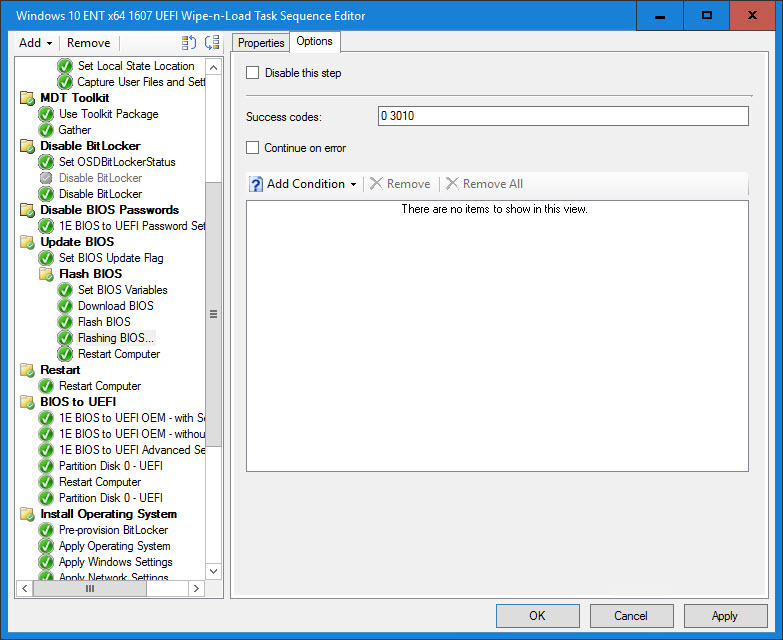
13. The Flashing BIOS… step is also another Run Command Line step that executes timeout.exe for 60 seconds. Timeout.exe is not part of the MDT Toolkit Package, so you will need to add the correct versions (x86/x64) to your MDT Toolkit Package if you want to use it. The Windows 10 version of timeout.exe will not run on Windows 7. However, the Windows 7 version of timeout.exe will run on Windows 10. The alternatively, simply include timeout.exe in the path on your Boot Images and then it will run regardless of the operating system. Otherwise, I have seen ping commands being used to create a sleep cycle. The reason I do this is because some vendors recommend not rebooting right away (even though the main process finished). Therefore, I stick it in there for good measure.
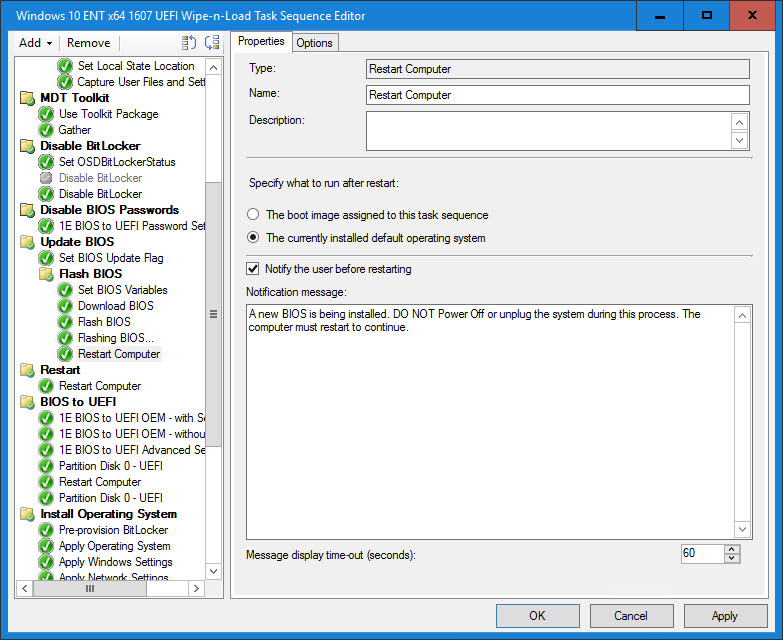
14. Once the first phase of the BIOS update has run, the system needs to be rebooted so that the second phase can run. Since this is for a Wipe-n-Load Task Sequence, we will go ahead and reboot into the Boot Image after the BIOS update has completed. Provide the end user a message like “A new BIOS is being installed. DO NOT Power Off or unplug the system during this process. The computer must restart to continue.”
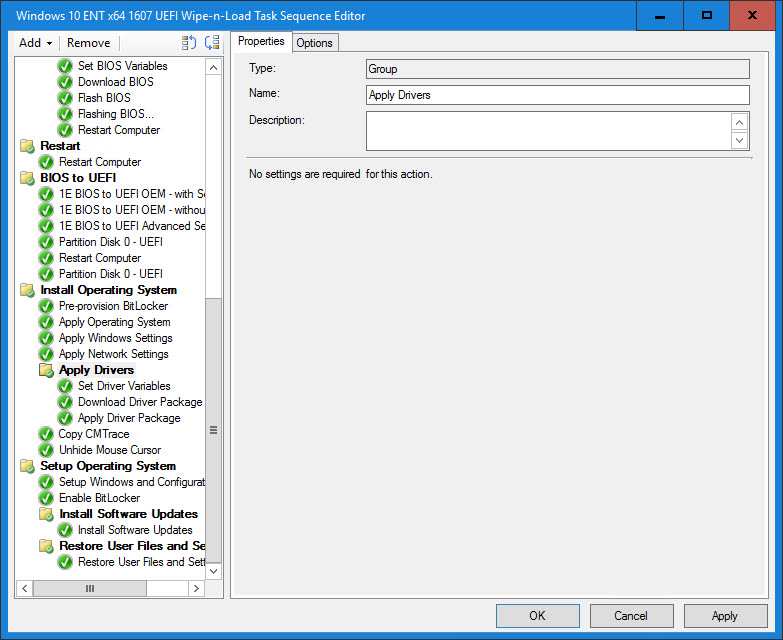
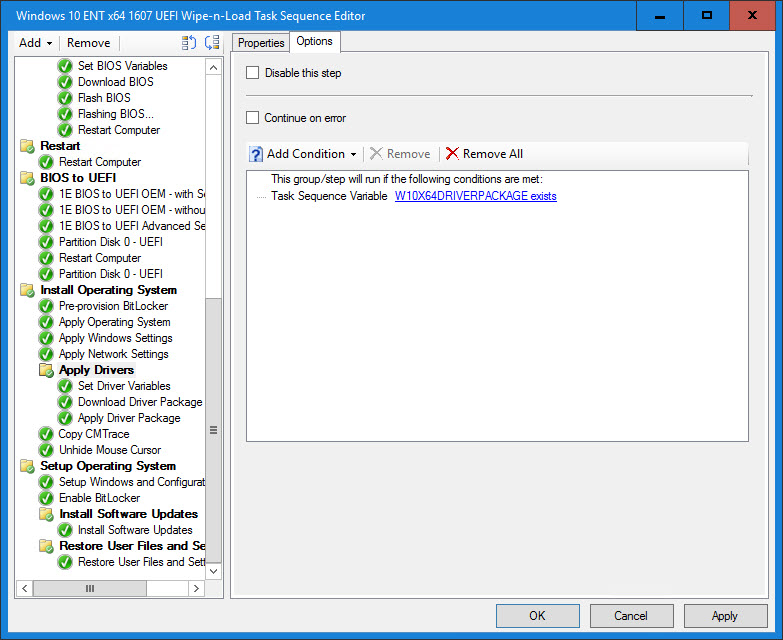
15. Directly below the Apply Network Settings step, create a new group called Apply Drivers. The condition on this group is if W10X64DRIVERPACKAGE exists. If the variable does not exist, then it was not populated in the MDT db and this group will be skipped. This is by design for the scenario where a model does not have a Windows 10 Driver Package and/or the out of the box Windows 10 drivers work just fine.
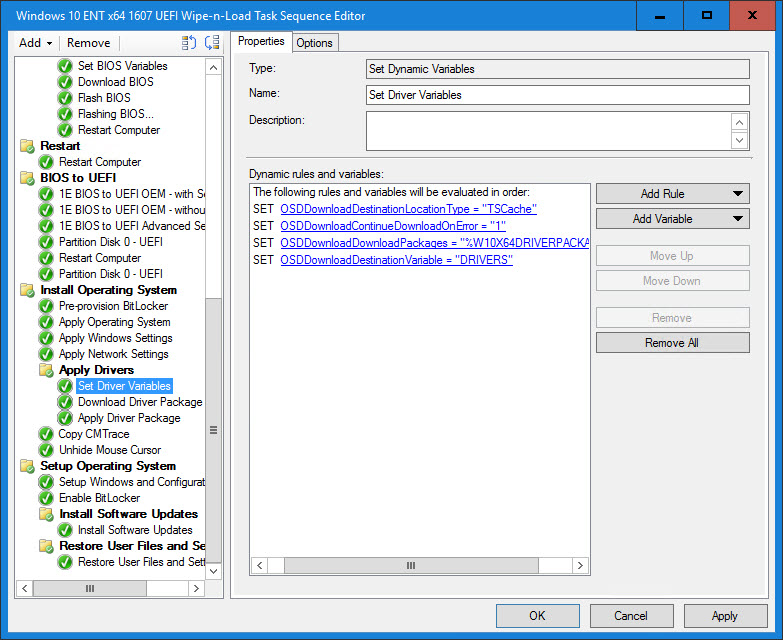
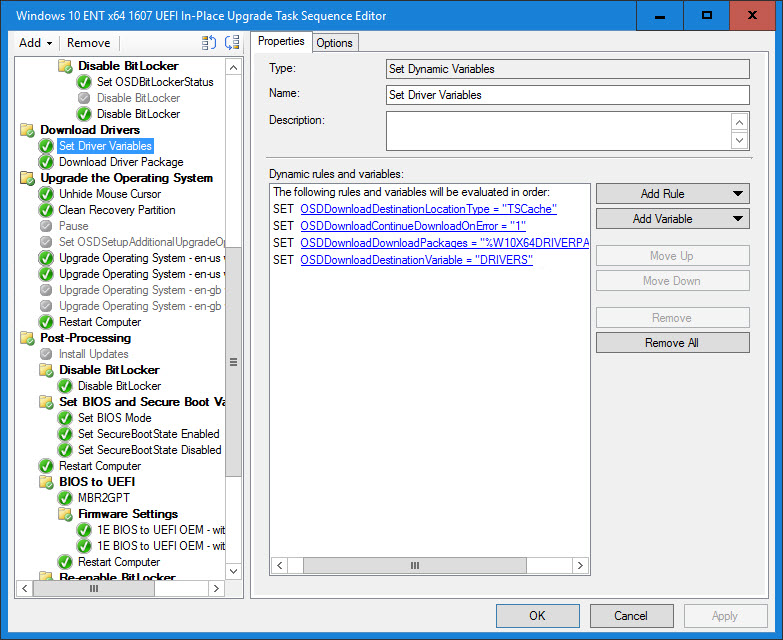
16. Set Driver Variables (similar to the Set BIOS Variables) is where part of the magic happens and is a Set Dynamic Variables Task Sequence step. This is where we also set the following variables: OSDDownloadDestinationLocationType, OSDDownloadContinueDownloadOnError, OSDDownloadDownloadPackages and OSDDownloadDestinationVariable. Here, we are downloading the package found in the W10X64DRIVERPACKAGE variable and we are going to store the download location in a base variable called DRIVERS. Since there is only one package, the location will get stored in the variable DRIVERS01.
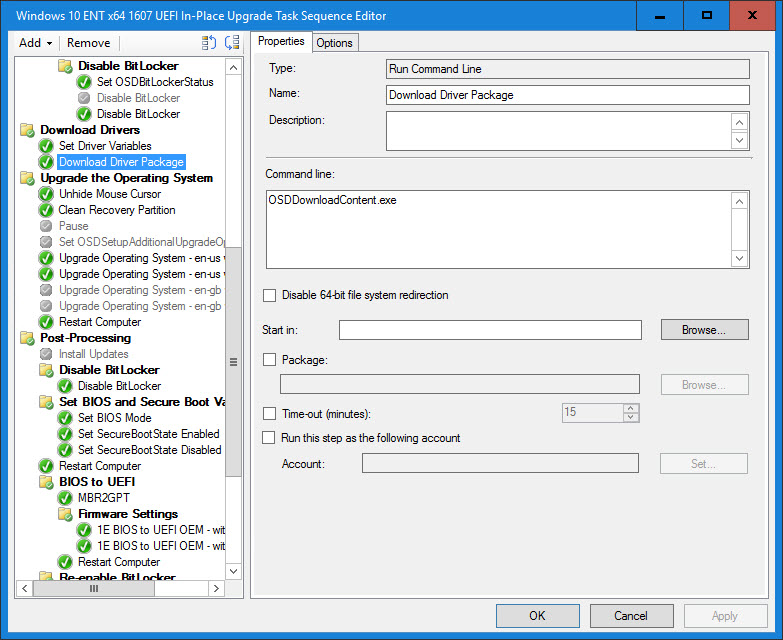
17. The Download Driver Package step is a Run Command Line step that calls OSDDownloadContent.exe. This exe is tied to the Download Package Content Task Sequence step and will consume and use the variables set in the previous step. This step is also part of the magic as it will do a dynamic content location request for the package and then download it to the TS Cache.
[Update] Directly after the Download Driver Package step, it is important to insert a Reset Variables step. Since the variables are being set outside of the Download Package Content step, the variables do not get deleted. Resetting them to blank will allow subsequent Download Package Content steps outside of this process to work normally if inserted into the Task Sequence.
18. The Apply Driver Package step is another Run Command Line step that simply executes DISM to apply the drivers to the Windows installation contained in the OSDisk variable (which is set in the Format and Partition Disk step).


The following section is for an In-Place Upgrade Task Sequence
The same approach can be used for an In-Place Upgrade Task Sequence with a few changes.
[Update] Directly after the Download BIOS step, it is important to insert a Reset Variables step. Since the variables are being set outside of the Download Package Content step, the variables do not get deleted. Resetting them to blank will allow subsequent Download Package Content steps to work normally if inserted into the Task Sequence.
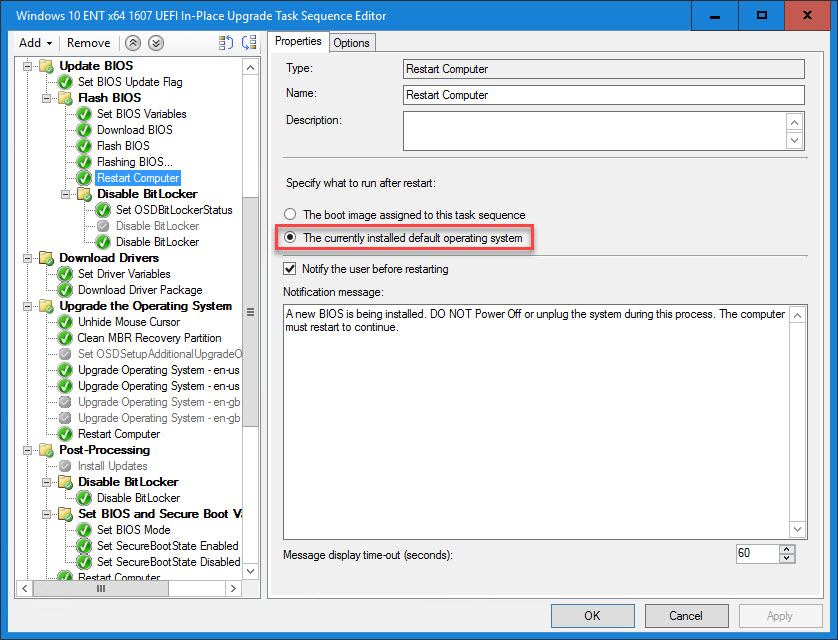
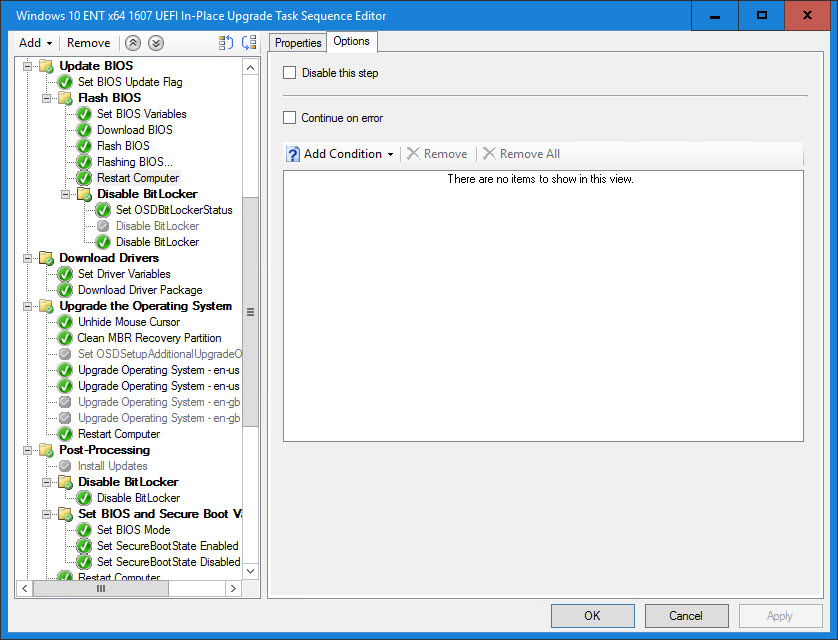
19. After the Flashing BIOS… step, change the Restart Computer step to restart to the currently installed default operating system. Provide the end user a message like “A new BIOS is being installed. DO NOT Power Off or unplug the system during this process. The computer must restart to continue.” NOTE: After the reboot, if using BitLocker on Windows 7, you will need to disable/suspend it again since the built-in Configuration Manager step only suspends it for one reboot.
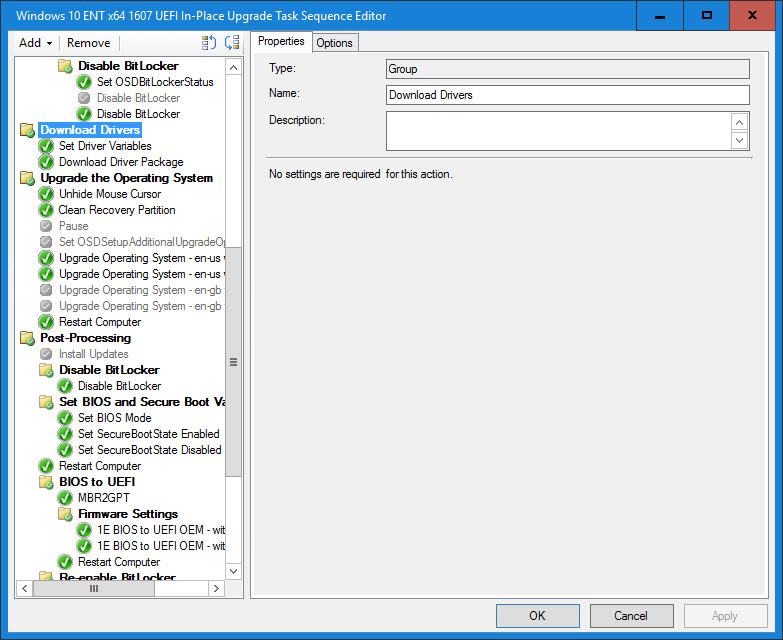
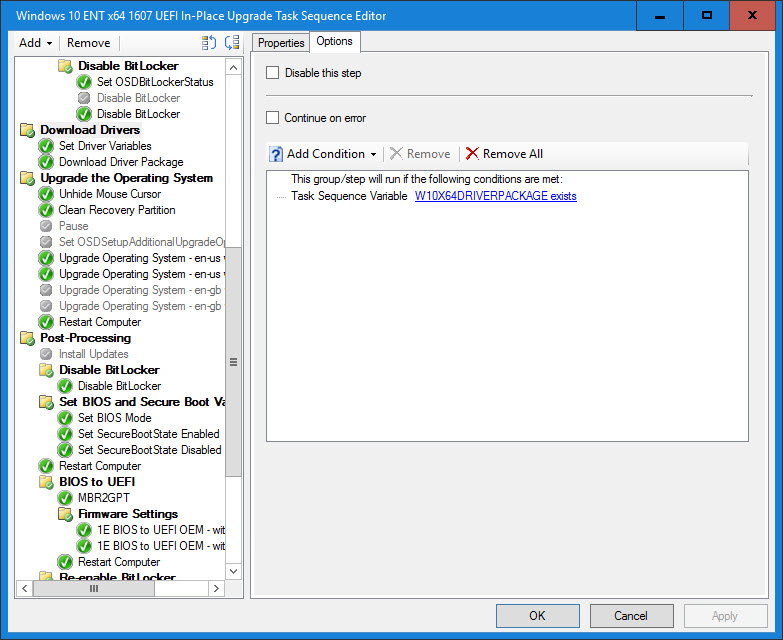
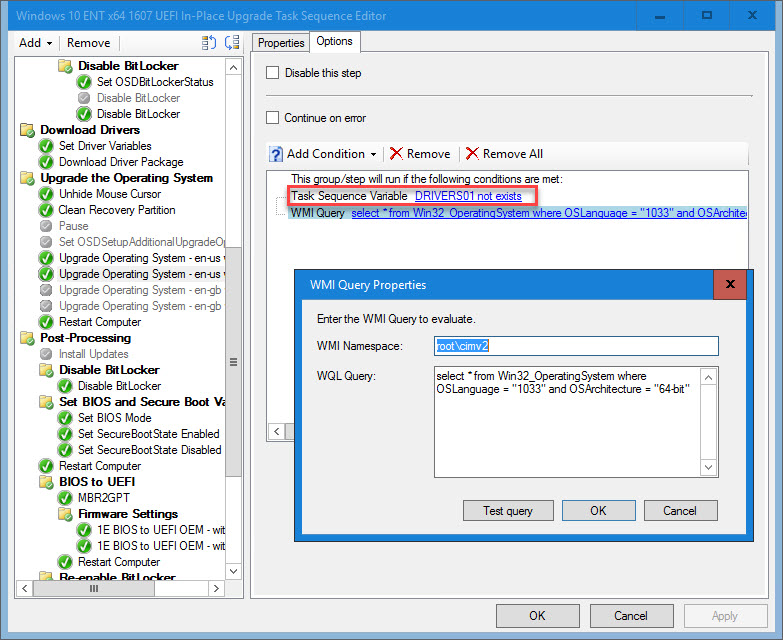
20. Create a group called Download Drivers with the condition that the variable W10X64DRIVERPACKAGE exists (similar to the Apply Drivers group created above for the Wipe-n-Load Task Sequence).
21. The Set Driver Variables step is the same as Step 16 above.
22. The Download Driver Package step is the same as Step 17 above.
[Update] Directly after the Download Driver step, it is important to insert a Reset Variables step. Since the variables are being set outside of the Download Package Content step, the variables do not get deleted. Resetting them to blank will allow subsequent Download Package Content steps outside of this process to work normally if inserted into the Task Sequence.
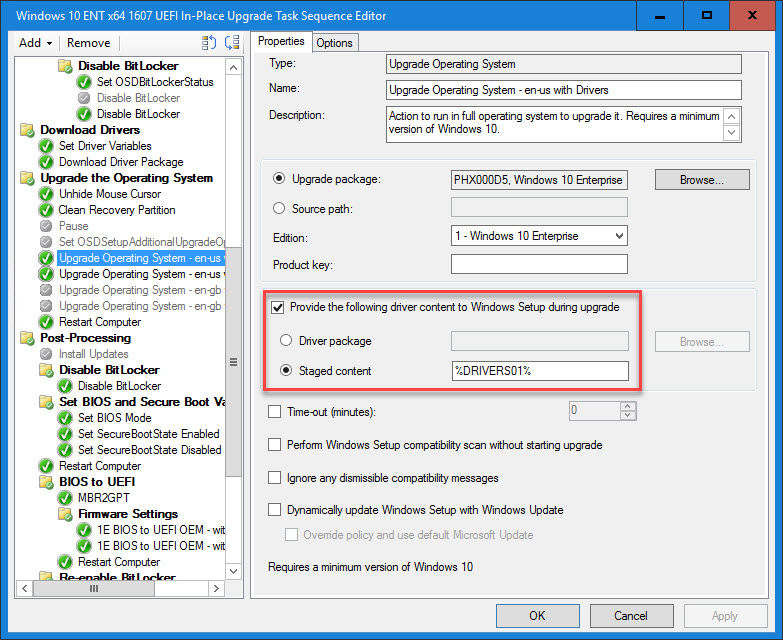
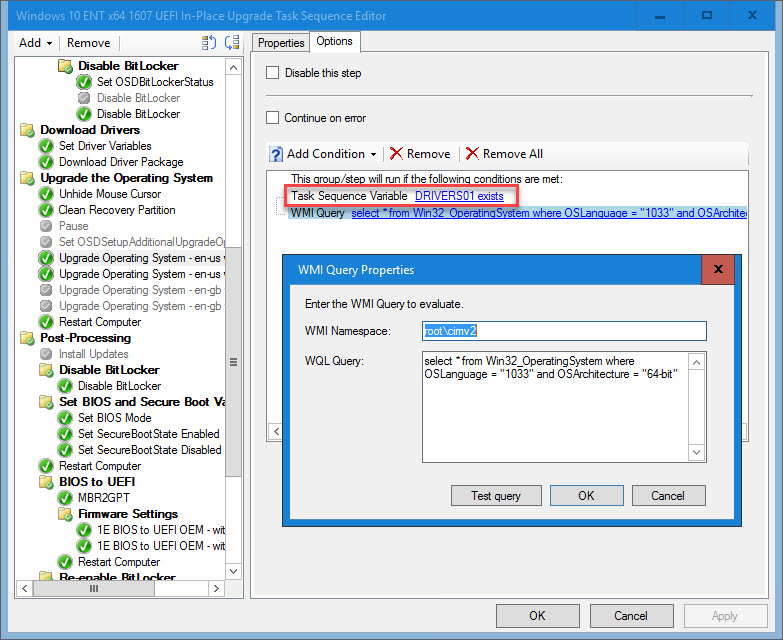
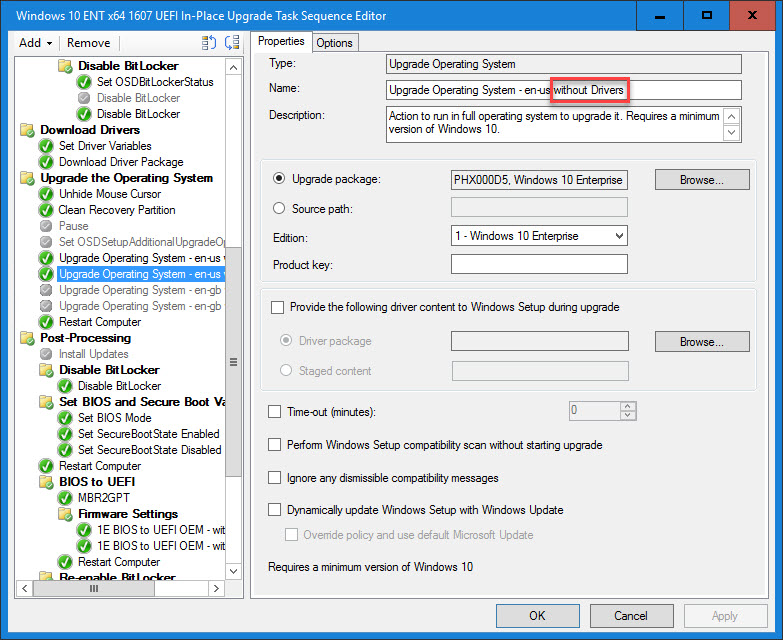
23. Now we need to inform the Update Operating System step the location of the drivers. Enable the “Provide the following driver content to Windows Setup during upgrade” option and enter %DRIVERS01% for the “Staged content” location. Since we only want this to run when the Driver Package exists, add the condition Task Sequence Variable DRIVERS01 exists.
24. In the case that the Driver Package does not exist, duplicate the previous step, clear the “Provide the following driver content to Windows Setup during upgrade” option and add the condition Task Sequence Variable DRIVERS01 not exists. This can be reduced to using one step by using the undocumented variable OSDUpgradeStagedContent variable that Johan Arwidmark talks about in his blog post Improving the ConfigMgr Inplace-Upgrade Task Sequence.
25. Chances are, there will be a need to have more than BIOS Package or Driver Package in the production environment for a given model. As new BIOS updates and drivers are released, they can be pilot tested in the environment using the same exact Task Sequences without modification. There is no need to setup different Task Sequences, simply define your pilot systems in the MDT database under the Computers node.

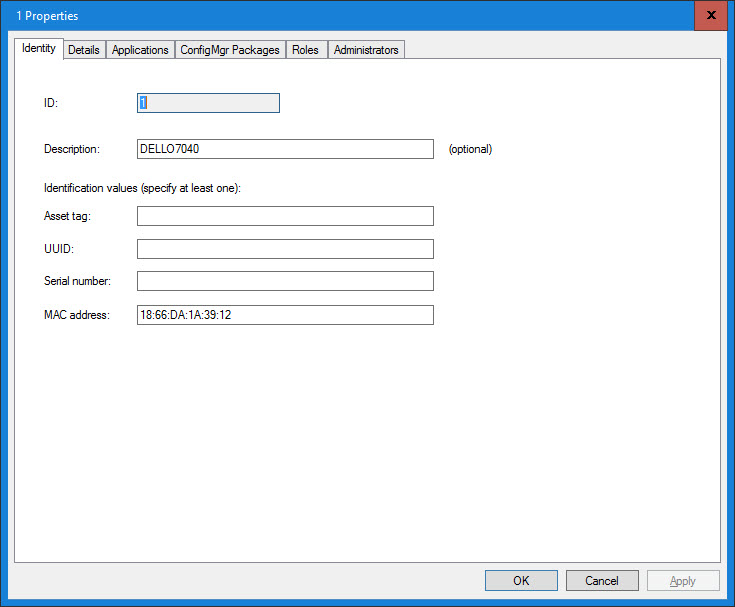
26. This can be done by adding a new record in the MDT database using the Asset tag, UUID, Serial number or MAC address.
27. The same extended fields show up on the Details tab for the computer record. Add in the new BIOS package and Driver package information and the next time the system is built it will use these packages. Once the packages have passed the pilot testing phase and have been deemed production worthy, simply change the BIOS package and Driver package information in the Make and Model node for that particular model.
Lastly, as new models enter the environment, simply create the BIOS and Driver Packages in Configuration Manager and then create the entry in MDT for the new model – once again, all done without modifying either Task Sequence. In summary, this solution meets all of the five requirements that I defined in Part 1:
1. Runs in Full OS and WinPE
2. Same method works across baremetal, refresh and in-place upgrade Task Sequences
3. Dynamic without the need to edit the TS or scripts
4. Supports Production and Pre-Production in the same TS
5. Intuitive and easy to use
Now, who would like to see this functionality built into Configuration Manager out of the box?
And, who would like to see the hardware vendors publish the BIOS WMI date stamp so that it can be consumed electronically?
Originally posted on https://miketerrill.net/

Pingback: Configuration Manager Dynamic Drivers & BIOS Management with Total Control Part 1 | Mike's Tech Blog
Hi Mike
Great article. I’ve done something similar for BIOS upgrades in the past, but good to see how the expert does it and get a few extra tips (like allowing time before rebooting after applying the BIOS).
Is there any benefit of calling the OSDDownloadContent.exe instead of using the Download Package Content step?
Also I guess its ok to use any method to delay the TS after applying the BIOS (I normally use this PowerShell command powershell.exe -Command “& { Start-Sleep -Seconds 60 }”)?
Regards
Mark
Hi Mark,
The way I have it allows you to dynamically populate what it is going to download. If you call the Download Package Content step directly, then you need to statically set what it will download if that step evaluates to true. My goal is to get away from statically defining things in the TS and make them dynamic as much as possible. This way, they are more flexible and if you reference the same steps in multiple task sequences, then you are only making the change once. Plus, I working in a fairly larger environment (400K+) and task sequences with direct reference packages create tons of policies.
As for the delay method using powershell, that will absolutely work (provided you have powershell in your boot images).
-Mike
Hi Mike, thanks for the article. Does this process work with Nomad? We set this up in our lab (with Nomad) but the package fails to download. The package is at version 5 and it appears that Nomad cannot determine the package version and tries to download version 1, then it fails. The Nomad logs show it trying to contact the MP for the information but it fails to do so. I don’t know if Nomad is supposed to be able to talk to an MP or not. When we turn off Nomad, it works.
Thanks!
Jeff
Yes and No. If you content is at version 1, then it will work. However, if it is not at version 1, Nomad is unable to figure out what version and the corresponding hash to use. IMO, SMSTSDownloadProgram was kind of half baked, as it doesn’t provide all of the necessary information in the command line and/or ini file (like hash and version). For statically defined packages, there is a corresponding package hash variable and version variable. SMSTSNomad reads these variables to get the additional information it needs. For this dynamic method, the TS Engine is not populating either of these variables, which causes SMSTSNomad to fail for dynamic packages that have a version greater than 1. SMSTSNomad *should* be able to query the MP to get this information – I would open a case with 1E if you haven’t already (and note that I do not work for 1E anymore).
-Mike
Thanks Mike, and yes I know you’ve moved on from 1E. Best of luck to you. We have opened a case with 1E so hopefully we’ll be able to work this out. I really do like this solution!
Hello, I got a question. I have an inplace-upgrade TS like this one but there is a step I don’t get. You restart the computer after updating the BIOS but before installing the update. This is something I wanted to do but when I do that, I get to the login screen and nothing happen until a user is logged for a certain period of time. How did you solved that?
Thank you
Has nothing to do with a user logging on. The SMS Host Agent service is set to a delayed start. We do two things – in a TS, we change this to no delayed start and we also set a custom background/logon screen to let the end user know that an upgrade is in progress. Gary has posted some of the tips and tricks we use on his blog at https://garytown.com/.
-Mike
Pingback: Windows 10 BIOS to UEFI In-place Upgrade Task Sequence using MBR2GPT | Mike's Tech Blog
“Refresh the views after adding the columns” can be done with this command: EXECUTE sp_refreshview ‘[dbo].[MakeModelSettings]’
Hi Mike,
I am curious about your MDT DB setup as you’ve indicated it’s a pretty large environment and I am assuming it’s also quite dispersed connected with slow links (I know you are leveraging 1E:). Do you have a single DB or multiples based on geography so not all endpoints would hit a single DB. I am designing something similar with Azure PaaS DB and a webservice for clients to query the MDT DB instead of direct DB connections via standard MDT functionality.
Thanks
Interesting solution using Azure PaaS DB – I like it. We are still designing things but will likely use a single DB since we aren’t talking about a lot of data and traffic using a custom webservice. However, I am very curious to hear how yours turns out.
Hi Mike,
Thanks for the article, its very informative and gave me some great ideas.
I am not a real fan of MDT so try to avoid it where possible, so I have used a bit of your task sequence but have completely omitted the MDT part. Instead I have used a “Set Dynamic Variables” step at the top of the task sequence with a condition for each of the hardware types we use on site.. eg.
IF Make = “Dell Inc.” and Model = “Optiplex 7050” ….. Set BIOSPackage = TS100003, SET DriverPackage = TS100009, Set ProposedBIOS = “1.7.7”
IF Make = Hewlett-Packard and Model = “HP EliteBook 840 G2” ….. Set BIOSPackage = TS100004, SET DriverPackage = TS100010, Set ProposedBIOS = “M71 Ver. 01.22”
etc etc
then on the BIOS upgrade step I just put the WMI query SELECT SMBIOSBIOSVersion from WIN32_BIOS where SMBIOSBIOSVersion < '%ProposedBIOS%' to determine if the upgrade is necessary and have a run command line step that calls a script that is specific to each hardware type
Although this works, it defeats the dynamic part of the solution. If you want to add a new model, you have to edit the TS. If you need to change a driver package to a different one, you have to edit the TS. It also makes it more tricky to test pre-production driver packages without editing the TS. MDT is just one way to making it fully dynamic. This could be done with a webservice that queries a db (or even a file on a server).
Mike, I have gone down the route of creating a package of drivers for each hardware model, when this is distributed I simply add a new model variant to the set dynamic variables step. This is no more intrusive than editing the mdt database and a lot less onerous. To separate pre-production drivers I have 2 set dynamic variables steps the second only runs if a variable TESTPC = TRUE
I’m trying to same thing using SCCM TS, not MDT and running into issues with DISM. Can you confirm whether you’ve tested successfully in SCCM?
This is all based on Configuration Manager, and I test the Task Sequences under different scenarios before I publish them publicly. I also know several companies and consulting companies that use this solution – so yes, it works!
Adam, I had a few issues with some drivers not installing using the dism method so I have been using the command line DPInst /s /se /sa /sw /sh to install the drivers as I find it more reliable. obviously this means you need dpinst.exe in the root of each of your driver packages. I also include a dpinst.xml file in the root of the package with the text……
*
Oh and set Continue on Error flag on that step of the task sequence as DPInst generates a different success error code according to how many drivers it installs successfully or skips.
Continue on error, not a good idea. You will then miss when there’s a real driver failure. I have driver package that have over 30 drivers and I always end with exit code 0. If you got something else, check your drive package. If some are skip, remove them as it’s not needed and generate false positive. All my drivers work with dism, there’s no reason it shouldn’t. If you got error, check the driver package, something is missing. I’ve had that problem at first, all my driver where working fine using the good old install driver step, when I switched to DISM, oh now I’m getting failed. Everytime, it was because there was a missing file somewhere in one of the drivers, although I could install them directly in device manager, dism didn’t liked them. I manage to find every driver that had missing files, some where even bugged from the vendor itself.
PaulF: Using the variable like you do is not dynamic. Dynamic means you don’t have to touch the TS. Now you gotta touch it everytime you have new model or bios version, which mean you could simply use the good old install driver step and it would do the samething.
As for the BIOS, I would recommend using SSM for HP, it will automate the version for you and install the needed version, thus making it 100% dynamic. You can even include everything in a package if you prefer instead of having it on the network like I do (I prefer network since no more update to the package and when I change it, it’s right now for everyone running the job).
Of course its dynamic, The ts picks the correct driver package based on the hardware you are building on. You dont need a package and a step for each model. Yes you have to add a new condition to 1 step but this really isnt a big ask. What Mike’s method is doing is simply adding another product and another layer of complexity into the TS.
MDT as its perks, but still, your method is moding a TS each time there’s a new model. It might not be a big deal in your environment, but where I work, each modification must be approve by various team and QA before sending to prod. That mean each new model, not only do I have to make a new TS from the current prod one, but I must check to be sure I didn’t screw up anything else.
I’m not using 100% this method, at first it wasn’t using MDT. My method use the dynamic package version, which extract an xml with all the driver package in it. All the driver package have the same name as the model the wmi request return. Thus, when looking for the package, I look at model and version (for W7, W10, Test, etc. depending on what’s in the TS). This way, when I do a new model, the only thing required, if you didn’t automated it, is to generate a new xml after the creation of the new package. Nothing else change, no touch to a working TS, no approbation of modification, etc…
Using MDT simply this in the form that you don’T need anymore to extract an xml file with all the packages in it, then search through it. You simply create a model in MDT with the right driver package and you attribute it to the computer.
Great discussion guys!
See my other blog called Configuration Manager Dynamic Drivers & BIOS Management with Total Control Part 1 (https://miketerrill.net/2017/09/10/configuration-manager-dynamic-drivers-bios-management-with-total-control-part-1/) where I defined the following requirements of the solution:
1. Runs in Full OS and WinPE
2. Same method works across baremetal, refresh and in-place upgrade Task Sequences
3. Dynamic without the need to edit the TS or scripts
4. Supports Production and Pre-Production in the same TS
5. Intuitive and easy to use
This approach meets these needs. I agree that once a TS is marked for production and you have production deployments happening, you do not modified the TS (extreme case would require an emergency change). I work in a fairly larger environment (400K) and the minute you touch a TS, you stop OSD for the entire company. Depending on the size of the TS and the number of reference packages, simply making a change to one of those packages can cause a massive impact in a decent size environment. Mike Marable has a good explanation at the bottom of his blog https://thesystemsmonkey.wordpress.com/2015/01/19/learn-from-my-mistakes-mass-package-updates-with-1e-nomadbranch/:
It was this vast number of deployments that brought the house down. It was like a series of nested FOREACH statements….
FOREACH package in the task sequence
FIND all other task sequences that reference the package
FOREACH of those task sequences
FIND each deployment for that task sequence
FOREACH of those deployments
Update policy
Smaller environments are likely not to experience these kinds of issues as they probably are not constantly using OSD every minute (nor do they have billions of policies) and editing a TS after it has been marked production might be acceptable. As my grandfather used to say ‘there are multiple ways to skin a cat’ and the same goes for OSD. It is all about figuring out what works for your environment, business processes and resource level.
So for Dell systems, how do we set up FlashBIOSCMD? Do we put “Flash64W.exe /b=XPS_9350_112.exe” in the MDT database for that computer type? And repeat for each model? Or do you actually have a FlashBIOS.cmd script written out?
Nothing having much luck getting this to work. In your BIOS.ini, you call tables “ComputerSettings” and “MakeModelSettings”, but when I actually look in the MDT database, they’re called “ComputerIdentity” and “Settings”
Hi Mike, (MDT 8443)
I am trying to extend database but unable to add any column.
Just for testing, add TARGETBIOSDATE as new column, and make sure Allow Null is true.
Refresh the view with following (no error)
EXECUTE sp_refreshview ‘[dbo].[ComputerSettings]’
EXECUTE sp_refreshview ‘[dbo].[LocationSettings]’
EXECUTE sp_refreshview ‘[dbo].[MakeModelSettings]’
EXECUTE sp_refreshview ‘[dbo].[RoleSettings]’
when i click on Locations in MDT DATASE and View custom under details tab, TARGETBIOSDATE is not listed. any thoughts\tips?
thx in advance
Not sure – are you running it with enough SQL rights?
I have the same problem with a device
HP Compaq Elite 8000 Convertible Minitower PC
uuid And serial number
FFFFFFFF-FFFF-FFFF-FFFF-FFFFFFFFFFFF
I hope you can solve this problem
Contact HP Support – they might be able to provide you with a utility or method to fix it.
Mike,
Would it possible for you to share flashbios.cmd that used in MDT/TS for reference ?
Sure:
@if not defined debug echo off
@Echo :::::::::::::::::::::::::::::::::::::::::
@Echo :: Dell flash BIOS wrapper
@Echo :::::::::::::::::::::::::::::::::::::::::
:: Find the binaries
if not exist "%~dps0\Flash64W.exe" (echo Missing Flash64W.exe & exit 2)
set FlashBin=
set FlashLog=
for %%i in ( *.exe ) do @if /i not "%%i"=="flash64w.exe" (set FlashBin=%%~fi&set FlashLog=%%~ni.txt)
if not defined FlashBin exit 1
if not defined Flashlog exit 1
:::::::
echo Run "%~dps0\Flash64W.exe" /b="%FLashBin%" /s /f /l="%_SMSTSLogPath%\%FlashLog%"
"%~dps0\Flash64W.exe" /b="%FLashBin%" /s /f /l="%_SMSTSLogPath%\%FlashLog%"
:::::::
echo Finished: %ErrorLevel%
if errorlevel 3 exit %ErrorLevel%
if errorlevel 2 exit 0
if errorlevel 1 exit 1
exit 0
This is a great way to manage drivers, Mike. Our team has been using it for about 5 months now. Are there ways to log the installs? I assume not easily.
Thanks for the feedback and I am glad it is working out for you. The smsts.log should pick up the output from dism for the new computer scenario. As for the IPU, that would be in the panther logs.
Good stuff, did find one tiny issue though; OSDDownloadContinueDownloadOnError should be set as true/false… 1/0 didn’t work for me. I also combined the 3 steps into 1 with a Run Command Line step like: powershell.exe -executionpolicy bypass -nologo -noprofile -noninteractive -command “& {$tse=New-Object -COMObject Microsoft.SMS.TSEnvironment; ; $tse.Value(‘OSDDownloadContinueDownloadOnError’)=’true’; $tse.Value(‘OSDDownloadDestinationLocationType’)=’TSCache’; $tse.Value(‘OSDDownloadDownloadPackages’)=’%DRIVERPackage%’; iex ‘OSDDownloadContent.exe’; $ec=$LastExitCode; $tse.Value(‘OSDDownloadDestinationLocationType’)=”; $tse.Value(‘OSDDownloadDownloadPackages’)=”; exit $ec;}”
Strange about the 1/0-True/False. When I dump the variables/values during a running Download Package Content I see the value as 1 or 0. Neat tip for combining 3 steps into 1. How much information do you get in the smsts.log and status message? Is it enough to figure out what went wrong if there is an issue?
What if you want to provide a vendor, Dell, your image? They will not have access to your MDT DB, so they wouldn’t be able to use Standalone Task Sequence media.
/BG
You would need to continue to directly reference each driver package (and all packages for that matter).
Dell offer a Connected Config solution which involves adding a DP in their factory. This would allow access to the MDT DB.
Pingback: SCCM Information – Computer WorkShop CT
Hi Mike, is there a OSDDownloadDownloadPackageVersion or something similar for Package version?
Nope, but I have a UserVoice item that could use some love: https://configurationmanager.uservoice.com/forums/300492-ideas/suggestions/32759620-download-package-content-dynamic-option
Pingback: Driver Pack Mapping and Pre-Cache – GARYTOWN ConfigMgr Blog