As I was preparing for my Midwest Management Summit 2017 session, Building the Ultimate Windows 10 UEFI Task Sequence, I did a full end-to-end run of the In-place Upgrade Task Sequence and started running into issues. This led me to discover a couple of issues around Configuration Manager (specifically the Format and Partition Disk step) and Windows 10 Recovery partitions. The version of this Task Sequence flips the machine from BIOS to UEFI using the new MBR2GPT utility. The high-level process goes something like this:
1. Deploy TS to current OS (can be Win7/8/8.1/10) running in Legacy BIOS mode
2. In-place Upgrade to Windows 10 (still in Legacy BIOS after upgrade)
3. Once upgrade is done, reboot into WinPE 1703
4. Run MBR2GPT (supported and recommend method is to run in this version of WinPE)
5. Flip firmware settings (if successful)
6. Reboot to Windows 10 running UEFI
Only one little problem, MBR2GPT was not able to convert the disk (and I even managed to make it crash, but that is another story). After inspecting the disk layout, I noticed that there were 4 partitions (MBR2GPT can only work with 3 or less since it needs to create the EFI partition). After further investigation, it appeared that there were now two Recovery partitions (which seemed a bit odd):

The test system was first built from the following Configuration Manager Windows 7 OSD Task Sequence:

The problem is with the highlighted Partition Disk 0 – BIOS step. Behind the scenes, it creates a diskpart answer file that it uses to partition and format the disk. The Recovery partition is getting set to type 7 instead of type 27 (hidden). When the Windows 10 Setup runs, it does not recognize (or use) the Recovery partition that was created by Configuration Manager and proceeds to create a proper 450 MB hidden Recovery partition after the Windows partition. This is why the system is ending up with four partitions. Even if the Recovery partition that Configuration Manager created was the correct type, it would need to have a certain amount of free space based on its size in order for the Windows 10 Setup to be able to use it (see BIOS/MBR-based hard drive partitions for details on the Recovery tools partition sizes). During the upgrade, what should happen is setup should either resize the existing partition or create a new one if needed (see /ResizeRecoveryPartition switch description from the Windows Setup Command-Line Options). In my testing, it never attempted to resize the partition and always created another Recovery partition after the Windows partition. This is still bad because we end up with 4 partitions and that does not work well for MBR2GPT.
Luckily, there are a few things that can be done to avoid both of these issues. When creating partitions for BIOS based systems, I still like to use the built-in Format and Partition Disk step for creating the System Reserved and the Windows partitions. The reason for this is that I can assign the Windows partition to an OSD variable (which can be useful later on in the Task Sequence). For the Recovery partition, I create this right after the Format and Partition Disk step using a diskpart script in a Package. Now this is what my Format and Partition Disk step looks like for BIOS systems:
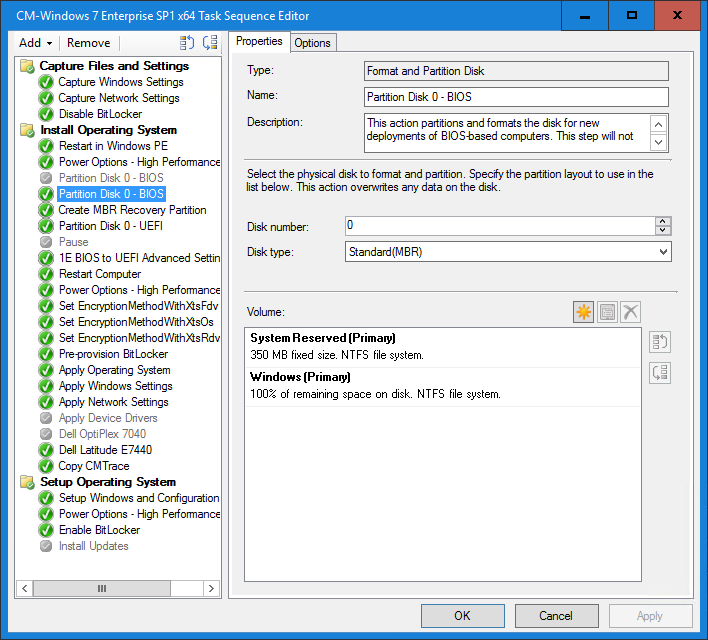

On the Windows partition, I now set this to 100% of the remaining space on the disk and notice that OSDisk variable that gets assigned for later use. By leaving this to 99%, this leaves a lot of space for the recovery partition on really large disks when we only need about 499 MB. This Task Sequence step directly after this is a Run Command Line step that calls diskpart with an answer file (with the same conditions as the Format and Partition Disk step).
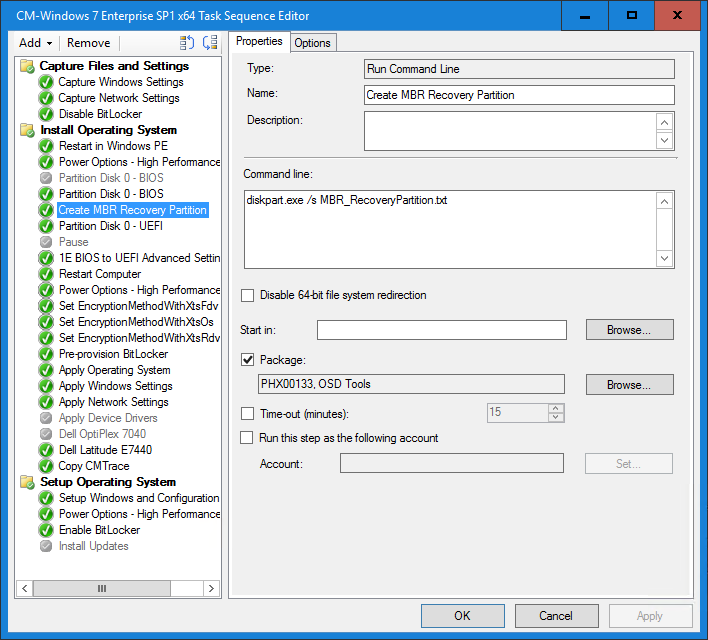
NOTE: this is statically set to Disk 0 (like the Format and Partition Disk step). If you have systems that the OS disk is showing up on Disk 1, then be sure to create multiple steps with conditions.
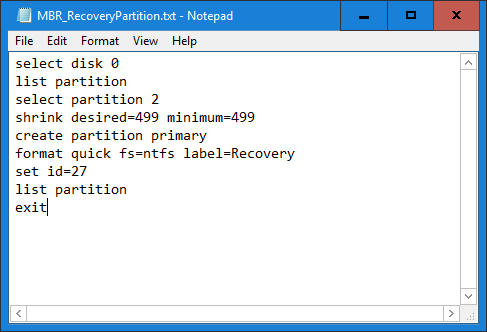
After selecting the disk number in my MBR_RecoveryPartition.txt file, the first thing I do is select the Windows partition (#2) and shrink it by 499 MB (to keep within the Recovery Partition parameters). Then simply create a new partition with the remaining space, format it and then set the partition type to 27 (hidden). I list the partition information before and after the commands so that the information gets picked up in the logs and status messages. Using this method, we now have a 499 MB hidden Recovery partition.
Windows 10 In-Place Upgrade
If we just leave this as-is, then chances are the Windows 10 Setup will still create another recovery partition (which is not what we want to happen). Since the previous Windows recovery partition will be replaced, we can create a step right before the Upgrade Operating System step that cleans the Recovery partition. This way, the Windows 10 Setup will use it since there is enough free disk space on that partition (which is exactly what we want so that MBR2GPT will run). This is also Run Command Line step that calls diskpart with an answer file.


NOTE: this is also statically set to Disk 0. If you have systems that the OS disk is showing up on Disk 1, then be sure to create multiple steps with conditions. In addition, only target systems where the third partition is the recovery partition or put a condition on this step that checks for a recovery partition. All data on this partition will be lost after this step executes.
When formatting this partition, the partition type gets reset to 7. The above diskpart script resets the partition type back to 27 (hidden) after the format. Windows 10 Setup will now use the third partition as the recovery partition and after the upgrade there will only be three partitions. This will now allow MBR2GPT to run correctly after the upgrade so that BIOS to UEFI can be done as part of the in-place upgrade to Windows 10.
Originally posted on https://miketerrill.net/

Pingback: Windows 10 BIOS to UEFI In-place Upgrade Task Sequence using MBR2GPT | Mike's Tech Blog
Pingback: OSD Partition Setup, Mike Terrill Edition (The Optimized Way). – GARYTOWN ConfigMgr Blog
Pingback: MEMCM OSD | Disk Partitioning to Correctly Include Recovery Tools Partition | Conway's IT Blog