In this blog post, I am going to show some simple steps that you can add to your Task Sequences to be able to detect, disable, and enable BitLocker status. This can be useful (and necessary) when performing activities like flashing the BIOS, running the new MBR2GPT utility, or upgrading to a newer version of Windows. In Configuration Manager, there are a few Task Sequence steps that are for BitLocker configuration and management:
Disable BitLocker – this step will disable BitLocker encryption on the current operating system drive or one that you specify and runs in a full operating system (does not run in WinPE). It does not decrypt the drive, but it does leave the key protectors visible in clear text on the hard drive. This step only disables BitLocker for one reboot (if you would like to see this step updated, vote for my Configuration Manager Uservoice item Add Reboot Count functionality to the Disable BitLocker TS Step). This means that BitLocker will be enabled again after the restart. If you need BitLocker to be disabled for more than one restart, then you can use manage-bde with a Run Command Line step (see below). Also, if there are data drives encrypted, then they need to be disabled before disabling the operating system drive.
Note: before running MBR2GPT, BitLocker should be disabled. Also, for just a Windows 10 In-place Upgrade with BitLocker (not doing MBR2GPT), it is not required to disable BitLocker, however, there have been reports of BitLocker not being suspended long enough during the upgrade (see the link to Jonathan Conway’s blog below) .
Enable BitLocker – this step will enable BitLocker encryption on a drive. It only runs in a full operating system (in other words, it does not run in WinPE). If selected for use, the TPM must already be enabled, activated, and allow ownership prior to running this step. This step can be used to re-enable BitLocker if the drive is already encrypted with BitLocker but in a disabled state.

Pre-provision BitLocker – this step runs under WinPE (only) and is used to enable BitLocker during the WinPE phase of the Task Sequence. It also encrypts the used drive space, which makes encryption times faster. Once in the full operating system, use the Enable BitLocker step to apply the key management options. This step is generally be used in New Computer or Wipe-and-Load Task Sequences.

Manage-bde – this is a built in command line tool that allows for the enabling, disabling, updating and reporting on BitLocker. The Microsoft TechNet documentation on Manage-bde is a bit stale and has not been updated to reflect some of the new capabilities that have been added in the newer releases. The most important one is the ability to control the reboot count when the protectors have been suspended. There is a new parameter called -RebootCount or -rc that takes a value between 0 and 15, where 0 suspends the protection indefinitely. This can be useful if you have several reboots during a Task Sequence and you need to make sure that BitLocker stays suspended (optional method listed below).

Note: Jonathan Conway has a great blog on how to use Manage-bde with the Task Sequence called SCCM Windows 10 Upgrade Task Sequence: BitLocker PIN Protector Issues on Laptops.
Now, to disable BitLocker, you could place that step in the Task Sequence and allow it to ‘Continue on error’. If you like to only use ‘Continue on error’ in certain cases and definitely want to know if BitLocker was enabled (so that you can conditionally re-enable it later on in the Task Sequence), then this can easily be done with a Set Task Sequence Variable step. Create a new Group called Disable BitLocker and on the Options tab add the following:
Task Sequence Variable _SMSTSinWinPE equals “False”


Place a Set Task Sequence Variable step in the Disable BitLocker Group and call it Set OSDBitLockerStatus for the name. Enter OSDBitLockerStatus for the Task Sequence Variable and enter Protected for the Value.
On the Options tab, add the following:
WMI Namespace: root\cimv2\Security\MicrosoftVolumeEncryption
WMI Query: select * from win32_encryptablevolume where driveletter = ‘c:’ and protectionstatus = ‘1’


This will check the BitLocker status on the C: drive (which is hopefully the OS drive). Keep in mind that if there are other data volumes that are BitLocker encrypted, these will need to be detected and decrypted first. Those systems can be filtered out in the collection targeting or it can be built into the Task Sequence using the same logic as above.
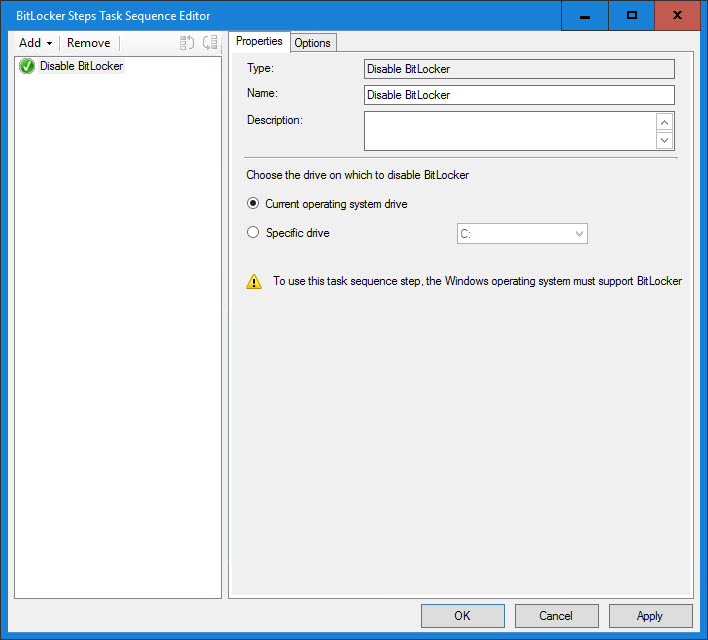
Next, add a Disable BitLocker step (with the option set Current operating system drive).
On the Options tab, add the following:
Task Sequence Variable OSDBitLockerStatus equals “Protected”


Optionally (recommended if needing multiple reboots), instead of using the built in Disable BitLocker step, add a Run Command Line step:
Name: Disable BitLocker
Command line: manage-bde -protectors -disable C: -RC 0
On the Options tab, add the following:
Task Sequence Variable OSDBitLockerStatus equals “Protected”


To re-enable BitLocker later on in the Task Sequence, create another group called Re-enable BitLocker.
On the Options tab, add the following:
Task Sequence Variable _SMSTSinWinPE equals “False”
Task Sequence Variable OSDBitLockerStatus equals “Protected”


Next, add an Enable BitLocker step under the Re-enable BitLocker Group (with the option set Current operating system drive). Since the drive is already encrypted, this step will just re-enable the key protectors if they are currently disabled (like if you used managed-bde and specified a reboot count).

Remember that the built in Disable BitLocker step will only disable BitLocker for one reboot (similar to what happens when you suspend BitLocker from the Control Panel applet), but if you used manage-bde with -RC 0, you will need to re-enable BitLocker.
Keep this Task Sequence template handy so that you can easily copy and paste into other Task Sequences in the future. I will be referring to this template in upcoming blog posts.
Originally posted on https://miketerrill.net/

Pingback: Upgrading the BIOS Part 2 | Mike's Tech Blog
Pingback: Windows 10 BIOS to UEFI In-place Upgrade Task Sequence using MBR2GPT | Mike's Tech Blog
I’ve come through to this blog from your BIOS to UEFI inplace upgrade blog. The Set OSDBitLockerStatus step fails for me, when testing the query in the task sequence editor it comes back as access denied. When running the actual task sequence it fails at that step. Is there another mechanism for detecting whether bitlocker is enabled?
root\cimv2\Security\MicrosoftVolumeEncryption is a secured namespace so it can only be viewed elevated. If testing from the admin console, you will need to launch the console as administrator in order to be able to use the Test Query feature.
Thank you
If SCCM wasn’t an option, what is recommended for the management side of things with BitLocker
Depends on the level of control – they are starting to incorporate more BitLocker functionality in Azure connected devices but that will require the latest versions of Windows 10.
Thanks for a great post, the bit on detecting Bitlocker during a Task Sequence to selectively skip the related steps is exactly what I was looking for.
I did run into one issue, the wmi query for the Set OSDBitlockerStatus did not work for me as written above. I had to change it slightly, removing spaces around the equals signs:
select * from win32_encryptablevolume WHERE driveletter=’c:’ and protectionstatus=’1′
Thanks again!
Thanks for this blog post Mike. I wish they would at least change the wording to Suspend Bitlocker instead of Disable. That would have saved me some time in my TS.
Reblogged this on system center experts.
Great post, though I have a question. I’m using the multiple reboot Suspend/Disable step, then changing a bunch of BIOS settings (enable VTx, etc.). After that I boot to PE and do MBR2GPT, immediately followed by a step to convert Legacy to UEFI boot(using a 1E plug in). After it reboots into the OS it is unable to enable BitLocker again. I’ve tried using the step you have above, Manage-bde -protectors -enable C: , and even manually doing it from Control Panel. All fail with 80070002 (cannot find the file specified). Note: all above steps work on a machine built from scratch, though in that scenario I turn on BitLocker after the BIOS to UEFI conversion.
Any advice?
You need to delete the protectors and recreate them once the system is UEFI. Depending on the encryption algorithm you are using, you might be better off decrypting and encrypting with a newer encryption algorithm. Check this blog for more details on the different types: https://blogs.technet.microsoft.com/dubaisec/2016/03/04/bitlocker-aes-xts-new-encryption-type/
-Mike
Hi Mike
On the re-enable bitlocker step, the condition for OSDBitLockerStatus equals protected. In my test this does not re-enable BitLocker as it says the condition is FALSE, which is correct as I disabled BitLocker earlier in the TS.
Am I missing something here? I’ve added this into the Post Processing group in an IPU TS. So when In Place is finished BitLocker is still suspended.
I set the OSDBitLockerStatus at the beginning so that the same sequence can be used on systems with and without BitLocker. That way, on the flip side, we know what the starting state was and what actions need to be performed. In other words when starting if the system had BitLocker enabled, then re-enable BitLocker. Otherwise do nothing since BitLocker wasn’t enabled at the start. Hopefully that makes sense.
So after reading over what I just posted, I can tell you the DRA is not getting applied b/c the “unique identifier” setting is not getting applied from the GPO that we have linked to the OU.
According to the online help for this setting:
Computer Config > Policies > Administrative Templates > Windows Components > BitLocker Drive Encryption > “Provide the unique identifiers for your organization”
Identification fields are required for management of certificate-based data recovery agents on BitLocker-protected drives. BitLocker will only manage and update certificate-based data recovery agents when the identification field is present on a drive and is identical to the value configured on the computer. The identification field can be any value of 260 characters or fewer.
The status for the “no DRA” computer shows the identification field is “unknown” :
Size: 231.97 GB
BitLocker Version: 2.0
Conversion Status: Used Space Only Encrypted
Percentage Encrypted: 100.0%
Encryption Method: XTS-AES 128
Protection Status: Protection On
Lock Status: Unlocked
Identification Field: Unknown
Key Protectors:
Numerical Password
TPM
So now my question if I have confirmed the GPO with the setting is linked to the correct OU, and gpresult shows it “should” be applied, why would this setting be missing?
Honestly I am not sure. Have you solved it or opened up a case with Microsoft support yet?
The “manage-bde.exe -sI c:” command would not work during the deploy b/c the computer based group policies hadn’t really been applied yet. It might sound crazy, but what we did was add a Group Policy setting to our BitLocker GPO to create a Scheduled Task that runs the manage-bde command “immediately, one time” on next start up.
No matter what syntax I try, I get an error when trying to run “manage-bde.exe -SetIdentifier c:” as a Command Line task to populate the volume identifier as set by my GPO.
If I pause my TS and run the command by hand in a command prompt, I see
ERROR: An error occurred code 0x80070490):
Element not found.
Other manage-bde commands work (-status, -protectors get).
Just in case anyone else runs into this cut-n-paste issue, when you copy the WMI Query: above you’ll need to fix the right and left single quotes above around the C: and 1 values with single quotes. Otherwise you’ll get a 80041017 error when the WMI Query fails. Another poster above mentioned they had to remove spaces but that’s not the issue and I suspect that when they did that they retyped the quotes at the same time and thought the spaces were the issue. Also note that unlike many WMI Queries the TS Editors “Test query” button won’t work because it requires elevated rights. If the fix above is made it will run in the TS since they always run with elevated rights.
Yep – always be careful when copying and pasting, especially quotes. 😉