4/12/2020
[Download exported Configuration Baseline and Configuration Items here. This includes the CIs from Part 2 and Part 3.]
In Configuring WoL with Configuration Manager – Part 1, I covered the settings that are required to enable Wake-On-LAN that are not hardware manufacturer specific. In Part 2, I am going to go over the BIOS (UEFI) specific settings for current model HP desktops. There are multiple ways to configure BIOS settings on HP desktops and laptops. HP provides the BIOS Configuration Utility, which is a command line utility that can be used to get and set BIOS settings and can even be used to set multiple settings using an answer file. HP also provides the HP Client Management Script Library (CMSL), which is a collection of PowerShell functions that not only allow managing BIOS settings, but can also be used to download driver and firmware updates. Another method for managing HP systems is by using the HP Manageability Integration Kit (HP MIK). The HP MIK is a client management console extension for Microsoft Endpoint Manager Configuration Manager (MEMCM – previously called System Center Configuration Manager). However, my favorite way to get and set BIOS settings is just doing it directly with WMI (via PowerShell), as this does not require any additional dependencies and can be done in Windows 10 or WinPE.
For configuring the HP desktop WoL settings, I will be using Configuration Manager Configuration Items (CIs) that are deployed via a Configuration Baseline. CIs can not only be used to report on settings, they can also be used to enforce settings and manage drift. Unlike GPOs, reporting is natively built in to Configuration Manager, which makes compliance reporting really easy.
The current HP desktop models have two BIOS settings that need to be configured in order to perform successful WoL – “Wake On LAN” and “S5 Maximum Power Savings“. If power utilization is not a concern and you want to add a little more redundancy to systems that should always stay up, there are a few other settings that are of interest. The first one is what the system should do in the event of a power loss and is called “After Power Loss“. The other settings have to do with the capability of enabling a power on event and can power on a system at a pre-determined hour, minute and day. These settings are: “BIOS Power-On Hour“, “BIOS Power-On Minute“, “Sunday“, “Monday“, “Tuesday“, “Wednesday“, “Thursday“, “Friday“, and “Saturday“.
The following chart summarizes the settings, the values that I am going configure, and the possible values. These settings will enable WoL (to boot to the hard drive), disable S5 Maximum Power Savings (which if enabled will prevent WoL from being successful), always turn the system back on after a power loss, and enable the system to power up every day at 4:44 AM:
| Setting | Value | Possible Values |
| Wake On LAN | Boot to Hard Drive | Disabled, Boot to Network, Boot to Hard Drive, Boot to Normal Boot Order |
| S5 Maximum Power Savings | Disable | Disable, Enable |
| After Power Loss | Power On | Power Off, Power On, Previous State |
| BIOS Power-On Hour | 4 | 0-23 |
| BIOS Power-On Minute | 44 | 0-59 |
| Sunday | Enable | Disable, Enable |
| Monday | Enable | Disable, Enable |
| Tuesday | Enable | Disable, Enable |
| Wednesday | Enable | Disable, Enable |
| Thursday | Enable | Disable, Enable |
| Friday | Enable | Disable, Enable |
| Saturday | Enable | Disable, Enable |
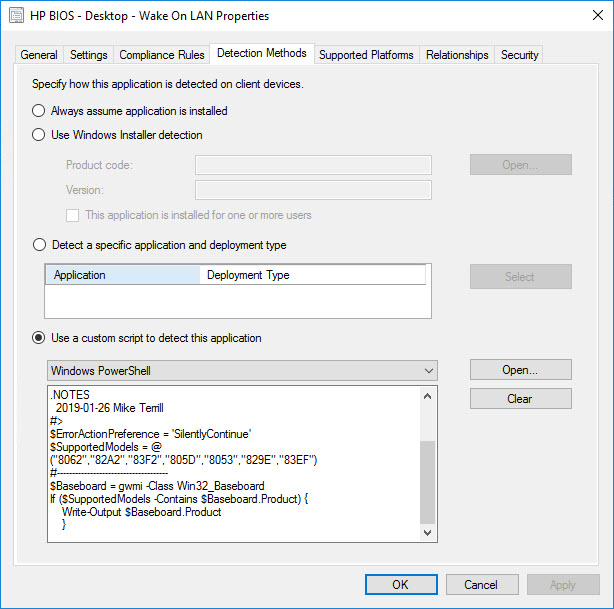
As mentioned above, I like configuring BIOS settings using CIs. When creating a CI that may or may not be applicable to other systems, it is a good idea to create an Application type CI (instead of an Operating System type CI). This way detection logic can be applied to see if the CI should or should not be evaluated on a system. For BIOS settings, I like to limit my CIs to the hardware models that I have certified and tested that it actually works. For HP models, I use the Win32_Baseboard Product identifier. The custom script for the HP desktop detection logic is the following:
<# .SYNOPSIS Detects supported HP Models .DESCRIPTION For Detection Logic for a Configuration Item .NOTES 2019-01-26 Mike Terrill #>
$ErrorActionPreference = 'SilentlyContinue'
$SupportedModels = @("8062","82A2","83F2","805D","8053","829E","83EF")
#-------------------------------------
$Baseboard = gwmi -Class Win32_Baseboard
If ($SupportedModels -Contains $Baseboard.Product) {
    Write-Output $Baseboard.Product
    }
This corresponds to the following HP desktop models: HP ProDesk 400 G3(8062)/G4(82A2)/G5(83F2),600 G2(805D/8053), 600 G3(829E), 600 G4(83EF). NOTE: Add your own models here in each of the CI Detection Methods.
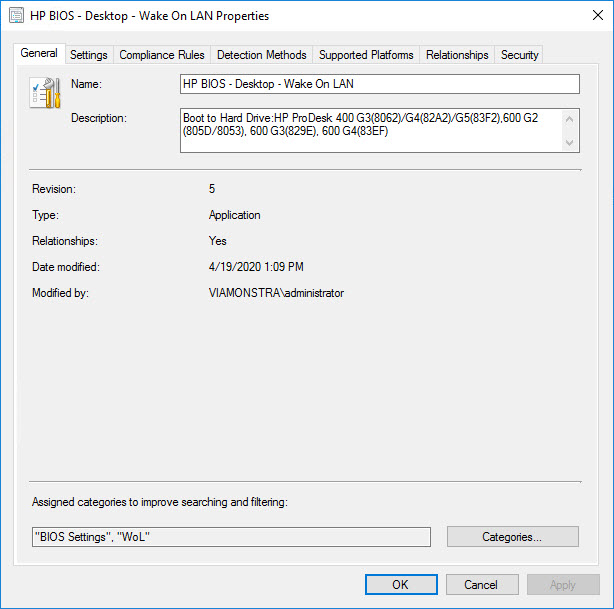
For the CI Name and CI Setting Name, I like to use the following naming structure for easy identification and purpose:
{Manufacturer} BIOS – {Laptop/Desktop/All} – {BIOS Setting Name}
So for the HP Desktop WoL setting would look like the following:
HP BIOS – Desktop – Wake On LAN
For the CI Description, I like to include the desired setting value and the models that are supported. For the HP Desktop WoL setting I have the following:
Boot to Hard Drive:HP ProDesk 400 G3(8062)/G4(82A2)/G5(83F2),600 G2(805D/8053), 600 G3(829E), 600 G4(83EF)
I also like to use categories for easy searching/filtering and use “BIOS Settings” and “WoL” for this CI. The CI General tab looks like the following:
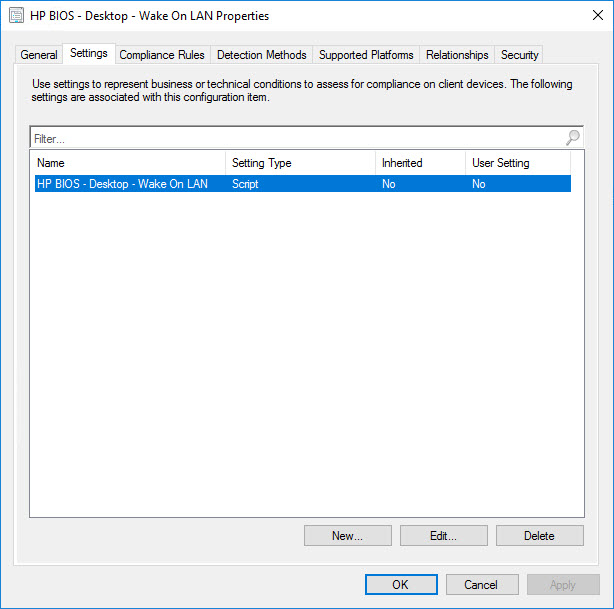
CI Setting Name is the same:
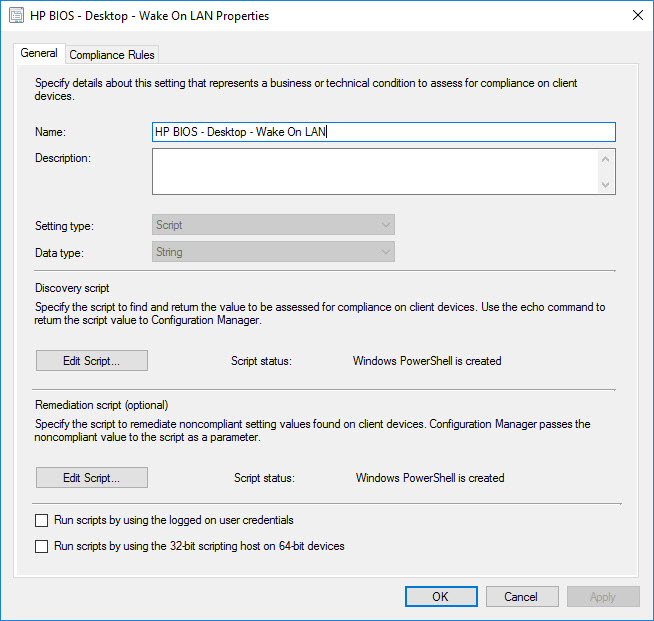
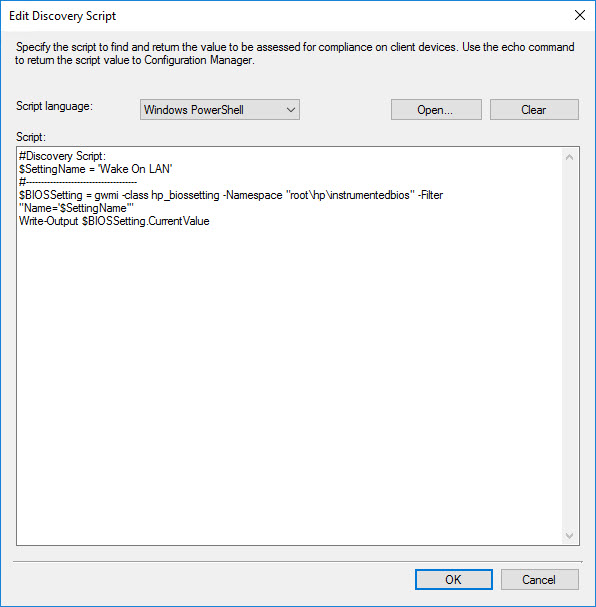
I also like to keep the Discovery Script modular so that it is easy to re-use for multiple BIOS settings. By keeping the Setting name at the top of the script, that is the only thing that needs to be changed for creating Discovery Scripts for other BIOS settings. For HP Desktop WoL the discovery script would be the following:
#Discovery Script:
$SettingName = 'Wake On LAN'
#-------------------------------------
$BIOSSetting = gwmi -class hp_biossetting -Namespace "root\hp\instrumentedbios" -Filter "Name='$SettingName'"
Write-Output $BIOSSetting.CurrentValue
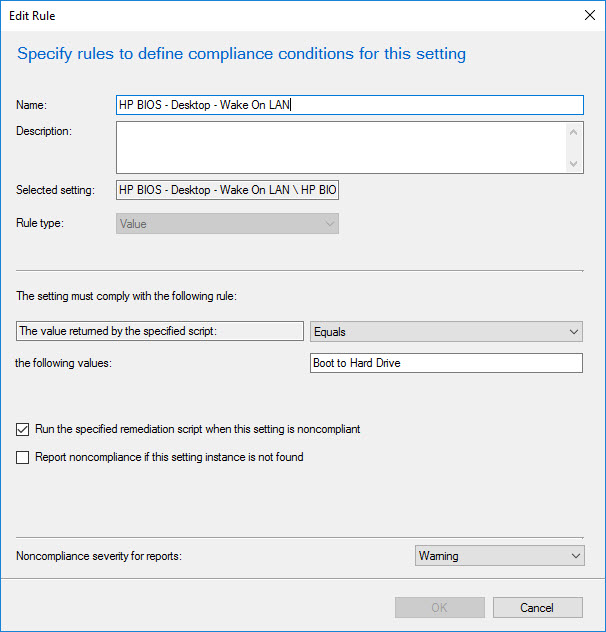
The Compliance Rule will be a string value that should be compared to the desired setting. In this case, I want this setting to be equal to “Boot to Hard Drive” and I want to run the remediation script when the setting is non-compliant. NOTE: In order for the “Run the specified remediation script when this setting is noncompliant” to be visible, there needs to be a remediation script defined which is below.
Like the modular Discovery Script, I also like to keep the Remediation Script modular so that it is easy to re-use for multiple BIOS settings. By keeping the Setting name, setting value and BIOS password at the top of the script, that is the only thing that needs to be changed for creating Remediation Scripts for other BIOS settings. For HP Desktop WoL the remediation script would be the following:
#Remediation Script:
$SettingName = 'Wake On LAN'
$Value = 'Boot to Hard Drive' #Disabled,Boot to Network,Boot to Hard Drive,Boot to Normal Boot Order
$BIOSPW = 'Password1'
#-------------------------------------
$BIOS= gwmi -class hp_biossettinginterface -Namespace "root\hp\instrumentedbios"
$BIOSSetting = gwmi -class hp_biossetting -Namespace "root\hp\instrumentedbios"
If (($BIOSSetting | ?{ $_.Name -eq 'Setup Password' }).IsSet -eq 0)
{
    $Result = $BIOS.SetBIOSSetting($SettingName,$Value)
}
elseif (($BIOSSetting | ?{ $_.Name -eq 'Setup Password' }).IsSet -eq 1)
{
    $PW = "<utf-16/>$BIOSPW"
    $Result = $BIOS.SetBIOSSetting($SettingName,$Value,$PW)
}

Exit $Result.Return

In order to change a BIOS setting, a BIOS password is required if one is set. Above is one method for a single static BIOS password. If you have multiple static BIOS passwords or dynamic BIOS Passwords, then more would need to be done in order to determine the correct BIOS password to use. This approach is more secure than using the BIOS Configuration Utility and the password bin file (because getting the password bin file is like having the password. Plus the password bin file is easy to crack if you really did need to get the password). If CM is secured properly (which it should be, otherwise you have more important things to worry about), then only the CM admin (or admins) that are scoped to manage CIs will be able to read these directly in the console. Getting the password from the Management Point is probably not impossible, but it would require a bit of work and some luck. As for the client, I have yet been able to find it. However, if there is a way to easily grab this information, please reach out to me and let me know via the comments below or a DM on Twitter.
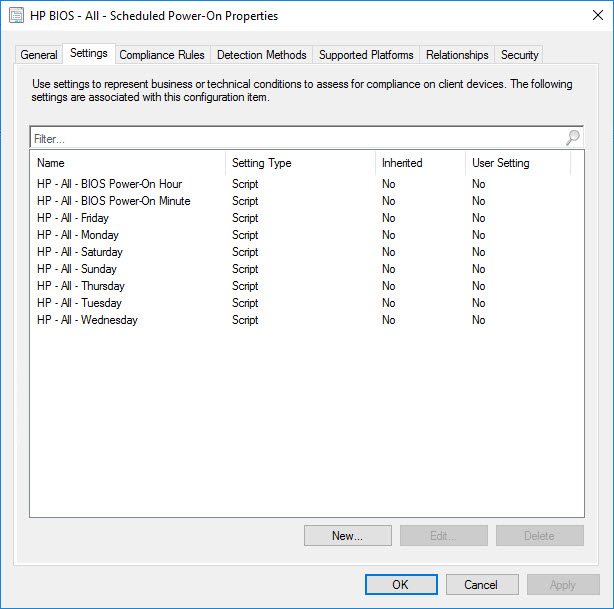
The other settings, S5 Maximum Power Savings and After Power Loss, follow the same approach. For the daily Power-On, I combine each setting in the same CI and it will look like the following:
Lastly, we need to create a Configuration Baseline. I like to use a similar naming structure for easy identification and purpose:
BIOS Settings – {Purpose} – {Intended Platform} {Prod/Pre-Prod}
So for these WoL settings I use the following:
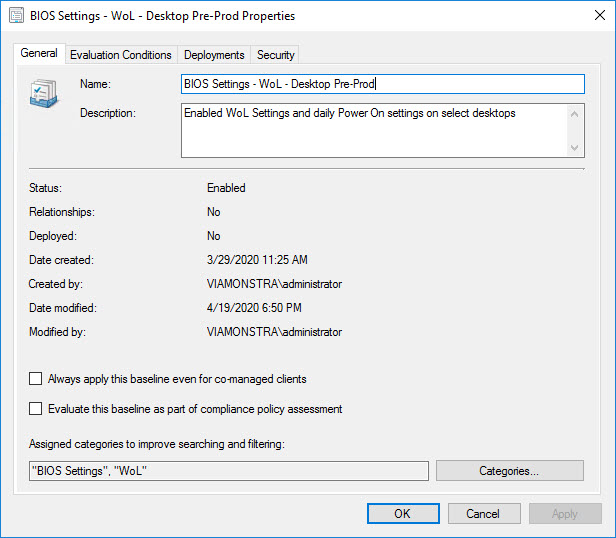
BIOS Settings – WoL – Desktop Pre-Prod
I like to duplicate Baselines (and even some CIs) into a production and pre-production. That way it is easy to test and make changes once it is already rolled out to production.
For the Baseline Description, I like to include a brief description for the Baseline. For this Baseline, I use the following:
Enabled WoL Settings and daily Power On settings on select desktops
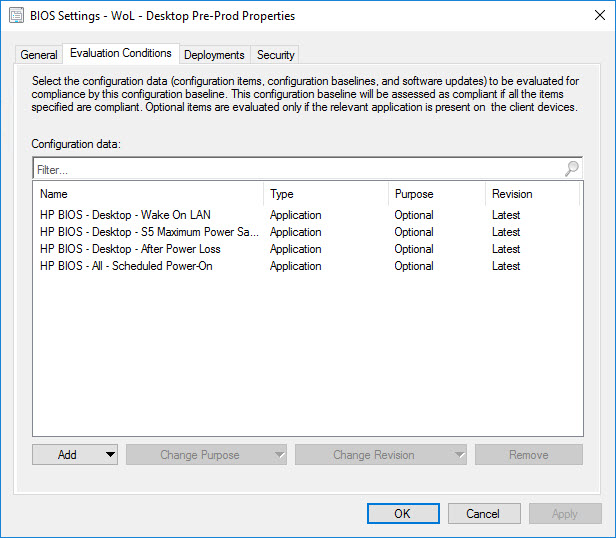
Just like the CI, I also like to use categories for easy searching/filtering and use “BIOS Settings” and “WoL” for this Baseline. The Baseline General tab looks like the following:
Since all Settings might not apply to all targeted systems, it is very important to change the “Purpose” from “Required” (default) to “Optional”. Otherwise, systems that are not applicable will show up as non-compliant.
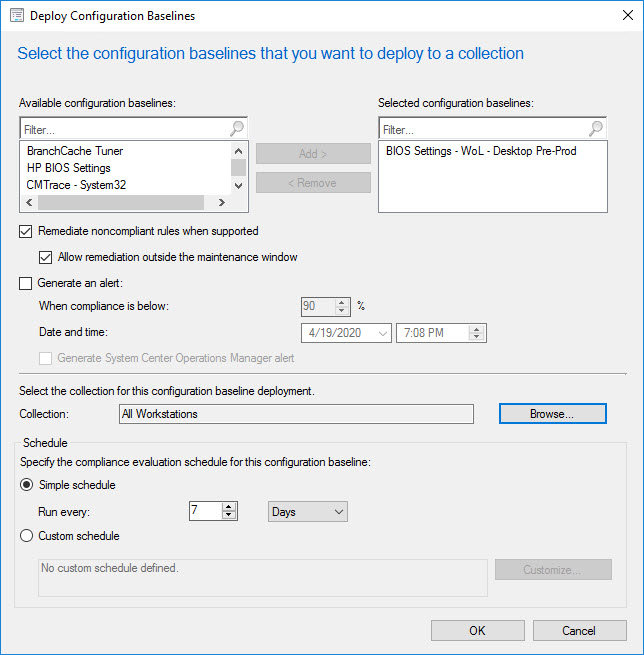
This Configuration Baseline can now be deployed to a target collection. Be sure to enable “Remediate noncompliant rules when supported” (and “Allow remediation outside of maintenance window” if desired).
If you have made it all the way to the bottom of this post, thanks for reading and congratulations! Hopefully this helps you to configure your systems for Wake-On-LAN so that they can be woken up and/or kept powered on during this time when there is a push to get more people to work from home. It will also help with other deployments, upgrades and patching as well. Now scroll back up to the top and download the provided Configuration Baseline and Configuration Items, modify them for your HP models and test it out in your environment. In Part 3, I cover the BIOS/UEFI specific settings for current model Dell desktops.
Originally posted on https://miketerrill.net/

Pingback: Configuring WoL with Configuration Manager – Part 1 | Mike's Tech Blog
Pingback: Configuring WoL with CM for Dell Desktops – Part 3 | Mike's Tech Blog
Hi Mike, this is absolutely brilliant and saved me so much time. Thank you very much for documenting this.
Pingback: HP WiFi BIOS Profiles – Auto Populate via ConfigMgr or Intune – GARYTOWN ConfigMgr Blog