If you are using the full Win10 media to perform OS upgrades (like using a Configuration Manager Task Sequence), then you are going to want to put the install.wim on a diet. In addition, if you are servicing your WIM with the latest patches, you want to make sure that you are doing it in a way that does not bloat the WIM. My colleagues and I have played with various ways to optimize the WIM size so that we could keep it current and also keep upgrade times to a minimum. In the past at MMSMOA and on Twitter, I have presented the follow graphic on what happens to the WIM size if you ‘stack’ CUs:
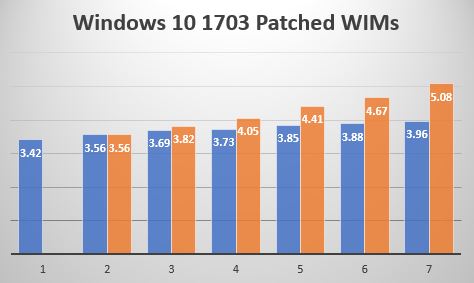
The first blue bar represents the original Windows 10 1703 x64 install.wim. The subsequent blue bars represent applying the latest CU to the original install.wim. The orange bars represent stacking the CUs, so it would be install.wim + CU1 + CU2 + CU3 + CU4 + CU5 + CU6. As you can see, the WIM size grows an extra 1.12 GB larger when it is done this way. The lesson learned here is do not stack CUs and always apply the latest CU to the latest available install.wim. By the way, unless you are replacing the install.wim in the source directory of your OS Upgrade package each month, the Servicing option in Configuration Manager will end up stacking CUs since it will start from the previously serviced WIM (oh – and it will want to patch multiple indexes if those exist making the process take forever).
That analysis was done on Windows 10 1703, however, things changed a bit with the 1709 release. Someone at Microsoft got lazy and thought it would be a great idea to put not 2, not 3, but 6 indexes in the 1709 WIM.

You are probably think – ‘yeah, but WIMs are single instance so it shouldn’t make that much of a difference’. WRONG! What you want to do (unless of course you are deploying all of those other releases) is export the index you need (in our case Enterprise).
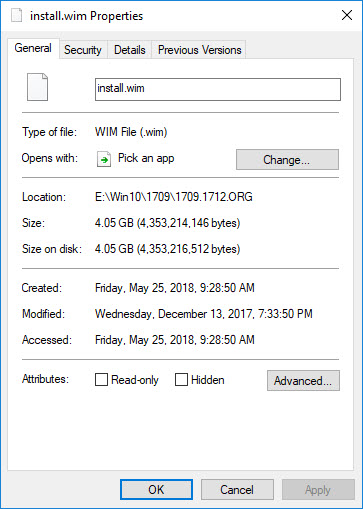
Starting with the install.wim from the ISO en_windows_10_multi-edition_vl_version_1709_updated_dec_2017_x64_dvd_100406172.iso (remember – you want to start with the latest available media from Microsoft), we see that the size is 4.05 GB
Now, export index 3 to a new WIM in folder 1709.1712.ORG.1
dism /export-image /sourceimagefile:e:\win10\1709\1709.1712.ORG\install.wim /sourceindex:3 /destinationimagefile:e:\win10\1709\1709.1712.ORG.1\install.wim
And notice the size of the WIM is now 3.63 GB (a 0.42 GB savings).

Now I have read some other blogs recently that follow a very similar procedure as below, but they all are missing one critical step – adding in .NET. Now you are wondering ‘why add .NET?’. The ultimate goal is to NOT have to apply the CU after the OS Upgrade. If you upgrade a system running 1607 that has .NET installed with a 1709 WIM with the latest CU but without .NET, guess what happens? On the first scan the system will want to download the latest CU and apply it turning our 60 – 120 minute upgrade into a 120 – 240 minute upgrade. Props to my colleague Jeff Carreon for discovering this last summer (2017). So we have been adding .NET as a base standard to all of our WIMs since then to prevent this from happening.
Adding .NET is simple. I like to copy the install.wim out to a Temp directory and then re-export the WIM each time (Sorry – I don’t have this scripted yet but the first part is a one time process to get to the WIM that we will use each month).
Copy install.wim from 1709.1712.ORG.1 to Temp
Add .NET
dism /mount-image /imagefile:e:\win10\1709\Temp\install.wim /index:1 /mountdir:e:\win10\1709\mount
dism /image:e:\win10\1709\mount /enable-feature /featurename:NetFx3 /All /LimitAccess /Source:g:\sources\sxs
dism /commit-image /mountdir:e:\win10\1709\mount
dism /image:e:\win10\1709\mount /get-features /format:table
dism /unmount-image /mountdir:e:\win10\1709\mount /commit
Notice the size of the WIM is now 3.79 GB.
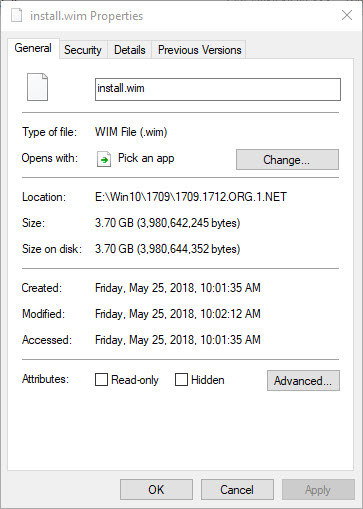
Export index 1 to a new WIM in folder 1709.1712.ORG.1.NET
dism /export-image /sourceimagefile:e:\win10\1709\Temp\install.wim /sourceindex:1 /destinationimagefile:e:\win10\1709\1709.1712.ORG.1.NET\install.wim
Now the size of the WIM is 3.70 GB (0.09 GB less).
 This is your new install.wim starting point until Microsoft releases an updated media ISO.
We service our WIM on the third Tuesday of the month. This gives one week to discover any issues with the released patches (not like that has ever happened) before making a change to our production WIM.
May 2018 Servicing:
The first patch that we apply to the WIM is the latest Servicing Stack Update. It is not only important to do this, it is critical that you do it if you want your WIM to work correctly. Also, pay attention to the fine print on the KB articles for the CUs and you will likely see something like this at the bottom:

Again, copy the install.wim from 1709.1712.ORG.1.NET to Temp and mount the WIM:
dism /mount-image /imagefile:e:\win10\1709\Temp\install.wim /index:1 /mountdir:e:\win10\1709\mount
Add in May Servicing Stack KB4132650.
dism /image:e:\win10\1709\mount /add-package /packagepath:e:\win10\1709\temp\windows10.0-kb4132650-x64_80c6e23ef266c2848e69946133cc800a5ab9d6b3.msu
The next patch that we apply is the one for Adobe Flash Player. The latest available in May was KB4093110 (however, check for a new one each time).
dism /image:e:\win10\1709\mount /add-package /packagepath:e:\win10\1709\temp\windows10.0-kb4093110-x64_2422543693a0939d7f7113ac13d97a272a3770bb.msu
Add in May quality CU KB4103714.
dism /image:e:\win10\1709\mount /add-package /packagepath:e:\win10\1709\temp\windows10.0-kb4103714-x64_97bad62ead2010977fa1e9b5226e77dd9e5a5cb7.msu
Commit the image
dism /commit-image /mountdir:e:\win10\1709\mount
Unmount the image:
dism /unmount-image /mountdir:e:\win10\1709\mount /commit
Notice the size of the patched install.wim is 4.60 GB.
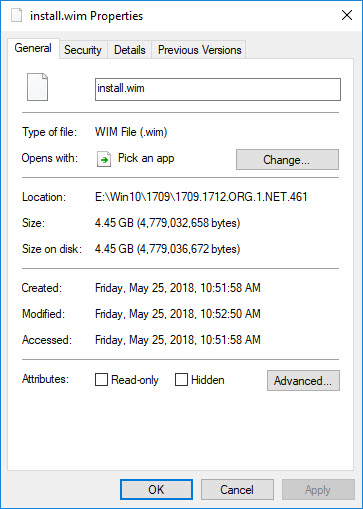
Export index 1 to a new WIM in folder 1709.1712.ORG.1.NET.461
dism /export-image /sourceimagefile:e:\win10\1709\Temp\install.wim /sourceindex:1 /destinationimagefile:e:\win10\1709\1709.1712.ORG.1.NET.461\install.wim
Now notice the size of the install.wim is 4.45 GB (saving an additional 0.15 GB). Not bad for a fully patched WIM with .NET and it is only 0.40 GB larger than the original multi-index WIM.
NOTE: I have also experimented with using clean up image, component cleanup and reset base (dism /image:e:\win10\1709\mount /cleanup-image /startcomponentcleanup /resetbase) and it did manage to produce a slightly smaller WIM (4.42 GB), dism reports an error (Error: 0x800f0806 The operation could not be completed due to pending operations) and my guess is that there are online operations that need to be done for .NET. So for now I am leaving this step out.
Take this new patched install.wim with .NET and replace the one in your OS Upgrade Package each month.
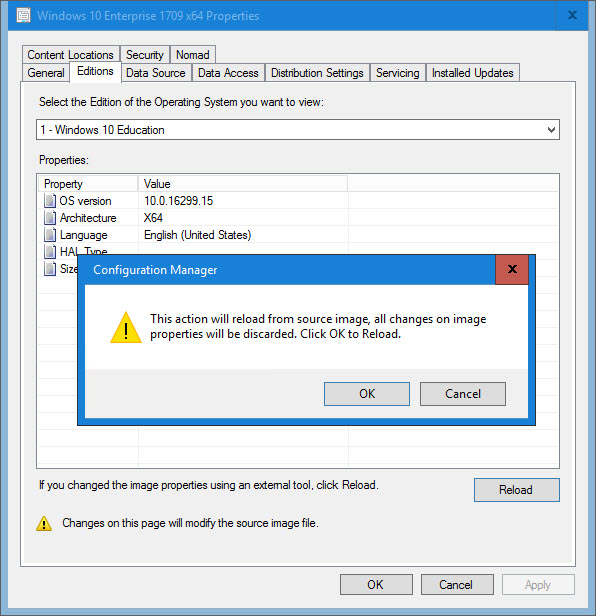
The first time you do this, be sure to go into the OS Upgrade package and ‘reload’ the image properties:
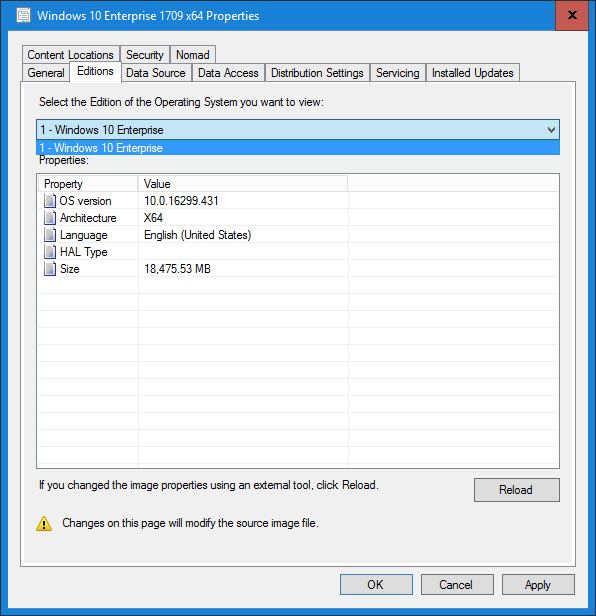
Then you will notice that it only lists one index:
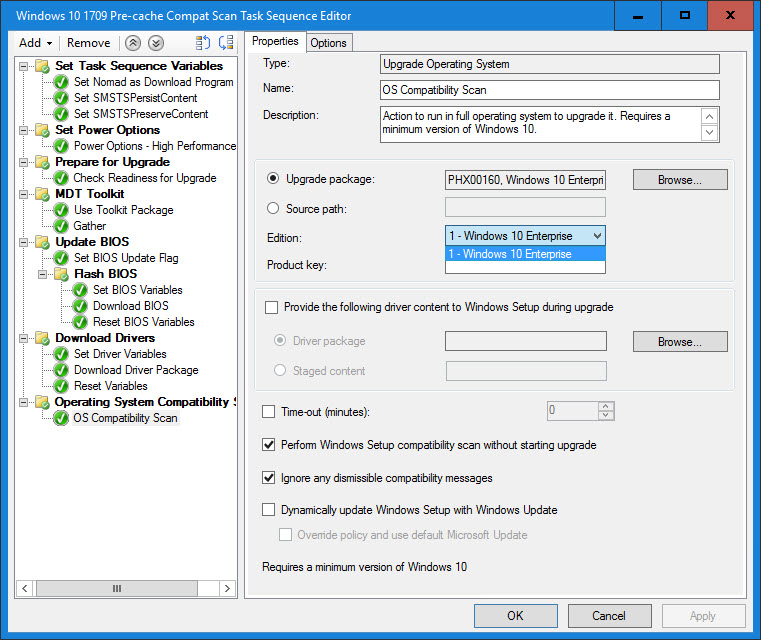
Go into any Task Sequences that use this OS Upgrade package and make sure that all of the Upgrade Operating System steps reflect image index 1 for the edition:

Originally posted on https://miketerrill.net/


To do ResetBase, you’ll need to do several passes as changing component states (and some hotfixes – mostly W8 era) blocks some offline actions.
1. Integrate patches
2. ResetBase
3. Enable .Net
4. Reintegrate patches (it’ll touch only .Net components)
5. Profit
Thanks Don – I’ll have to give this a shot.
Can this be applied to media that is used for a clean install from MDT?
Yes, it should work for MDT as well!
Pingback: Automating Windows 10 Servicing | The Systems Monkey
I get An error occurred trying to open – E:\sources\sxs\…t-windows-netfx3-ondemand-package.cab Error: 0x80070003 when running this script during the .net framework part. using 1803 media not 1709. Im servicing on w10 1803 and have adk 1803 installed. I’m doing this with pro not enterprise as that’s what we have to use in our environment, not sure if pro vs enterprise makes a difference, had to modify your script to work for pro
Not sure as I haven’t tried using Pro.
Do you keep the WIM file small by exporting it after updating it, yes?
Yes.
Ok, so I have 3 Windows 10 Enterprise Indexes now. Is this normal? Which one is the newest?
Not sure how you ended up with 3, but sounds like something was done incorrectly.
Pingback: Adding Dynamic Updates to Windows 10 In-Place Upgrade Media During Offline Servicing - A Square Dozen
Pingback: SCCM Information – Computer WorkShop CT
Pingback: Windows as a Service in the Enterprise Table of Contents | Mike's Tech Blog
Pingback: Windows as a Service in the Enterprise Overview Part 2 | Mike's Tech Blog
Why aren’t you applying latest CU for .net ?
Unless you are referring to something else, .NET patches are included in the second Tuesday LCUs: “The same quality improvements are rolled into future second-Tuesday update releases.” https://blogs.msdn.microsoft.com/dotnet/2019/01/22/net-framework-january-22-2018-cumulative-update-for-windows-10-version-1809-and-windows-server-2019/
https://devblogs.microsoft.com/dotnet/announcing-cumulative-updates-for-net-framework-for-windows-10-october-2018-update/
.NET Framework updates will be delivered in the following way:
Windows 10 October 2018 Update (version 1809) and Windows Server 2019 – One Cumulative Update for .NET Framework, alongside the Windows Cumulative Update.
Windows 10 April 2018 (version 1803) and earlier versions of Windows 10, including Windows Server 2016 – One Windows Cumulative Update (which includes .NET Framework updates), per Windows version.
Thank you for this post.
I did tests with a WIM, Windows 10 1809.
The CU is correctly installed from the WIM file.
But after deploying the system, Windows Update asks me to install the CU previously add to the WIM file.
Sounds like it was not applied correctly or there were changes after the LCU was applied. I recommend using David Segura’s OSDBuilder: https://www.osdeploy.com/osdbuilder/home
Pingback: How To Reduce SCCM OSD Time - sccmf12twice.com
Hi All,
It is very useful article before version 1902 been released. Microsoft has listened and has made an improvement.
the latest ConfigMgr version 1902 Include Optimized image servicing (Service option in Configuration manager), when you create a schedule to update an OS image, select the option to Remove superseded updates after the images is updated.
And another interesting features called Import a Single index of An OS image, when you import an OS image, select the option to Extract a specific image index from the specified WIM file, so the result you have a smaller image file(just one index).
I am still not a fan of the in-console servicing and prefer to use #OSDBuilder since I get more control (beyond just patches). But if it works for you, great!