1E BIOS to UEFI is a component of the 1E OSD Solution Accelerator that comes with 1E Nomad and enables administrators to create a true Zero Touch BIOS to UEFI Task Sequence method. This enables enterprises to get to secure Windows 10 by enabling feature like Secure Boot, Credential Guard and Device Guard to name a few, without requiring a high-touch and costly manual process.
The Challenge
There are two challenges when it comes to converting a system from BIOS to UEFI during an OSD Task Sequence. The first part of the problem is manipulating all the necessary BIOS settings that are required on class 2 UEFI devices to make them boot up in UEFI mode (class 3 UEFI devices like Surface Books only have the option of running UEFI). Fortunately, most of the major vendors, like Dell, HP and Lenovo, provide methods and tools that allow this to be done programmatically on their enterprise class systems. The downside is that this often needs to be scripted and getting the right combination to work on all your supported models can be tricky and time consuming. Some settings can vary even between models from the same vendor (some vendors are worse than others). Also, the order in which the settings are applied is important. The utility or method might return a success on a setting change but not actually change the setting because of a dependency on another setting. The second part of this problem is to be able to get the Task Sequence to reboot successfully and continue the Task Sequence after the BIOS/UEFI changes take effect. Microsoft is addressing this problem starting in the Configuration Manager 1610 release. For more information on this step, see the Task sequence steps to manage BIOS to UEFI conversion. Also, my good friend Nickolaj has written a blog called Convert from BIOS to UEFI during Windows 10 deployments with ConfigMgr Current Branch – Introduction, where he talks about what is happening with the new Task Sequence variable called TSUEFIDrive.
The Solution
1E BIOS to UEFI contains two simple Task Sequence actions that overcomes both challenges and can be used with any version of Configuration Manager Current Branch (1511, 1602, 1606, as well as the recently released 1610), and Configuration Manager 2012 SP2/R2 SP1. The first task sequence action is the 1E BIOS to UEFI step. I call this the magic step (which drives 1E Marketing crazy). The reason I call it the magic step is because it was the first solution to address the BIOS to UEFI problem in a single reboot (and no, we aren’t doing anything dodgy like flipping read-only variables). Microsoft now includes this capability in the 1610 release, but this step is still beneficial to older versions. Maybe someday I will blog on what is happening behind the scenes, but that will need to come later since there are certain companies that take an interest in my work and like to copy it (and no, I am not talking about Microsoft).
This clever step has no configuration and only needs to be placed twice in the Task Sequence as seen below:

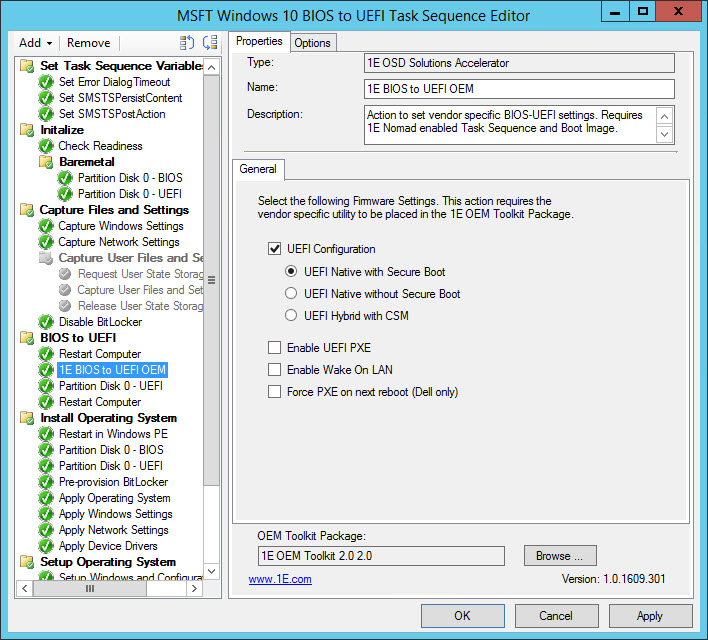
The other custom action is called 1E BIOS to UEFI OEM. This step is the one that everyone loves as it has buttons and check boxes that can be set. This step works on Dell, Lenovo and HP enterprise class systems.

This step calls the right commands in the correct order for the make and model it is running on. Simple, right? That was the goal – to be able to abstract all the commands that need to be run (and the order they need to be run) from the administrator so that he/she can go on with more important thing (like deploying Windows 10 in UEFI). Before getting into the details of the settings, you are probably wondering what the OEM Toolkit Package is that is referenced at the bottom of the step. Well, when installing the 1E BIOS to UEFI solution, you have the option of the installer automatically downloading the vendor utilities, creating a Configuration Manager Package and distributing it to a Distribution Point Group so that you can get on with your Task Sequence. In other words, it automates the process and you do not have to follow some step-by-step document and manually create a toolkit package.
Now that we have that covered, let’s talk about the settings. The most important is the UEFI Configuration. Here we provide three options – 1: UEFI Native with Secure Boot 2: UEFI Native without Secure Boot 3: UEFI Hybrid with CSM. Here are the use cases for each one:
1: UEFI Native with Secure Boot – this will configure the BIOS/UEFI settings so that the system boots native UEFI and has Secure Boot enabled. NOTE: This is the only way currently to switch to UEFI on Lenovo systems as they do not provide a separate Boot Mode setting (at least one that pertains to UEFI).
2: UEFI Native without Secure Boot – this is the same as above but Secure Boot will not be enabled. You might be wondering ‘why would you not enable Secure Boot?’ Some low level drivers that get loaded at boot time might not be signed properly and if Secure Boot is enabled, then the system is not going to boot. Since Secure Boot can only be programmatically enabled (and not disabled), then someone needs to physically disable Secure Boot by going into the BIOS/UEFI settings. So, if you have a tricky system that has bad drivers then you can simply put a condition on this step so that Secure Boot is not enabled on these systems. Hint: once the issue is resolved you can use this step again to programmatically enable Secure Boot down the road.
3: UEFI Hybrid with CSM – you are probably thinking ‘what the heck is this and when would I use it?’ Well, for those of you that did not know this, Windows 7 does support running in UEFI mode. Still not getting it? If you are still deploying Windows 7 (which I bet most of you still are), you could have been deploying it in UEFI mode all this time. What this means is that you could have taken advantage of the fancy Windows 10 in-place upgrade and not had to worry about apps and user data. Since the disk will already be GPT there is no need to format and partition.
The last setting worth mentioning is the UEFI PXE setting. What this does is enable PXE in the UEFI network stack (which is not the same as PXE in the legacy BIOS). This is important as Configuration Manager will format and partition the disk based on the how the system was booted (Hint: look up _SMSTSBootUEFI).
Lastly, we continue to certify this step on all kinds of hardware models from each of the three vendors (that is how I know about all of the setting differences between models). Also, we have tons of ideas and features planned for this step. In fact, there were other tabs that originally showed up on early releases but got cut for the initial release – but that is top secret for now.
Configuration Manager 1610
So the burning question is ‘do I still need this if I have Configuration Manager 1610?’ Well, like I mentioned above, 1610 does take care of the magic step. However, you are on your own for handling the vendor settings. So that makes the 1E BIOS to UEFI OEM step still a valid component when it comes to doing BIOS to UEFI.
Here is the Microsoft Task Sequence that contains the new Task Sequence variable mentioned above along with the 1E BIOS to UEFI OEM step:
In summary, the 1E BIOS to UEFI solution is extremely useful, even with the new ability to format a disk for UEFI while still booted in BIOS mode in Configuration Manager 1610.
Originally posted on https://miketerrill.net/

Pingback: BIOS to UEFI made easier with Windows 10 Creators Update | Mike's Tech Blog
Mike, one thing I have noticed with Lenovo systems is that, depending upon which BIOS version is running, certain WMI settings aren’t available to be changed. For one BIOS version, it may be “Secure Boot”, for a different model, maybe “OS Optimized Defaults” isn’t available. The result in each situation is to make sure each client is using the most up-to-date BIOS version possible.
My question is this: does the 1E BIOS to UEFI OEM tool mitigate the need to perform these BIOS updates prior to converting from BIOS to UEFI? (i.e., does the tool work on Lenovos even if your BIOS is out-of-date?)
If the setting isn’t available via the WMI methods, then there is nothing we can do. It is always a good practice to keep your BIOS versions updated as I have seen settings that were supposed to work only start working once the BIOS was updated. That said, with 1E BIOS to UEFI, we account for the various models and settings per model and use the correct one (if available and working). It would be nice if the vendors had their own standard, but they do not unfortunately (or they don’t follow them). I have seen 3 or more ways to set UEFI even from the same vendor. This is why I always recommend certifying the process against a test model instead of just blasting it out. Some vendors are better than others, but even the most consistent vendor has their fair share of issues with combinations of BIOS versions and BIOS tool versions.