If you have already started working with UEFI devices, then you have probably figured out a few of the gotchas when it comes to booting these devices. First, you need to boot the device using the native architecture. So, if the device you are attempting to boot is a 64-bit device, then it needs to boot with a 64-bit boot image. Second, if you are using a USB Flash Drive, then you probably have realized that UEFI devices will not boot from a NTFS formatted flash drive. The flash drive needs to be formatted using FAT32 in order to boot UEFI. That is all fine and dandy, but what happens if you have a large WIM file (one that is greater than 4GB, like the Windows Server 2016 install.wim that is 4.38GB) that you need to copy onto the flash drive? The short answer is that you can’t, at least on the FAT32 partition. You can always split the WIM, but what fun is that? Plus, it sounds like extra work to me. Lucky for you, with the right USB flash drive and the information in this blog post, I will show you have you can fit that 4+GB WIM on your flash drive and still boot UEFI (because if you are still using BIOS, stop reading now and switch your system to UEFI).
The trick is to create multiple partitions on your flash drive, just like you do (or like Windows setup does for you) when you install Windows in UEFI mode. The problem is a limitation for creating multiple partitions on removable media. By flipping the ‘removable bit’ on the flash drive, you can then use diskpart to create a bootable FAT32 partition (large enough to fit all of the boot files) and then a second NTFS partition that contains the large WIM file (along with the other setup files that are needed. There are a few utilities out there on the Internet, like BootIT from Lexar (although I could not get it to work on some new Lexar USB flash drives that I just bought), that may or may not do the trick for you (NOTE: this does not work on all USB flash drives and you might toast your flash drive so use at your own risk). There are also some other tools that you might come across if you search long enough (and on some sketchy sites), but once again – use at your own risk. Hopefully one day soon, Windows will allow us to partition removable media since eventually most devices will be class 3 UEFI and WIM files are getting larger, not smaller.
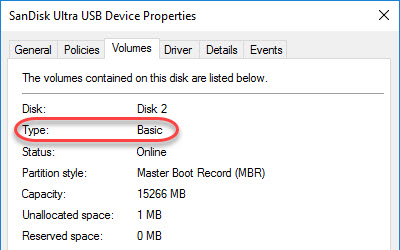
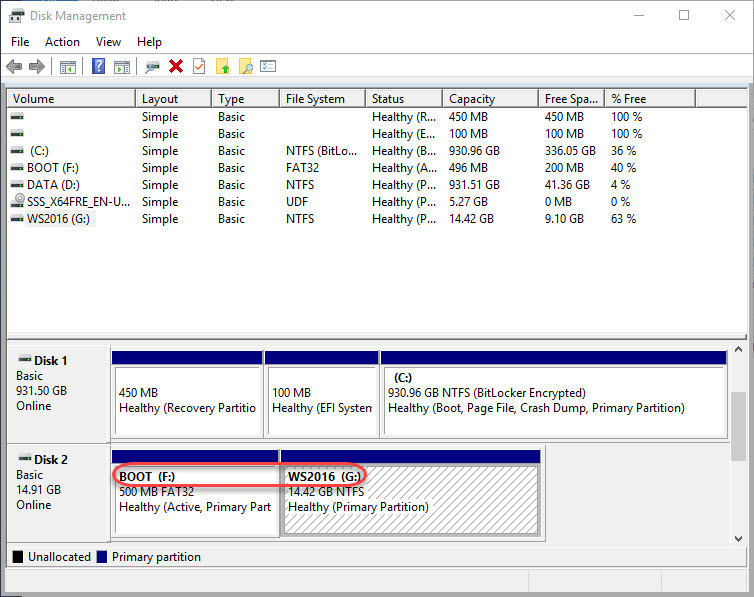
Lucky for me, the SanDisk Ultra 16GB (Model SDCZ45-016G), which I bought at Costco several years ago, already shows up as a basic disk type (in other words, not removable), and allows me to create multiple partitions so that I can make it bootable in a UEFI configured system and still have the ability to copy large WIM files onto it.
It also looks like these are still available on Amazon (although I cannot guarantee that they are like the Costco model apart from the matching characters on the model number).
The process:
- Plug in the flash drive and open up an elevated command prompt. Run the following commands:
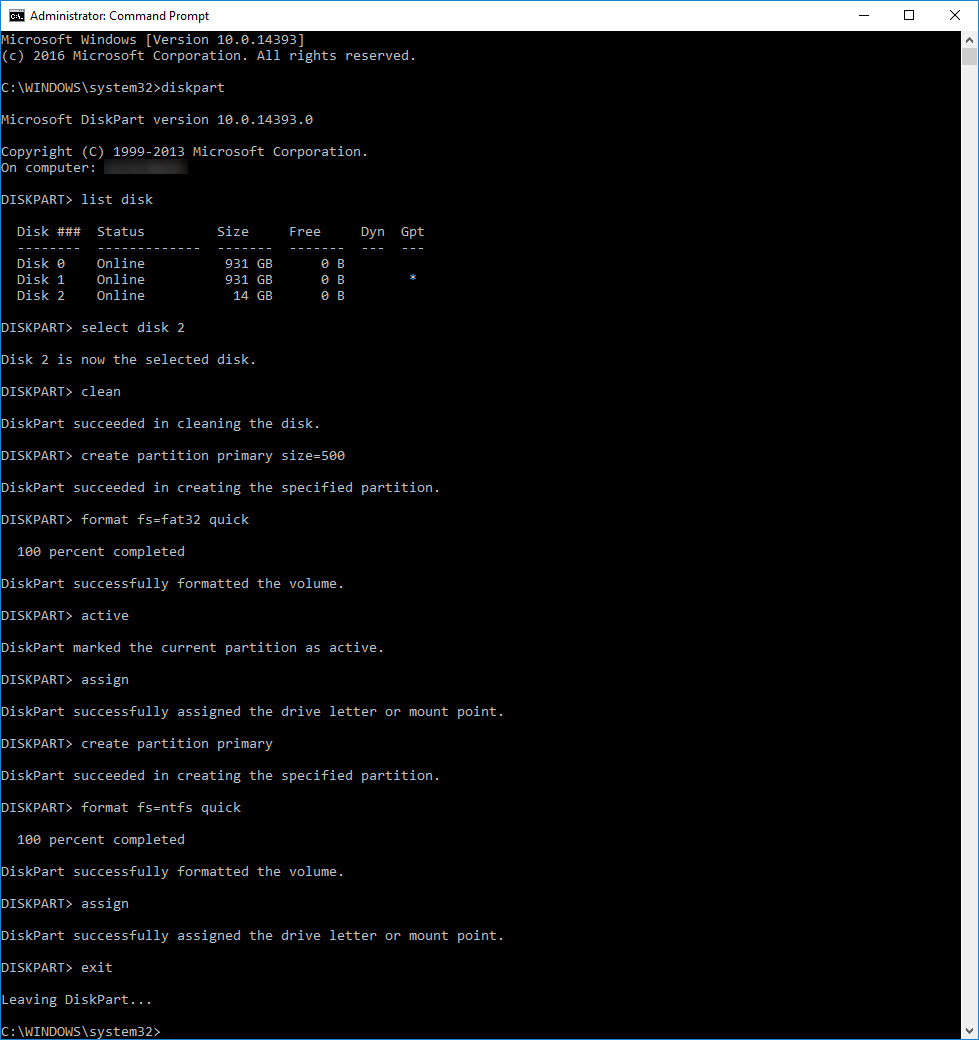
diskpart
list disk
select disk x (where x is the disk # of your flash drive)
clean (this is a destructive process, so be sure you have the correct drive and have backed up anything you want to keep)
create partition primary size=500
format fs=fat32 quick
active
assign
create partition primary (this creates the second partition)
format fs=ntfs quick
assign
exit


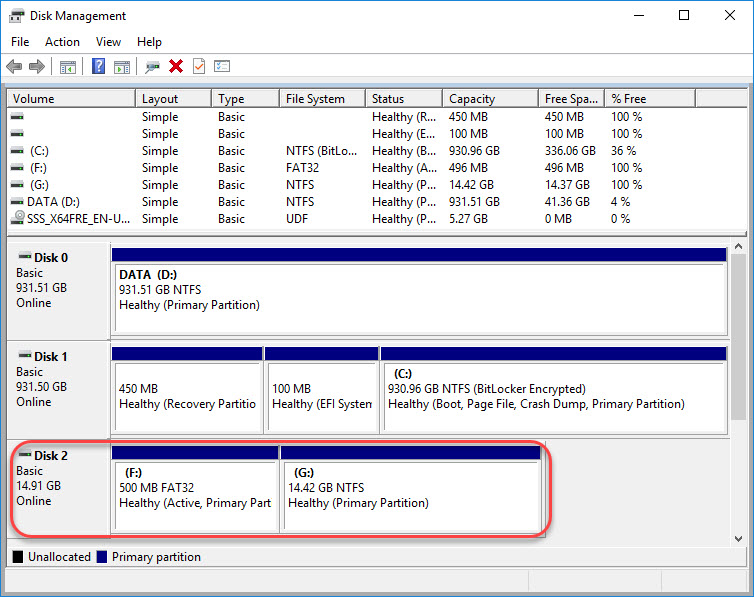
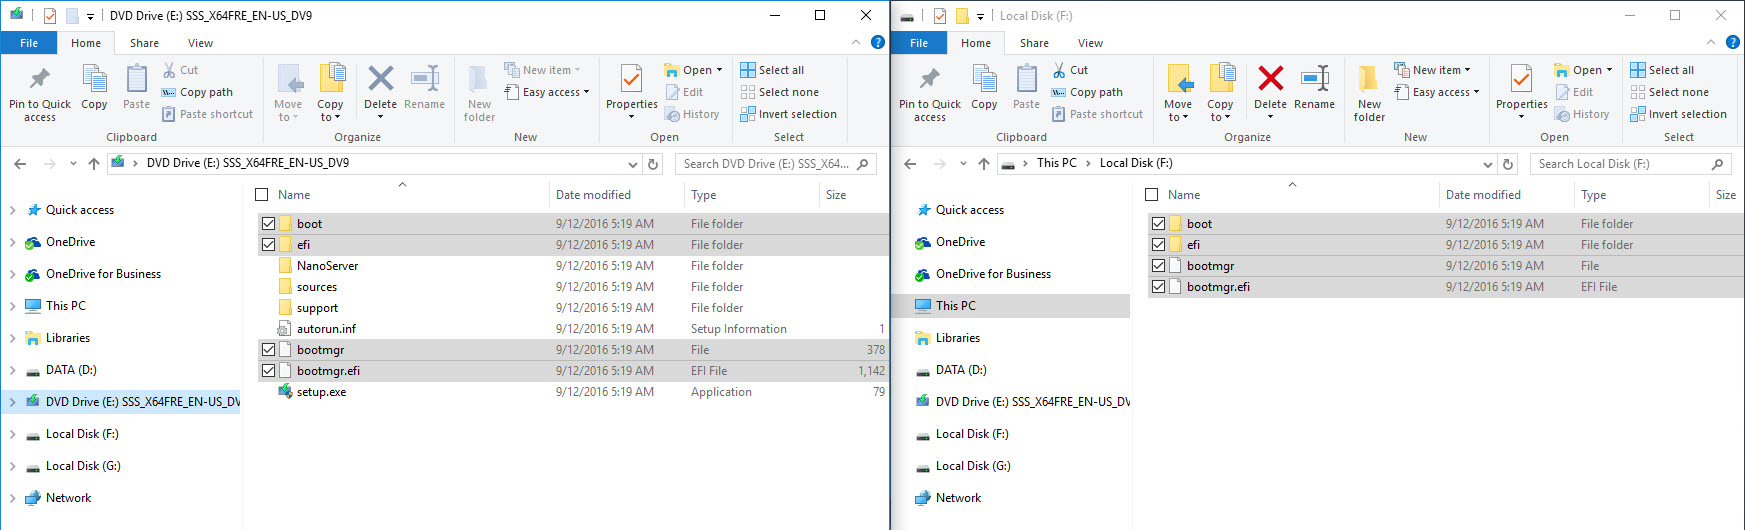
- For this example, we will use the Windows Server 2016 ISO (you could also do the same with Configuration Manager OSD Media). Mount the ISO (in this example, it is on drive E:) and copy the subfolders boot and efi and files bootmgr and bootmgr.efi to the fat32 drive that was created above (in this example, it is on drive F:).

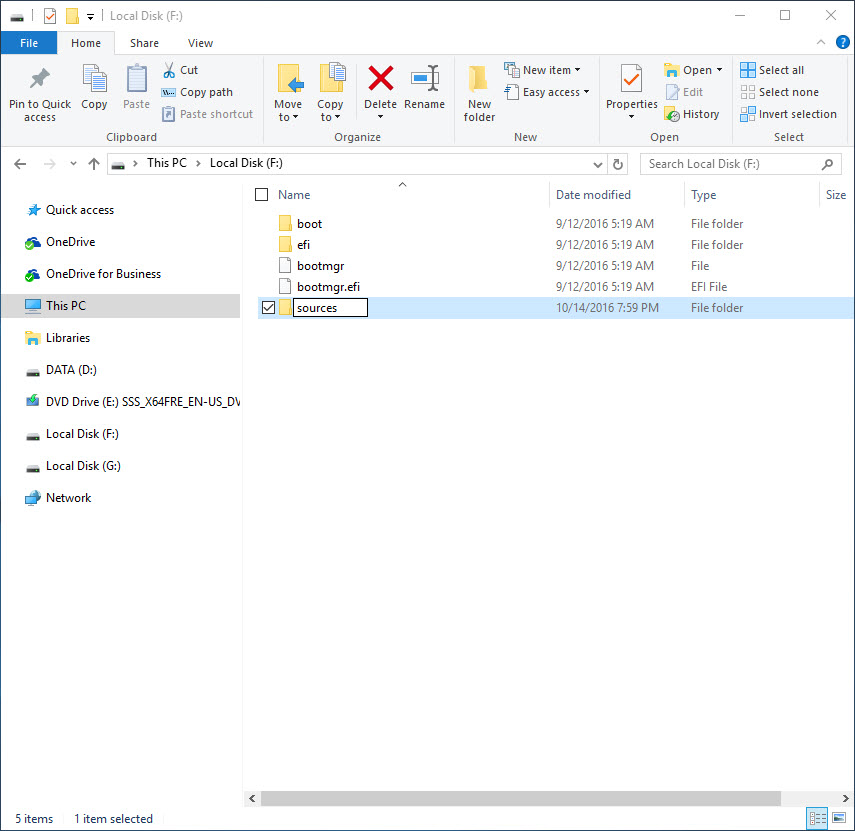
- On the fat32 drive create a subfolder called sources.

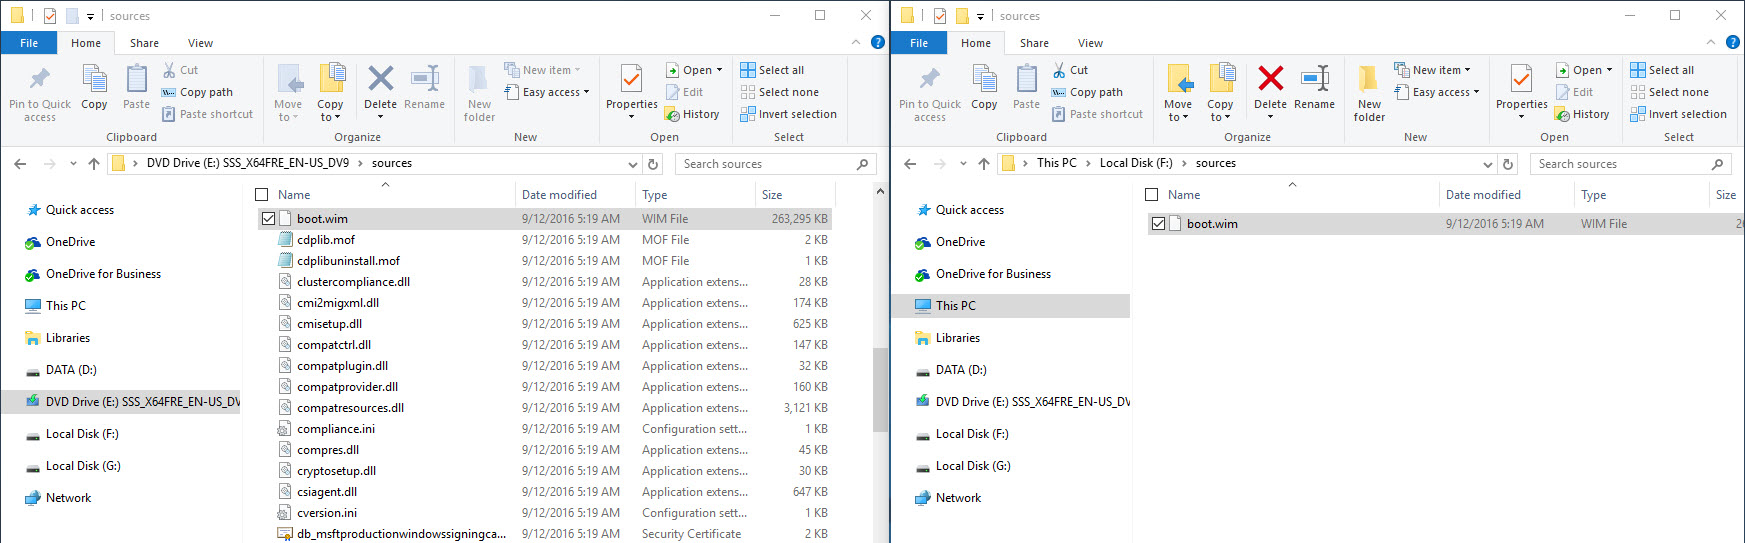
- On the Windows Server 2016 ISO drive, navigate to the sources directory. Locate the boot.wim and copy it to the fat32 drive in the sources subfolder.

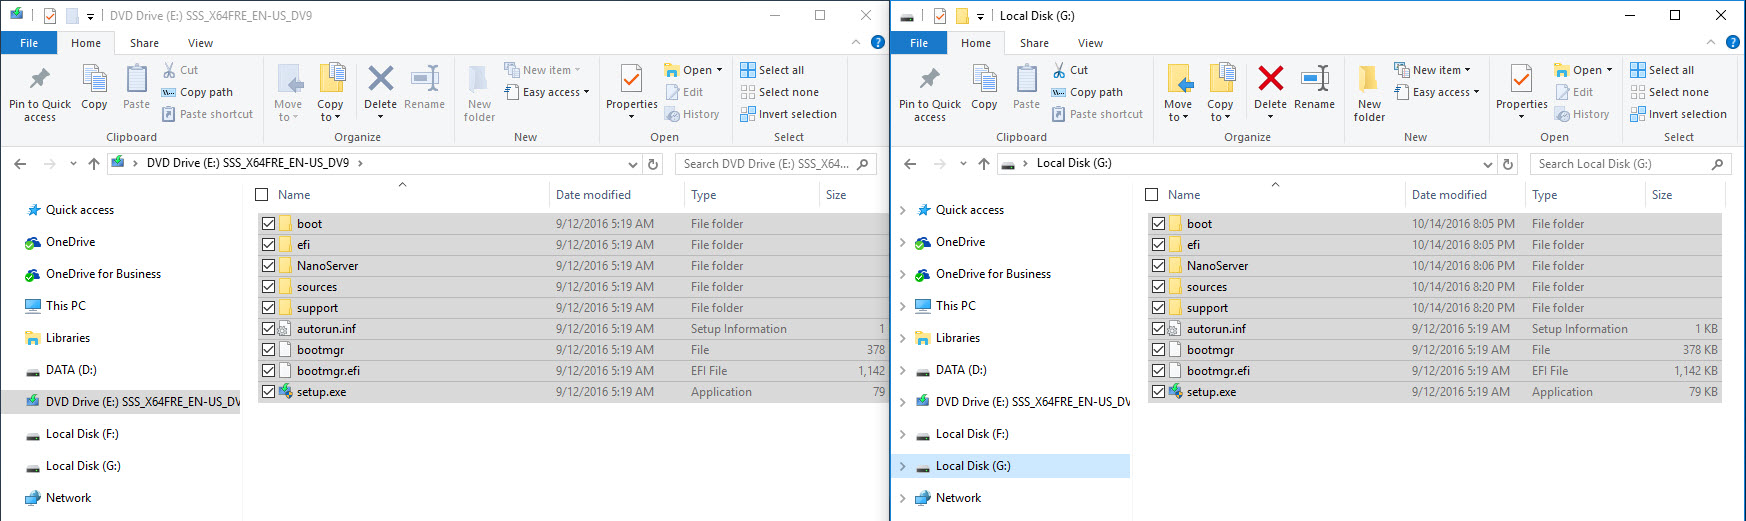
- Copy the entire contents of the Windows Server 2016 ISO drive to the ntfs drive (in this example, it is on drive G:).

- Optionally name the partitions on the USB flash drive for easy identification.

Now you should be able to boot right up using the USB flash drive in UEFI mode and in this case proceed to install Windows Server 2016.
Originally posted on https://miketerrill.net/

Pingback: Create multiple partitions on ANY USB Flash Drive | Mike's Tech Blog
Might want to ensure you put “diskpart.exe” as first step before trying to “List disk”
Linking to: https://miketerrill.net/2016/11/21/create-multiple-partitions-on-any-usb-flash-drive/ and verified that this works with Windows 1703 build 15063.483
Good catch! I updated the post.
Great catch, the really works well, I am using an old 60GB SSD drive in an external carrier, this just gets seen as a Disk and partitions however you want. Nice one
Hi, thanks for this. There is lot of misleading info on the internet. My machine is HP Microserver Gen8 and Windows Server 2016. First I tried Rufus. It creates bootable USB disk that works just fine in VMware (in UEFI mode). But this Microserver just do not like it. Probably something to do with UEFI:NTFS plugin it uses. Your guide just works. I wonder why MS wont just provide split install.wim to work with FAT32.
You can now do multiple partitions on removable media in Windows 10 1703. I tried on a Lexar USB key that I have that I could not do double partitions before and I was able to create multiple partitions. This means that the OS you boot from still needs to be able to read it.
-Mike
After following the steps I was finally able to get the IFO image on the flash drive, thank you!
When I did try to install Windows Server 2016 on my device however, it gets to the install page and once I click install and it says setups is starting, the next screen says that no drivers could be found for installation. Any idea why I am getting this error? Thank you!
Is it possible you need storage/RAID drivers?
I seem to be having the same issue! I am currently trying to reinstall Server ’16 datacenter onto a DL380p gen 8 when the error pops up. I was previously able to get the .iso to install over iLO, but it caused some corruption in the windows files and I decided to reinstall using a USB key
Anyone ever figure out the no drivers could be found for installation issue? Running into the same thing myself.
Probably just means you don’t have the necessary storage controller drivers available – if that is what you are referring to…
The same procedure applies to Windows 10. But it was painful to find your (perfectly written) article. Maybe you could consider adding specifics tags to it, to help people trying to do the same thing as me: A bootable USB stick with multiple partitions for Windows 10 installation.
All the best,
Euclides
Out of curiosity, how does this work? Does windows see the same folder structure on both and somehow merge it together?
Also, thanks very much for this!
It is how the native UEFI boot process works.
Getting an error message when attempting to boot the PC. I’m trying to image brand-new Dell PCs (several models) with drivers from an offline image. When the boot process starts I select the USB FAT32 partition to boot from. It then immediately throws an error.
The error message reads:
Windows failed to start. A recent hardware or software change might be the cause. Status: 0xc000000f Info: A required device isn’t connected or can’t be accessed.
Are they configured to boot native UEFI? What are the models?
Creating multiple-partitions on “Removable” USB drives seems to have become possible from W10 1709. I can’t find a reference to the limitation in diskpart / the OS being removed. However with the same USB key 1603 didn’t let me but 1709 did.
I never recall seeing it mentioned anywhere, but Microsoft knew they needed to do something for UEFI systems (which require Fat32 to boot) and WIM sizes that were exceeding the 4GB file size limit of Fat32.
Pingback: Bootable UEFI USB for Server 2016 Installation | MCB Systems
Thanks! Comments like this make my day and I am glad it helped!
Very helpful, thanks. I can confirm that multi-partitioning works on Win10 1803 but not Win2016 1703. This article has some details: https://borncity.com/win/2017/04/22/windows-10-version-1703-usb-stick-multi-partition-support/. I’ve cited your article in mine: https://www.mcbsys.com/blog/2018/10/bootable-uefi-usb-for-server-2016-installation/.
Sorry make that Win2016 1607 where it only sees the first partition.
Thank you, Sir, for the extremely accurate article.
As I found out, the 1st partition must really be labeled as FAT32 (as you write) and not EFI system partition, otherwise windows installer will end with the error “windows could not prepare the computer to boot into the next phase of installation”.
Interesting – I have not experienced that particular error. However, thanks for the comment in case others run into it!
Hi, I have a huge windows 10 pro wim file of 6GB with a custom autounattend.xml file and have followed your article and have made 2 primary partitions (fat32 & ntfs) and i placed the xml file in fat32 partition where i get “no images available” and if i place the xml file in ntfs it ignores it!
Sorry I am unsure about this one as I do not really deploy Windows this way (with media and autounattend.xml files). 98% of how I deploy Windows is network based with ConfigMgr OSD.
I can’t thank you enough for this masterfully written and easy to follow article. I have used it with great success in the past for deploying Windows 10 images. I know your article uses installing Windows Server 2016 as the example, but I wanted to let others know who might be using it for Windows 10, that with the release of Windows 10 version 1909 a 500MB FAT32 partition is no longer big enough for the FAT32 boot partition on the flash drive. I believe the boot files in version 1909 take up about 550MB’s of space. To accomodate for this, when creating my UEFI bootable flash drive I typed . . .
create partition primary size=700
. . . when setting the size of the FAT32 partition to create a partition that is 700MB in size instead. This allows ample room to copy the boot folders and files over and leaves extra space for future updates that might continue to creep up in size. Again, I can’t thank you enough for this article.
You can recompress the “install.wim” file with “solid” or “recovery” level using “wimtools” or “dism” on either Linux or Windows. See: https://tqdev.com/2019-cannot-copy-windows-10-install-wim
Thank you so much! You helped me big time.
Thanks Ted! Glad I was able to help!