
UPDATE 7/28/2017: Microsoft released Configuration Manager CB 1706 which now collects both UEFI and Secure Boot inventory by default when clients are running CB 1706 or later. UEFI only inventory was first included in CB 1702.
Now that Windows 10 has been released, you are probably starting to take a closer look at the new OS and the related security benefits that it has to offer. Secure Boot is a supported security feature in Windows 10 that secures the boot process by only allowing the loading of drivers and boot loaders that are signed with a trusted signature. The first versions of Windows to support Secure Boot were Windows 8 and Windows Server 2012. Secure Boot requires computer systems to be running UEFI 2.3.1 (or later). Legacy ROMs or compatibility support modules (CSM) must be disabled in order to enable Secure Boot.
In this blog, I will show you how to extend the Configuration Manager hardware inventory so that you can report on the state of Secure Boot in your environment. This will not only tell you which systems have Secure Boot enabled or disabled, but it will also help you detect systems that are not currently running UEFI (the ones running in BIOS mode). Identifying these systems will be helpful when determining the deployment method that you will select when moving to Windows 10. If it is a requirement of your security team that all systems running Windows 10 must also be running Secure Boot, it will give you an idea on how much effort will be involved during the deployment process.
Now, for the systems that are running in BIOS mode, it will not show which ones are UEFI capable. However, most enterprise class systems purchased in the last three years are UEFI capable. In a later post, I will show how you can use OEM specific tools that will help you determine which systems are UEFI capable. If the desire is to ‘take the hit’ and change all of the BIOS systems to UEFI as part of the Windows 10 deployment, then this will require the disks to be completely re-partitioned so that it can boot UEFI. This is a destructive process, meaning that anything on the disk will be lost and any data that needs to be retained needs to be backed up to another location (like a network share, State Migration Point, external storage, or even a peer system – like Nomad Peer Backup Assistance). Note that it is not necessary to convert to UEFI in order to upgrade to Windows 10. Windows 10 supports systems that are currently running in BIOS mode, but you cannot take advantage of the security features in Windows 10 – like Secure Boot, Device Guard and Credential Guard.
The inventory extension is actually pretty simple and it will not add that much additional data to the hardware inventory scan. Since I am keying off of a registry key, this extension uses the registry property provider and requires an addition to the configuration.mof file. This file can be found in the .\inboxes\clifiles.src\hinv directory where Configuration Manager is installed on the Primary Site Server. Add in the following section (also provided below in a file called UEFI_SECUREBOOT_CONFIGURATION.mof) at the end of file in between the // Added extensions start and // Added extensions end lines:
// ==================================================================
// START SECTION
// Custom UEFI Secure Boot Settings
// ==================================================================

#pragma namespace ("\\\\.\\root\\cimv2")
#pragma deleteclass("SecureBootState", NOFAIL)
[DYNPROPS]
Class SecureBootState
{
	[key] string KeyName;
	Uint32 UEFISecureBootEnabled;
};

[DYNPROPS]
Instance of SecureBootState
{
	KeyName="Secure Boot Settings";
	[PropertyContext("Local|HKEY_LOCAL_MACHINE\\SYSTEM\\CurrentControlSet\\Control\\SecureBoot\\State|UEFISecureBootEnabled"),Dynamic,Provider("RegPropProv")] UEFISecureBootEnabled;
};

// ==================================================================
// Custom UEFI Secure Boot Settings
// END SECTION
// ==================================================================
Next, save the following text to a file called UEFI_SECUREBOOT_SMS_DEF.mof (or download the file below):
// ==================================================================
// START SECTION
// Custom UEFI Secure Boot Settings
// ==================================================================

#pragma namespace ("\\\\.\\root\\cimv2\\SMS")
#pragma deleteclass("SecureBootState", NOFAIL)
[SMS_Report(TRUE),
SMS_Group_Name("Secure Boot State"),
SMS_Class_ID("UEFI|SecureBootState|1.0")]
Class SecureBootState: SMS_Class_Template
{
[SMS_Report(TRUE),key] string KeyName;
[SMS_Report(TRUE)] Uint32 UEFISecureBootEnabled;
};

// ==================================================================
// Custom UEFI Secure Boot Settings
// END SECTION
// ==================================================================
I typically make a backup of each file on the Primary Site Server in a folder called Custom MOF Extensions so that they can be backed up as part of a DR plan and so other team members know what custom inventory extensions were done.
Following this, navigate to the Default Client Settings in the Configuration Manager Console and select the Hardware Inventory section. Once open, click on the Set Classes … button:

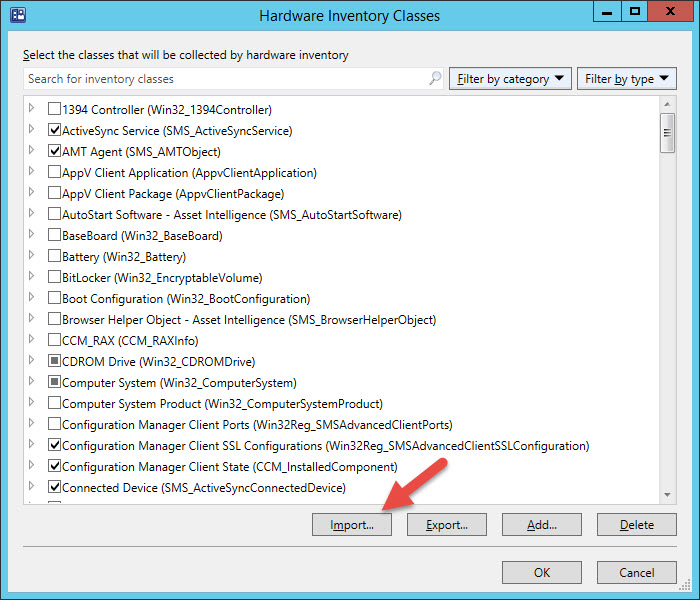
On the Hardware Inventory Classes screen, click the Import button and browse to the location where the UEFI_SECUREBOOT_SMS_DEF.mof file was saved earlier and leave the default selected (Import both hardware inventory classes and hardware inventory class settings) when prompted:
You should now see the new class listed and it will be enabled. If you would rather inventory this class on a specific collection of systems (like workstations), then un-select it from in the following screen.

Once systems start processing the new inventory extension, you will see a new Hardware Inventory category in Resource Explorer called Secure Boot State. If a system is running in UEFI mode, it will have a 1 in the column UEFI Secure Boot enabled for systems that have Secure Boot enabled:
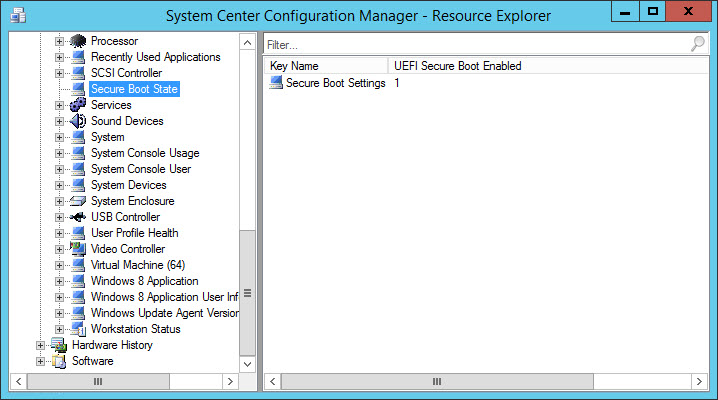
For systems that do not have Secure Boot enabled but are running in UEFI mode, the value will be 0, and for those systems not running in UEFI (i.e. ones running in BIOS mode), the value will be null.
Files:
UEFI_SECUREBOOT_CONFIGURATION.mof
Originally posted on http://miketerrill.net

Pingback: Mike Terrill on Windows 10’s Secure Boot and Cfg Mgr | Firmware Security
This is great. I did configure this and can find machines that is running UEFI and secure boot. One of the item that I am missing is machines that are UEFI capable but running on BIOS because the technicians decided to turn UEFI off.
Awesome – glad you found it useful and thanks for the feedback. In future posts, I plan on showing how you can determine which systems are UEFI capable. What manufacturers are you using?
Thank you. I am using Lenova and HP’s but might soon run it to other models like Dell.
Thanks again.
Hi Mike,
Great post! This is exactly what I need. But I don’t seem to get it to work.
I’ve added the UEFI_SECUREBOOT_CONFIGURATION.mof code to configuration.mof.
But when I try to import UEFI_SECUREBOOT_SMS_DEF.mof I get this error
“The MOF file you tried to import could not be compiled. Ensure that the MOF file contains valid data. You can use the command line mofcomp utility to test the data.”
If I try to check the mof file with mofcomp it says:
MOF file has been successfully parsed
Storing data in the repository…
An error occurred while creating object 2 defined on lines 11 – 15:
0X80041002 Class, instance, or property ‘SMS_Class_Template22’ was not found. Compiler returned error 0x8004100
Do you know what could be wrong? I have SCCM R2 SP1 CU1 installed.
Hi Henrik, it sounds like the file is corrupt. I would try to create it from scratch and then import it.
-Mike
Great post. Did you ever get around to posting if the BIOS is capable of UEFI?
Not yet but I need to write it up soon…so stay tuned!
Pingback: The Power of Power BI | Mike's Tech Blog
Hi, thank you for this post ! great article
I have modified the configuration.mof file and created a UEFI_SECUREBOOT_SMS_DEF.mof file.
i have an error when i try to import the custom mof file.
“The following classes for which you are trying to import settings do not exist. Import the required class definitions and then try to import the settings again.
Secure Boot State (SecureBootState)”
Any idea ? Should i import first the configuration.mof file before ? I use a custom client settings policy but it should be OK with any policy.
Thanks
Hi Renaud, You need to import the classes on the Default Client Settings. You do not need to enable them on the Default Client Settings if you want to enable them on a custom client settings (like I prefer). Also, I add the settings to the Configuration.mof first before importing the classes into the Default Client Settings. I hope this helps!
-Mike
Its giving me an error “The MOF file you tried to import could not be compiled. Ensure that the MOF file contains valid data. You can use the command line mofcomp utility to test the data. “when i go to import the client settings can you re-post your files for download? I know i have the code copied correctly.
Sorry about that, not sure why the links stopped working but it should work for you now. Let me know if it does not.
Thanks, Mike
Pingback: CM1701 TP: Hardware Inventory Collets UEFI information - RONNIPEDERSEN.COM
Pingback: Notes from Microsoft TechTalks.fi 2016 - RONNIPEDERSEN.COM
We implemented this, but we have almost all Windows 7 devices now. The only machines that are reporting any data back are Windows 10 and Server 2012 boxes. Can anyone confirm if this registry key is supposed to exist on Windows 7? None of the Windows 7 machines that I’ve checked have the registry key.
The key does not exist on systems that don’t support Secure Boot. This was one way that I found to help determine which machines were in BIOS vs UEFI. Therefore, if the key does not exist, then you can assume the system is in BIOS mode (there is an exception if you deployed Win 7 x64 in UEFI Hybrid mode) since Secure Boot is only supported in UEFI Native mode. In CM CB 1702, there is a new inventory class (SMS_Firmware) that now inventories systems running UEFI (and inventorying Secure Boot is in the Technical Preview).
Is there any way to put this into a report showing this for all systems in a collection or group?
Sure – ConfigMgr will automatically create the SQL view called v_GS_UEFI_SecureBootState0 that you can use for SSRS reports. There will also be a corresponding Attribute Class called Secure Boot State that you can use for Collection membership queries.
Pingback: BIOS and Secure Boot State Detection during a Task Sequence | Mike's Tech Blog
Pingback: Custom Windows 10 OS Build Number WMI Classes and reporting into SCCM
Pingback: Windows 10 Resources List – jorgep.com