Recently, my team has been doing a lot of testing for our next big Windows 10 In-place Upgrade. We are designing and developing a new process that I call Windows as a Service in the Enterprise (and we plan on sharing this at MMSMOA in May). As part of our testing, we need to test both physical systems and virtual, both legacy BIOS and UEFI. Since the days seem to run together, often times I find myself wondering not only what system I am looking at, but what OS it is currently running and how it is configured. Sure this is easy to find from System Information, but typing msinfo32 gets old. Having used BGInfo in the past, I thought this would be a perfect solution to just display this information on the desktop.
I took the time one weekend to figure out how I could use BGInfo to display the friendly version of Windows 10 – the YYMM one, not the OS build (I can barely remember my phone number these days let alone a bunch of Windows 10 build numbers – see sKatteRbrainZ‘s blog My First Day as Microsoft CEO for a funny laugh about Windows 10 versions, names and other things that don’t make sense). Also, being called the ‘UEFI guy’ at times, I wanted to display if a system was running legacy BIOS (bad) or UEFI (good) and if Secure Boot was On (good) or Off (bad).
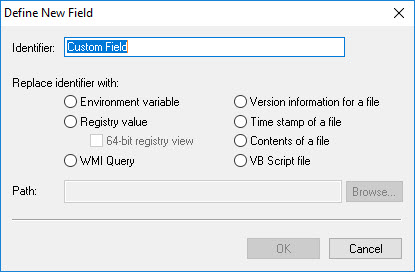
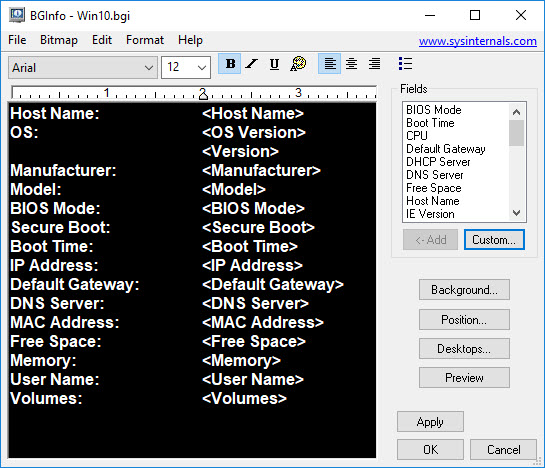
First things first, you want to be sure that you download the latest version of BGInfo that works with Windows 10 (at the time of this writing, the latest version is 4.25). Running BGInfo, we see that there are a few built in fields that we can use (but not what we are looking to add) and also a Custom button:

Looking at the possibilities, we see the options to select Environment variable, Registry, WMI Query, Version information for a file, Time stamp of a file, Contents of a file, or VB Script file (wait – no PowerShell option?? Quick, some tell Mark Russinovich to update this thing before Jeffrey Snover finds out).
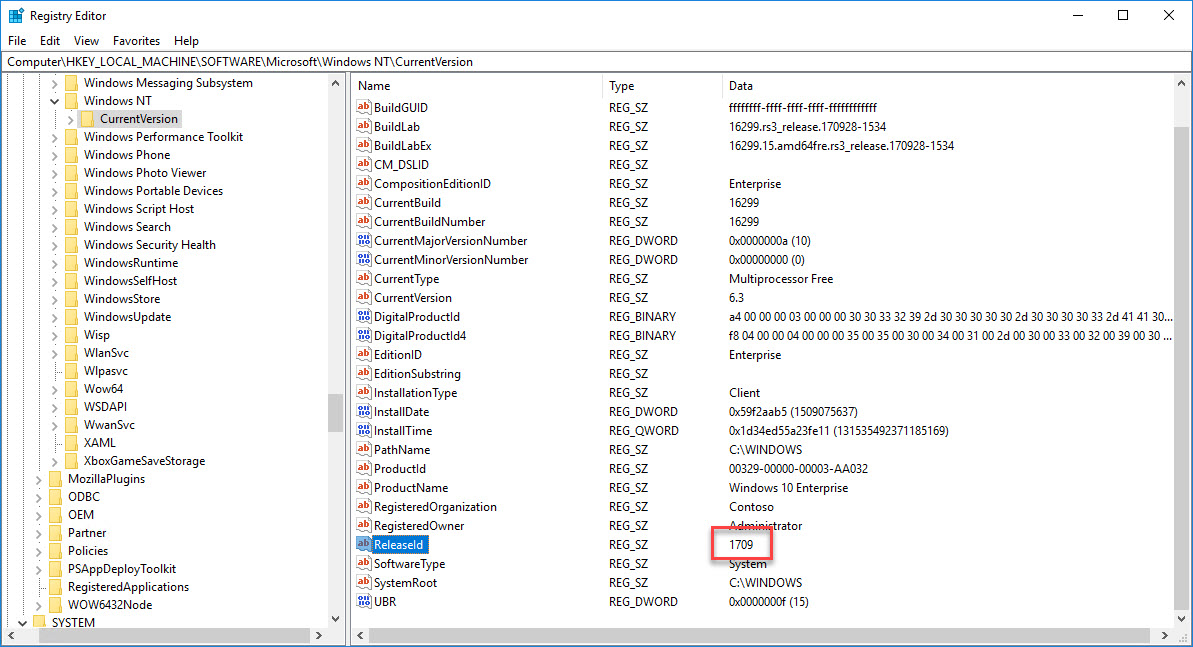
The friendly version of Windows 10 is actually easy to get since it is stored in the registry value ReleaseId under HKLM\SOFTWARE\Microsoft\Windows NT\CurrentVersion.
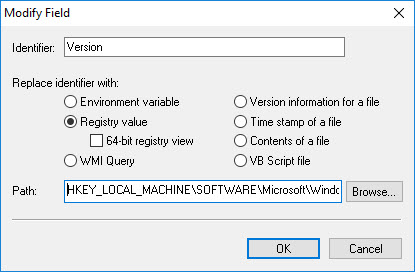
Simply add a new custom user defined field and call it Version pointing to that registry value.
Next, add a field called Manufacturer and another one called Model. These are handy to have when connecting to systems remotely, you quickly know what make/model you are on. Both will be WMI queries:
SELECT Manufacturer FROM Win32_ComputerSystem
SELECT Model FROM Win32_ComputerSystem
Now it is time to add the BIOS Mode. At first I thought this was going to be another easy WMI query. Back in Configuration Manager 1702, the CM team added this information to WMI under the class SMS_Firmware (and then added Secure Boot state in 1706). This was known as the Mike Terrill feature per David James:
However, my hopes were shattered once I found out that BGInfo can only use the default namespace. So with that out and PowerShell no where to be found, I had to resort to good old VBScript. The trick was to use the Secure Boot registry key to determine both the BIOS mode and the Secure Boot state.
BIOSMode.vbs:
Const HKEY_LOCAL_MACHINE  = &H80000002
strComputer = "."
hDefKey = HKEY_LOCAL_MACHINE
strKeyPath = "SYSTEM\CurrentControlSet\Control\SecureBoot\State"
Set oReg = GetObject("winmgmts:{impersonationLevel=impersonate}!\\" & strComputer & "\root\default:StdRegProv")

If oReg.EnumKey(hDefKey, strKeyPath, arrSubKeys) = 0 Then
  echo "UEFI"
Else
  echo "BIOS"
End If
SecureBoot.vbs:
Const HKEY_LOCAL_MACHINE = &H80000002
strComputer = "."
hDefKey = HKEY_LOCAL_MACHINE
Set oReg = GetObject("winmgmts:{impersonationLevel=impersonate}!\\" & strComputer & "\root\default:StdRegProv")
strKeyPath = "SYSTEM\CurrentControlSet\Control\SecureBoot\State"
strValueName = "UEFISecureBootEnabled"
oReg.GetDWORDValue hDefKey,strKeyPath,strValueName,dwValue

If dwValue = 0 Then
	Echo "OFF"
ElseIf dwValue = 1 Then
	Echo "ON"
Else
	Echo "NA"
End If
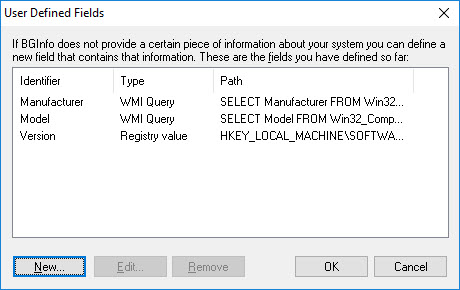
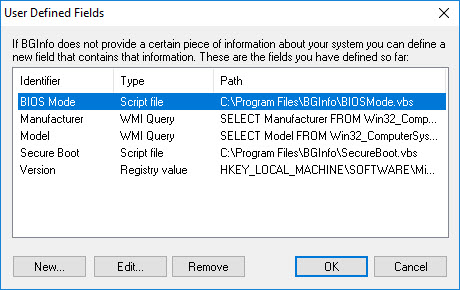
Place both scripts where BGInfo can access them when it is run (I use C:\Program Files\BGInfo\) and create a new custom user defined field for each (BIOS Mode and Secure Boot). Once done the User Defined Fields will look like the following:
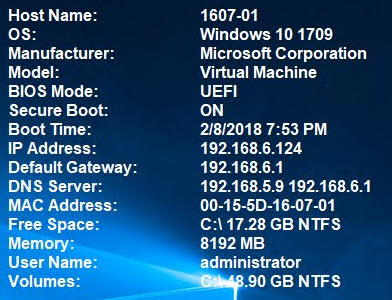
Lastly, add, order and position the desired fields that you want to be displayed and the Apply button to test it. I have selected the following fields:
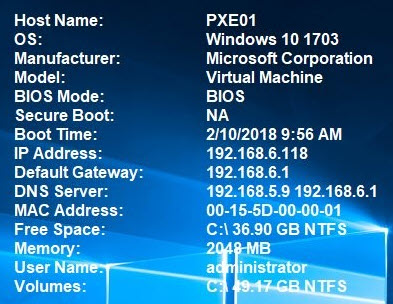
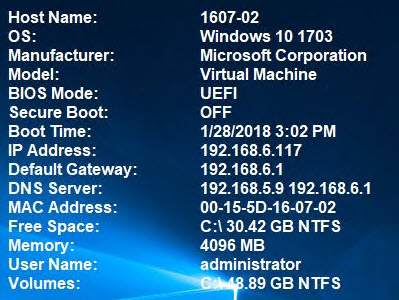
This looks like the following when run on different configurations of Windows 10:
Download BGInfo file and scripts (rename to .vbs after unzipping) here.
Hopefully you find this as useful as me when doing your Windows 10 In-place Upgrade testing. If you have other suggestions on fields you have added, tell me about them in the comments below.
Originally posted on https://miketerrill.net/

Reblogged this on Carpet Bomberz Inc. and commented:
Mike Terrill’s got some very useful tweaks to the SysInternals BGInfo desktop app. Will be adapting this for work real soon now.
Mike thanks for packaging this all up and wrapping it with a bow. Very much appreciated.
I’m noting some errors testing the .vbs file. And it’s my lack of programming skills more than anything that’s causing the issue. When I test either .vbs script in an elevated cmd prompt I get an error on the last Echo command in the If-Else conditional
type mismatch Echo
This is just running the command as: cscript SecureBoot.vbs
And this is in both of the .vbs files. I’m looking up anything I can about syntax on echo or type mismatches, but I cannot seem to get this to display the Secure Boot and Boot Mode on. Secure Boot displays as: (none) as does the Boot Mode.
It’s happening on a 1709 and 1607 W10 ENT install.
For some reason BGInfo & BGInfo64 requires you to remove the ‘wscript.’ in order for it to read the output. Don’t ask me why, that’s just how it is. For testing purposes on the command line with cscript, I put wscript.echo in the script. Once I get it working the way I like, I then remove it and use it with BGInfo(64).
Mike, thanks so much for that follow-up. I will give it a whirl and see if I can get it working.
Pingback: Windows 10 Soup Sandwiches – Skatterbrainz Blog
Pingback: adding BIOS Mode and Secure Boot state to BGInfo | Firmware Security
Pingback: Newsletter: February 24, 2018 – Notes from MWhite
Pingback: Windows 10 Version in BGInfo | Dennis Bray's Virtual Place
This seems also helpful and in the same spirit:
Identifier: OS 32 or 64:
WMI Query: SELECT OSArchitecture from Win32_OperatingSystem
(Of course, if you’ve selected BGInfo vs BGInfo64 at the start, this information might be redundant. I run BGInfo (32bit) always and then this query tells OS bitness.)
Pingback: BGinfo Updating MDT Default Templates – GARYTOWN ConfigMgr Blog
Hi Mike!
Just a small addition: Lenovo is a bit tricky with their BIOS information, so the Model field only shows the alphanumeric model number (something like 20F9003SUK). To see the full product name you need to gather either the SystemFamily value from ComputerSystem or the Version value from ComputerSystemProduct (which for the model number I mentioned before is ThinkPad T460s)
The queries for this would be the following:
SELECT SystemFamily FROM Win32_ComputerSystem
SELECT Version FROM Win32_ComputerSystemProduct
By the way, thanks for this useful post. 🙂
Regards from Spain,
— Wayfarer
Yep – I probably should have mentioned that for Lenovo. I wrote a blog on this back in my 1e days: https://www.1e.com/news-insights/blogs/getting-ready-for-windows-10-using-configuration-manager-inventory/
Very Useful! Thank you Mike.
Hi Mike, the vbs scripts are not working reliably, as it seems that the subkey “state” is deprecated or mostly absent. I can’t find it on a win10 1909 (and later ). Verified on three PCs booted in UEFI Mode (but non secure mode).
Regards from Germany Frederic
Hi Frederic, sorry to hear that you are having an issue with this. I have validated that these keys exist and are working correctly on newer builds in our work environment along with my colleagues labs. If you figure out what is happening in your environment, please let me know.
Thanks,
Mike