
[Update 4/5/2017] This post was based on the MBR2GPT that was released with the Windows Insider build 15007. There are a few things that have changed since then – the /silent switch has been replaced with the /convert switch. Also, it is highly recommended to run MBR2GPT from WinPE 1703 (this is required for earlier versions of Windows 10 – 1507, 1511, 1610). Look out for a new post on using this tool with Configuration Manager (including how to use it with BitLocker systems).
In my previous post, Getting Started with MBR2GPT, I showed a first look at the MBR to GPT conversion utility that is going to be released with the upcoming Windows 10 Creators Update. In this post, I am going to show how it can be integrated with a Configuration Manager OSD Task Sequence. In this test, I reset my test machine back to Legacy BIOS and disabled Secure Boot. Next, I installed build 15002 of the Windows 10 Enterprise Insider Preview, joined it to my test domain and installed the Configuration Manager 1610 client.
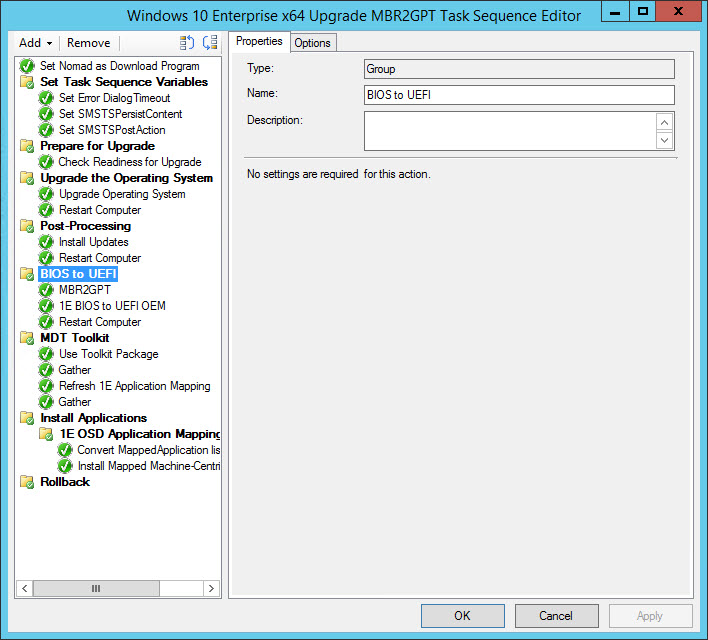
Starting off simple, the goal was to see if I could run MBR2GPT in a simple Task Sequence and automate what I did manually in the previous post. The first thing I did was add MBR2GPT.EXE to my 1E BIOS to UEFI OEM Toolkit Package – since I need to change the BIOS settings, it made sense to just add it to this package. The next step was to create a custom, simple Task Sequence – one that I can later just copy into a Windows 10 In-place Upgrade Task Sequence. The end result looks like this:

For the Options on this Group, I put the following Conditions:

I only want to run this on a Dell, HP or Lenovo that is currently running Legacy BIOS (no need to run it if the system is already UEFI).
The next step is to run MBR2GPT. This is the same command that I ran manually, but I added the /silent switch so that it would run without prompting for input:

Next, I run my 1E BIOS to UEFI OEM step (available to 1E Nomad customers) to configure the necessary BIOS settings. In this case I want to enable Secure Boot as well. The nice thing about this step is that conditions can be added so there can be multiple configuration – for example, one with Secure Boot and maybe one without Secure Boot (for systems that might have conflicts with Secure Boot because of bad video card drivers).

The last thing to do is reboot after running both of these steps in order for the configurations to take effect.

Running this Task Sequence on my test system yielded the following in the smsts.log where we can see that MBR2GPT ran successfully:

Adding this into an in-place upgrade Task Sequence might look something like this:
Keep in mind that this is only part of the Windows Insider release right now and should not be used in production, but initial tests seem to show promising results. Also, there are still some blockers for being able to use in-place upgrade like I mentioned in the previous post. Have a plan on how you plan on handling applications that need to be uninstalled, upgraded and replaced. In other words, just because you can do in-place upgrade, do you still want that old version of Office on your shiny new Windows 10 OS? In addition, Windows 10 content is going to have a massive impact to your network. Not just the Feature Updates, but the Quality Updates (i.e. security patches) are likely to have the biggest impact (especially if you have to patch multiple versions of Windows 10). Look into using a peer to peer solution (like 1E Nomad) sooner rather than later. Lastly, chances are, you are going to have to support multiple deployment methods in your environment – make sure the tools (and vendor) you choose is capable of handling all of them seamlessly (don’t settle for cheap knock offs – you get what you pay for and can open up your network to unwanted security vulnerabilities). Baremetal for new computers and break/fix, hardware refresh/replacement, wipe-and-load, and in-place upgrade.
Originally posted on https://miketerrill.net/

Pingback: Getting Started with MBR2GPT | Mike's Tech Blog
How well does MBR2GPT work if the drive is encrypted with bitlocker? Can we just disable bitlocker or would we need to fully decrypt the system before converting?
This is on my list to test…will let you know.
Using the switches that I published in the blog did not work – it returns an error: Cannot find room for the EFI system partition. There is a map switch that might come into play later. I would imagine that they are looking at the BitLocker scenario…
So maybe it wasn’t BitLocker that caused the failure. I was testing it on 1607 and it doesn’t seem to work with or without BitLocker. Time to install build 15002 and test BitLocker.
Update: I was able to get it partially working with BitLocker on 15002. I say partially because I needed to do some things with reagentc in order to re-enable BitLocker so this looks really promising. 🙂
Pingback: Using MBR2GPT with Configuration Manager OSD | Skatterbrainz Blog
Ok did you suspend Bitlocker like this to get MBR2GPT working?
http://jackychuasce.blogspot.de/2015/12/how-to-inplace-upgrade-windows-10-for.html
You can use the PowerShell BitLocker cmdlets, but I just used the built-in Task Sequence steps for BitLocker.
Oh now I realized that “REAgentC” is a CMD Utility…;-)
Can you explain which commands you used and the order together with MBR2GPT?
I did a few things, but still need to do some more testing. I am also waiting to see if they address it in a future Windows Insider Build before spending too much time on it.
What did you do to get it working? It fails everytime for me when running the conversion within WIndows 10 1703 and the AllowFullOS switch. I get the error “Cannot find room for the EFI system partition” yet the disk has bitlocker suspended and only the BDEDrive, C: and Recovery partitions on the disk – in that order on the disk.
Try running it in WinPE 1703 – that’s the recommended way and the only way I run it now.
Hi Mike,
I got confirmation from MS that this tool works on 1511 and 1607 only when run in WinPE. You have to download the creators update ADK (10.1.150121.1000) and install this ADK on your primary SCCM server. Then you can add the boot image from this ADK (I wasn’t able to add the boot image from this ADK when I still had the 1511 or 1607 ADK installed) into SCCM. You can then do a restart in winpe at the very end of your upgrade sequence and run the MBR2GT commands:
MBR2GPT.Exe /silent /logs:%_SMSTSLogPath%
I’m doing this at the moment with a run command line step. If you don’t specify this: /logs:%_SMSTSLogPath% then the logs will get stored by default in %WINDIR%, but since it’s in WINPE that means it will go to X:\Windows\System32 and get deleted on reboot.
Then I’m running the Dell BIOS CCTK commands to flip to UEFI (while still in winpe) and then reboot and voila!
I hadn’t heard that yet, so thanks for the info and I will confirm with my sources.
In the Official Docs i can read:
“You can use MBR2GPT to convert an MBR disk with BitLocker-encrypted volumes as long as protection has been suspended. To resume BitLocker after conversion, you will need to delete the existing protectors and recreate them.”
https://technet.microsoft.com/en-us/itpro/windows/deploy/mbr-to-gpt
But there is no exampe to that…Can you give me a hint how to do this?
Thanks.
After the OS Upgrade, when you’re restarting the machine prior to running MBR2GPT are you just restarting into WinPE?
Yes – I have plans for an upcoming blog on how to do this. The MSFT recommendation is to run MBR2GPT from WinPE 1703. Typically you don’t assign a Boot Image to In-Place Upgrade Task Sequence (as the in-place upgrade process doesn’t use WinPE), but in this case we need to reboot into WinPE for MBR2GPT. Stay tuned…
Yeah mine keeps failing when trying to run from WinPE after the upgrade…. arg….
My windows home version 1607 does not have MBR2GPT located on it and I’m actually having a difficult time finding a download from a reliable source. Should I not be running it on this version?
Hi Adam, MBR2GPT is available starting with Windows 10 Creators Update (1703). You can convert earlier supported versions of Windows 10 by booting into WinPE from the ADK 1703 and running it from there (it is recommended to run it from WinPE even for Windows 10 Creators Update to prevent any conflicts with software or filter drivers that may interfere with disk operations). After running MBR2GPT, you will have to flip the system’s firmware settings so that it can boot UEFI.
Thanks, Mike
Sorry Mike, I just re-read and figured out that I was behind on the builds. I misread a part about converting a 1607 from a 1703. I’ll probably just update and run it locally. Thanks for the crazy fast response.
No problem, your comment was pretty timely as I am working on a blog post to address MBR2GPT with Recovery partitions and also BitLocker. Just make sure your MBR disk only has 3 partitions, otherwise MBR2GPT will not run. Depending on if you upgraded from an earlier version of Windows, you might now have two Recovery partitions (the new one and the old one). Windows 10 Setup should try to use the existing one, but in my testing, it always creates a new one unless the partition has enough free space.
I have ‘System Reserve’ “C:” and “Healthy Recovery”
Sounds like you are good to go!
Pingback: MMS 2017 Retrospective – Part 2 – DEPLOY ALL THE THINGS.
Not sure if it’s just me… but I noticed that after running the Mbr2Gpt it unhides my reserved partition. So I made PS this script post update to hide the partition again:
$reservedDrive = Get-Volume -FileSystemLabel “System Reserved” | Select-Object DriveLetter -ExpandProperty DriveLetter
Set-Partition -DriveLetter $reservedDrive -IsHidden $true
Pingback: Windows 10 BIOS to UEFI In-place Upgrade Task Sequence using MBR2GPT | Mike's Tech Blog
Hello there,
Thank you for the detailed guide.
I tried the easy/quick way of running MBR2GPT. From within Win10 with the /allowfullos parameter.
It seems that not everything went smoothly. Quoting results of the conversion process:
MBR2GPT will now attempt to convert the default book disk.
If conversion is successful the disk can only be booted in GPT mode.
These changes cannot be undone!
MBR2GPT: Attempting to convert disk 0
MBR2GPT: Retrieving layout of disk
MBR2GPT: Validating layout, disk sector size is: 512 bytes
MBR2GPT: Trying to shrink the OS partition
MBR2GPT: Creating the EFI system partition
MBR2GPT: Installing the new boot files
MBR2GPT: Performing the layout conversion
MBR2GPT: Migrating default boot entry
Cannot add new OS boot entry. Please try adding it manually. Error: 0x00000020
MBR2GPT: Conversion completed. Boot entry needs to be added manually
MBR2GPT: Before the new system can boot properly you need to switch the firmware to boot to UEFI mode!
The partitions are created. I can see them in Disk Management. I don’t want to reboot my computer because if I understood correctly from the error message, my OS will never boot again unless I manually add the boot entry necessary which is something that i tried to do but:
“C:\WINDOWS\system32>bcdedit
The boot configuration data store could not be opened.
The requested system device cannot be found.”
.
Another alarming thing is that under “System Configuration” (msconfig) and in the tab “Boot” I don’t see any entry over there…
I assigned a drive letter to system partition (500MB) and checked it for errors. Nothing
I believe that a bootrec /fixboot is inevitable but I would rather not.
Any ideas before I reboot and, probably, lose the ability to boot into my OS?
Blast Hardwired by Metallica, bang your head, cross your fingers and then reboot. Seriously, you probably should have run the validate switch first to make sure everything would work correctly. And secondly, it should have been run from WinPE. Bootrec might not be able to fix it now that it is in flux. If it doesn’t boot and you aren’t comfortable editing the bcd, then I guess you could always boot up with a Windows USB/ISO and see if it can repair it for you.
Good luck!
-Mike