![]()
When starting any operating system deployment project, it is a good idea to know what systems are in your environment so that you can determine which of these systems need to support the new OS. Some systems may need to be replaced, where as others might only need a BIOS UEFI update. It is also a good idea to standardize on the BIOS UEFI settings for each supported model in the environment. This ensures that consistent settings are used so that certain systems management features function correctly (for example, like wake-on-lan).
Now that Windows 10 is here, now is the time to standardize on native UEFI as the default boot mode. When making this switch, it is also important to enable Secure Boot at the same time. But, before you can do that, you need to determine not only what is in your environment, but how each system is configured.
You can inventory these hardware specific settings with System Center Configuration Manager. For the HP systems this is pretty simple and on newer models – this information is already stored in WMI and does not require anything to be installed on the clients for it to be enabled. The information is all stored in the HP Namespace: root/hp/instrumentedBIOS. In order to get this information into ConfigMgr, we need to add the classes to the Default Client Settings Hardware Inventory.
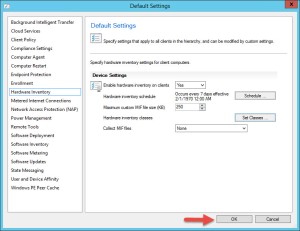
- Open the Default Client Settings, select Hardware Inventory and click the Set Classes button.

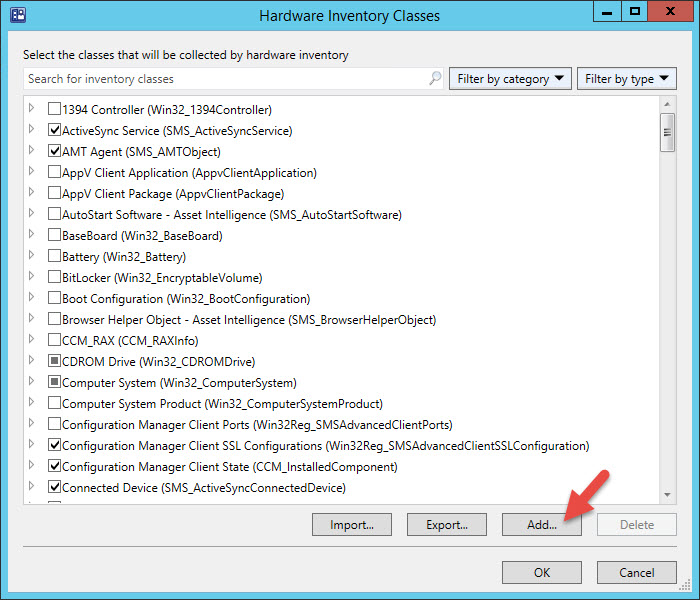
- On the Hardware Inventory Classes window, click the Add button.

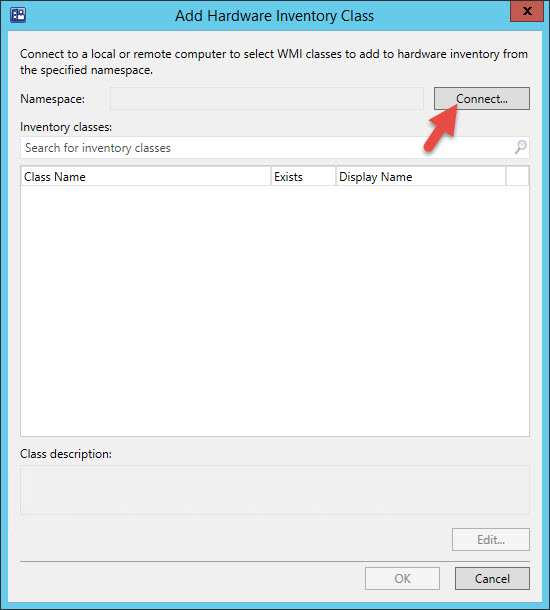
- On the Add Hardware Inventory Class window, click the Connect button.

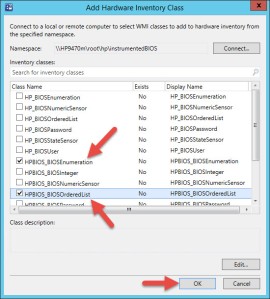
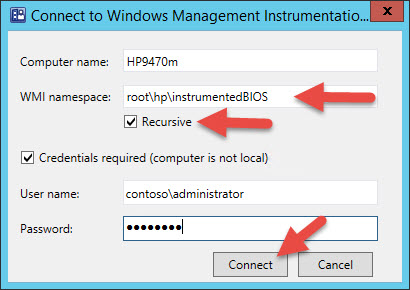
- If the system that is running the ConfigMgr Console is a HP, leave the pre-populated computer name. Otherwise type the computer name of a HP system that is current on the network. For the WMI namespace field, enter: root\hp\instrumentedBIOS and check the Recursive box. Enter credentials if connecting to a remote system and click the Connect button.

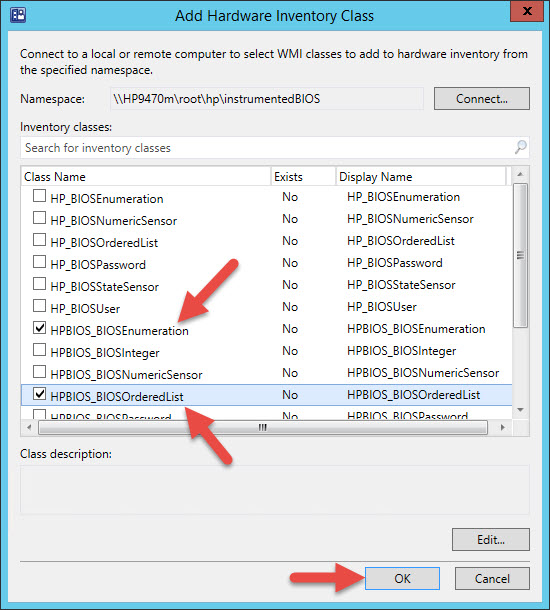
- On the Add Hardware Inventory Class window, select the following two classes: HPBIOS_BIOSEnumeration and HPBIOS_BIOSOrderedList and click OK. This enables us to inventory BIOS UEFI settings (current and possible) and also the device boot order for Legacy Boot and UEFI Boot.
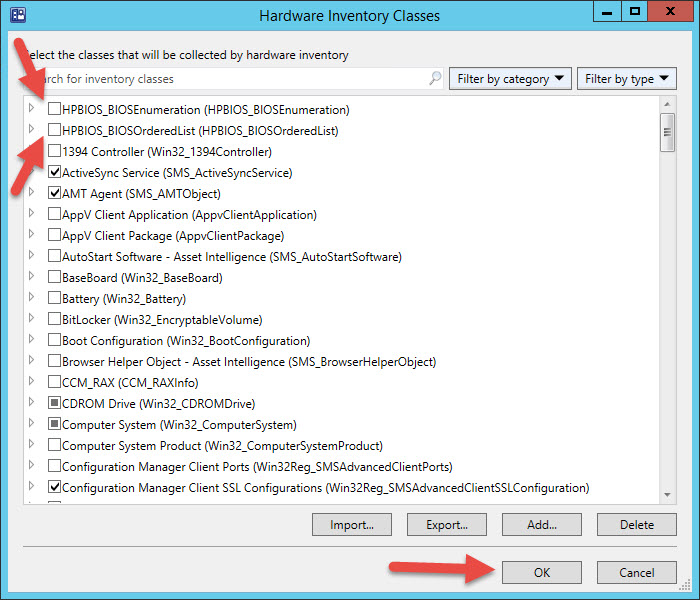
- Back on the Hardware Inventory Classes window, I recommend un-selecting the class for the Default Client Settings (in fact I recommend trimming the Default Client Hardware Inventory Classes down to just a few and target only the necessary classes via Custom Client Setting). We will add them to a Custom Client Settings designed for Workstations. Unselect HPBIOS_BIOSEnumeration and HPBIOS_BIOSOrderedList and click OK.

- On the Default Settings window, click OK.
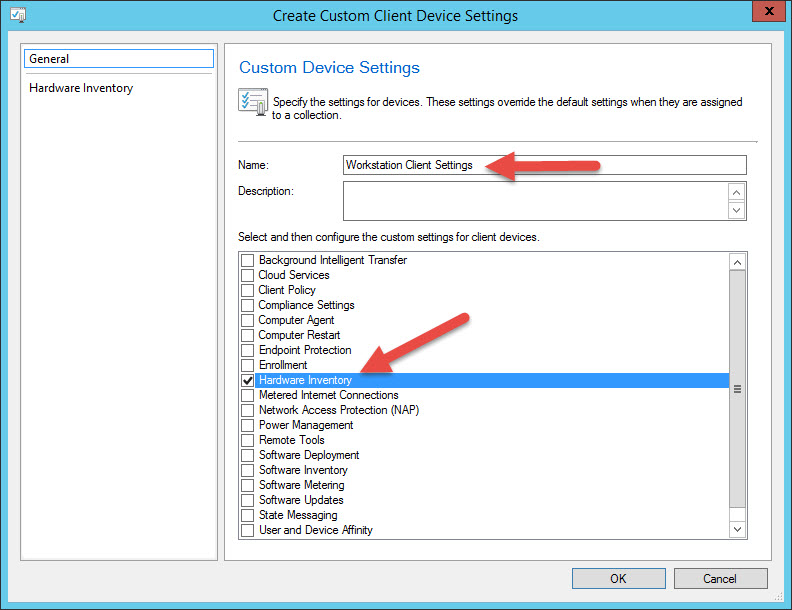
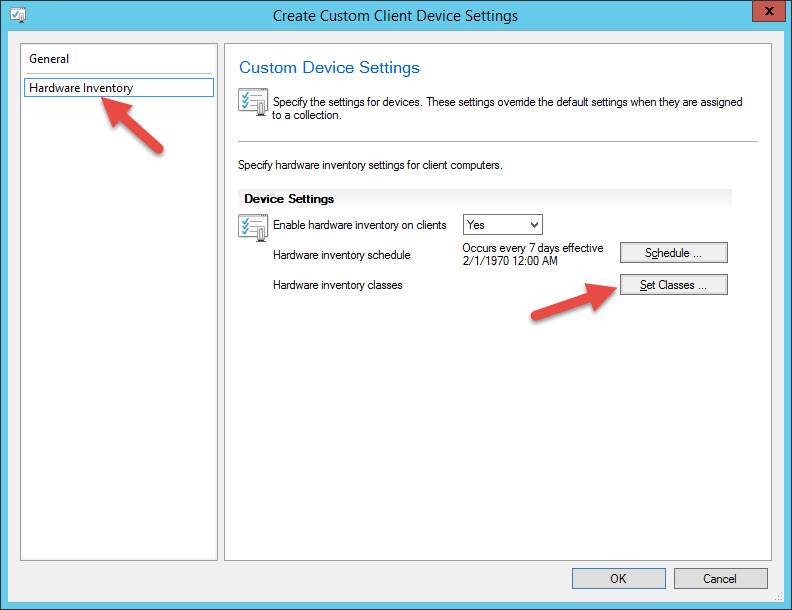
- Next, create a Custom Client Device Settings, give it the name Workstation Client Settings, select Hardware Inventory.

- Click on Hardware Inventory in the left pane and click Set Classes.

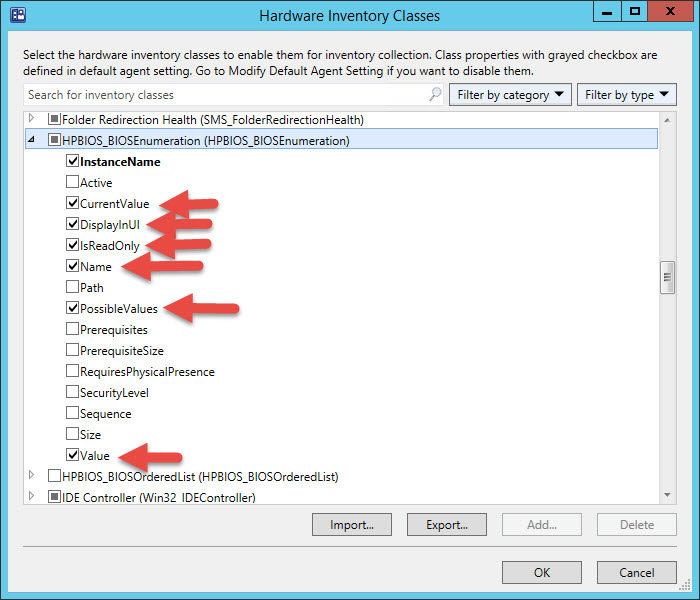
- Expand HPBIOS_BIOSEnumeration and select the following fields: CurrentValue, DisplayInUI, IsReadOnly, Name, PossibleValues, Value (InstanceName gets selected by default). These are the fields that have useful information that we can use for reporting.

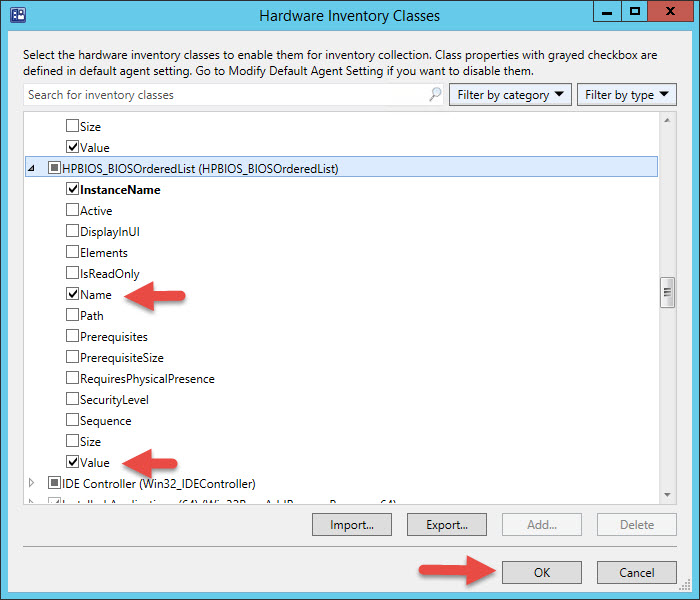
- Next, expand HPBIOS_BIOSOrderedList and select the following fields: Name, Value (InstanceName gets selected by default) and click OK.

- On the Create Custom Client Device Settings window, adjust the desired Hardware inventory schedule and click OK.

- Deploy the newly created Workstation Client Settings out to a collection that contains HP workstation systems. I have one called All Workstation Clients.

- On a targeted HP system, kick off a Machine Policy Retrieval & Evaluation Cycle and then a Hardware Inventory Cycle. In the InventoryAgent.log on the client, you should find two entries being inventoried for the newly defined namespace.


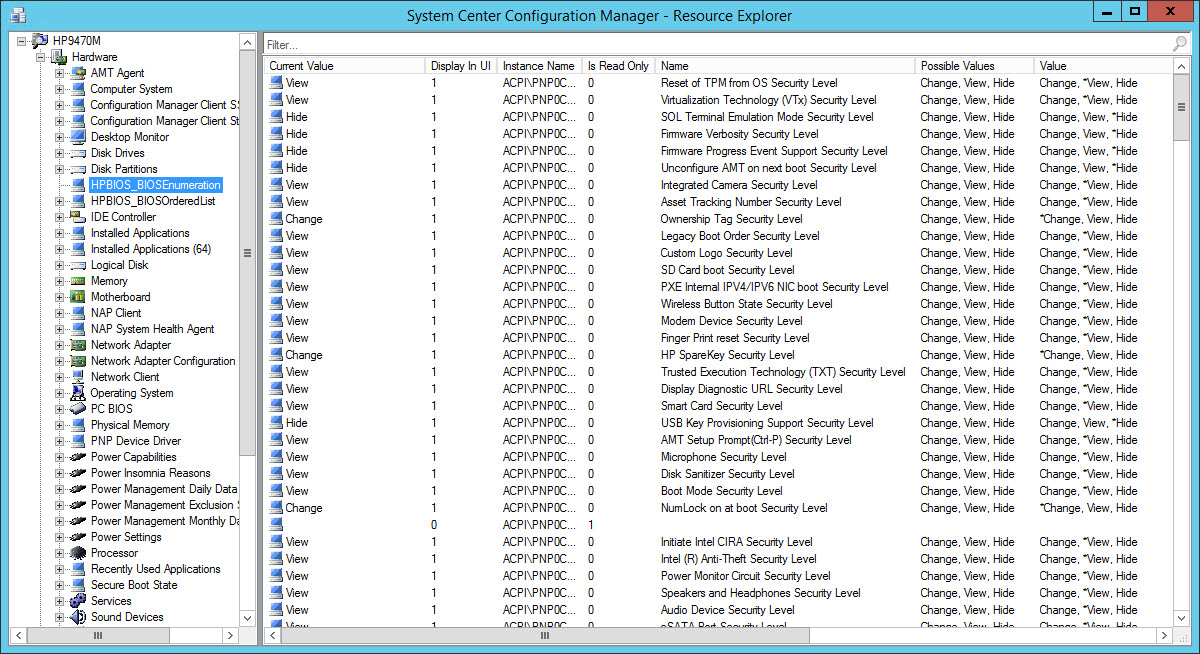
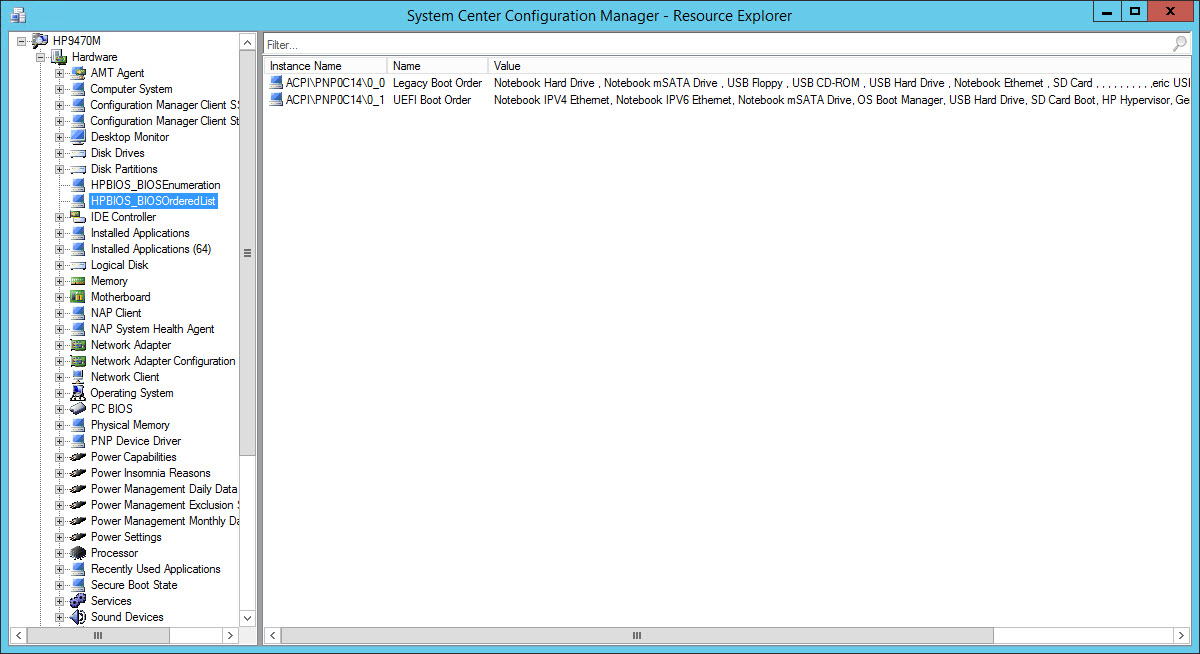
- Back in the ConfigMgr Console, use the Resource Explorer and open up the Hardware inventory for the system that was used in the previous step. Here you will see that the two new classes and corresponding values have been added.


- This information can now be used to show which systems are UEFI capable for your Windows 10 project.


Hopefully you found this post useful and in an upcoming post I will show you how to modify HP BIOS UEFI settings using System Center Configuration Manager.
Originally posted on https://miketerrill.net/

Hi Mike, thanks for your article here but I got a little confused while reading it because we inventory HP BIOS settings for years now but we always used HP wmi provider (CMI). Reading your article you suggest that you don’t need to install any software to read out the wmi information. I found this a bit strange, I can imagine that information can be made available if the BIOS meets some criteria but how can they make wmi methods available to change BIOS settings. I don’t see this possible without a provider. Or am I missing something here? Maybe this only works when the BIOS is in UEFI mode? Thanks in advance, Kris
Hi Kris, this is available (at least) on newer HP models (within the last 4 years). I am not sure exactly how they do it, but the namespace, classes and properties are available under newer Windows operating systems (including WinPE). It is possible that they have a provider in the out of the box Microsoft drivers or the firmware is able to load it. I have noticed that it does take a few seconds to be available after booting up. You should be able to using something like wbemtest and connect to the root\HP\InstrumentedBIOS namespace. Enumerate the classes (recursive) and select HPBIOS_BIOSEnumeration. From there you should see all of the Instances in that classes and this will contain all of the BIOS settings. The system that I do most of my HP testing on is an EliteBook Folio 9470m, which I think is about 3 or so years old. If you see otherwise on newer models, let me know.
Thanks,
Mike
Mike, I know this is an old post, but I set this up and I’m only getting 1 entry per system in hardware inventory. it’s not the same entry for every system either. the inventory item shows normally in InventoryAgent.log but resource explorer only shows 1 item. If I run gwmi -Namespace “root\hp\instrumentedbios” -Class HP_biosenumeration on the client, I get the full results.
I set this up over a month ago, so systems have gone through several inventory cycles. Just wondering if you’ve ever seen anything like this?
Sorry, I have not seen that. I would make sure that it is being processed correctly on the MP and Primary Site Server.
Hi Eric, I had the same problem at the first attempt. Additional I did not see the InstanceName at the first try. I then removed the entries and re-enter it and then the InstanceName was available and the Inventory showed up with many entries. Must be something with the Add function in the HW Inventory part in SCCM.
Pingback: OSD Task Sequence boots from network after first restart instead of booting to hard drive - System Management Recipes
Pingback: Windows KB5012170 failing to install (0x800F0922) | Mike's Tech Blog
Pingback: HP Devices – Inventory BIOS Settings in ConfigMgr – GARYTOWN ConfigMgr Blog